
If you use Salesforce every day, you’ve probably wished it worked faster or felt easier to use. Many Salesforce users don’t realize that they can optimize their Salesforce org on their own, without asking an Admin to make changes. Instead, they stick with default settings, even though small adjustments can save them a lot of time and significantly improve their productivity.
Most of the time, this shows up as endless scrolling to find important information buried at the bottom of the page, difficulty logging details during client calls, or manually searching for records. All of this slows down daily work and makes Salesforce feel more complicated than it needs to be.
The good news is that the Salesforce platform offers many built-in features that allow users to customize their environment, streamline workflows, and work more efficiently within their existing business processes.
That’s why, in this guide, I’ll show you how to approach Salesforce optimization from a user perspective. You’ll learn practical ways to improve Salesforce performance, reduce manual processes, and make Salesforce easier and more enjoyable to use, without impacting data quality or system performance.
Below, I’ll walk you through 9 practical tips to help you optimize your Salesforce environment and get more value from one of your most important business tools.
Why Salesforce optimization matters
Daily frustration is usually just the first symptom. When your Salesforce org isn’t optimized, the impact goes beyond slower clicks or extra scrolling. Over time, these small inefficiencies affect data quality, reporting accuracy, and how much teams trust Salesforce as one of their core business tools.
When it’s hard to find or update customer data, records are more likely to be skipped, updated inconsistently, or entered incorrectly. This leads to poor data quality and inaccurate reporting, making it harder to rely on Salesforce for optimal system performance metrics or actionable insights. While the most important optimization work is always handled by an Admin, there are many user-level features you can adjust on your own.
Optimizing your Salesforce org in this way helps align the system with real business processes. When the Salesforce platform is easier to use, keeping accurate and reliable data becomes part of the natural workflow. This improves operational efficiency, supports better decision-making, and ultimately leads to higher customer satisfaction and long-term business growth.
Now, let’s jump into the tips.
1. Quicker search (Einstein search)
Salesforce optimization often starts with the most-used feature: the global search bar.
Do you type in a record name, hit Enter, and then scroll endlessly to find what you’re looking for? There’s a much faster way, and it can significantly improve your day-to-day Salesforce performance.
Einstein Search is a powerful tool built into the Salesforce platform that helps you find records faster and save a lot of time. It also allows you to complete actions directly from the search results without opening each record.
Let me show you how it works.
Start typing a record name into the search bar, but don’t press Enter. You’ll notice that the results update in real time as you type. When you hover over the record you’re looking for, a Related List Quick Links panel appears on the right-hand side.

Hover over the objects in this panel to instantly preview results. From there, you can edit, delete, or use other available actions without opening the record. You can also click into the record, view all results, or quickly review key information – all from one place in the user interface.
Pretty cool, right?

Einstein Search also supports Natural Language Search, which means you can type everyday phrases directly into the search bar, for example: “opportunities closed today” or “open cases last month”. If you don’t see results right away, try clicking on the object related to your search first (in this case: Cases) to help Salesforce refine and personalize your search results.

But what if the record you’re looking for doesn’t appear in the first five results? Simply press Enter. You’ll see a breakdown on the left-hand side showing how many matching records exist across different objects in your Salesforce org. To narrow things down even further, click on one of the objects and use the available filters to find the exact record faster.

2. Favorites and Global actions
Favorites work like bookmarks in your browser. You can add Lists, Dashboards, Reports, and other records to your Favorites so you can quickly access the items you use most often within your Salesforce org.
Instead of manually typing record names into the search bar, wasting time trying to find them, or remembering where something is, Favorites help you save time and reduce manual processes. They’re especially useful when you need fast access to key records or customer data and want to streamline your daily work.
Depending on how you prefer to work, you can also add items from Favorites directly to the Navigation Bar (more on that in the next section).
To add a record to Favorites, simply click the star icon at the top of the page when the record is open. Once added, you’ll be able to access it quickly whenever you need it.
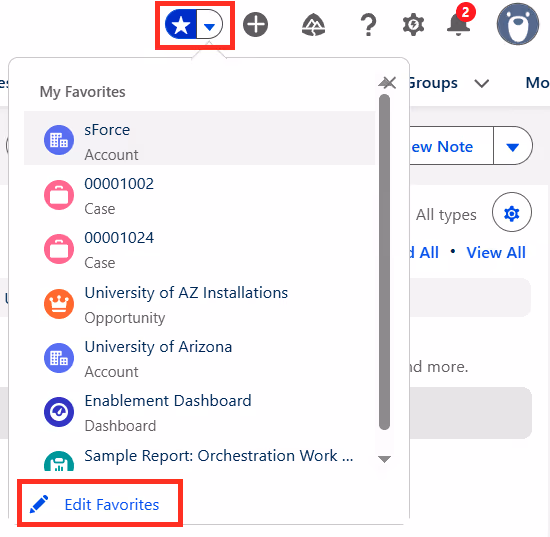
You can also edit your Favorites:
- remove items from the list
- edit their names (changes are visible only in your Favorites and do not affect the original Object’s name)
- reorder them to match your priorities

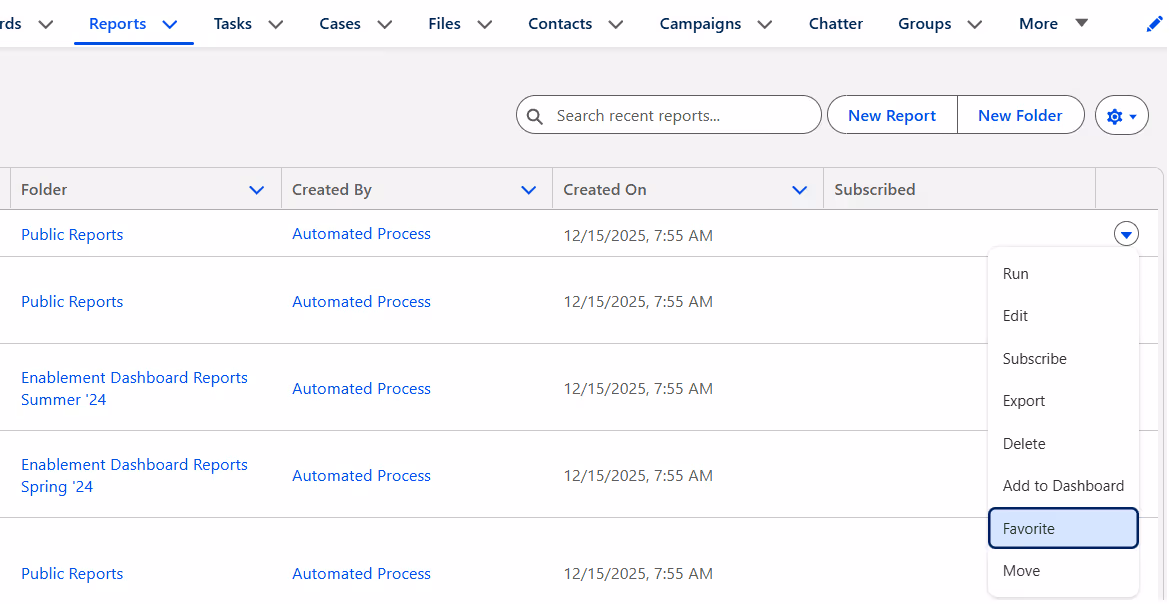
If you want to add multiple reports to Favorites without opening them one by one, you can do this directly from a report list. Just click Reports in the Navigation bar, find the relevant list, and use the arrow on the right-hand side next to a report:
Additionally, Global Actions (the + icon next to Favorites) allow you to create new records in just a few clicks. When you are on a client call and quickly need to insert data into the system and want to save time, this is a great feature to use.

3. Optimize the Navigation Bar
The Navigation Bar helps you access the most important items you use in your daily work, so they’re always at hand. Its key benefit for you as a user is that it allows you to customize it and adjust items to match your work style, improving your overall efficiency and satisfaction.
While the items visible in the Navigation Bar are initially added by an Admin, you can also add your own items, reorder them, or rename them. Keep in mind that you can’t remove or rename objects added by an Admin, but you still have plenty of flexibility to optimize your own setup.
So if the objects you use most often are scattered across the Navigation Bar and slowing you down, this kind of Salesforce optimization helps you move through your daily work more efficiently.
Let’s take a look at how.
There are two ways to reorganize your Navigation Bar:
Option 1: Click and drag an object directly in the Navigation Bar to change its position.

Option 2 (more advanced): Click the pencil icon on the right-hand side of the Navigation Bar (marked in red below).

From there, you can reorder objects to better support how you work on the Salesforce platform.
In this view, you can also:
- remove objects you’ve added (objects added by an Admin can’t be removed)
- rename objects by clicking the pencil icon (this change is visible only to you and does not affect the original Object’s name)
If you want to add items that aren’t currently on the Navigation Bar, click Add More Items in the top-right corner.

You can add them from Favorites or All items.

And voilà! Your Navigation Bar is now set up to make Salesforce easier to use, and better aligned with your daily workflows.
4. Chose display density with Comfy and Compact view
Have you ever checked your personal settings in Salesforce? They include a few simple but powerful options that can help improve Salesforce performance and make the user interface easier to work with.
One of them is the Comfy and Compact view, which lets you control the display density and decide how much information is shown on the page. If you’d like to see more information at once, switch to Compact view – it reduces scrolling and helps you stay focused on key information.
The Salesforce platform allows you to choose between Comfy and Compact views, depending on how you prefer your information displayed, making this a quick and effective way of customizing Salesforce to match your work style.
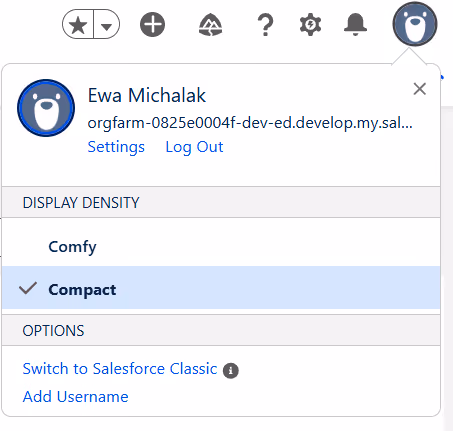
To switch between views, click your profile picture.
5. List views for better data management
List Views are a powerful tool that help you manage different sets of data within an object. Salesforce comes with a few default List Views, but the great news is that you can also create your own to better support your daily data management needs.
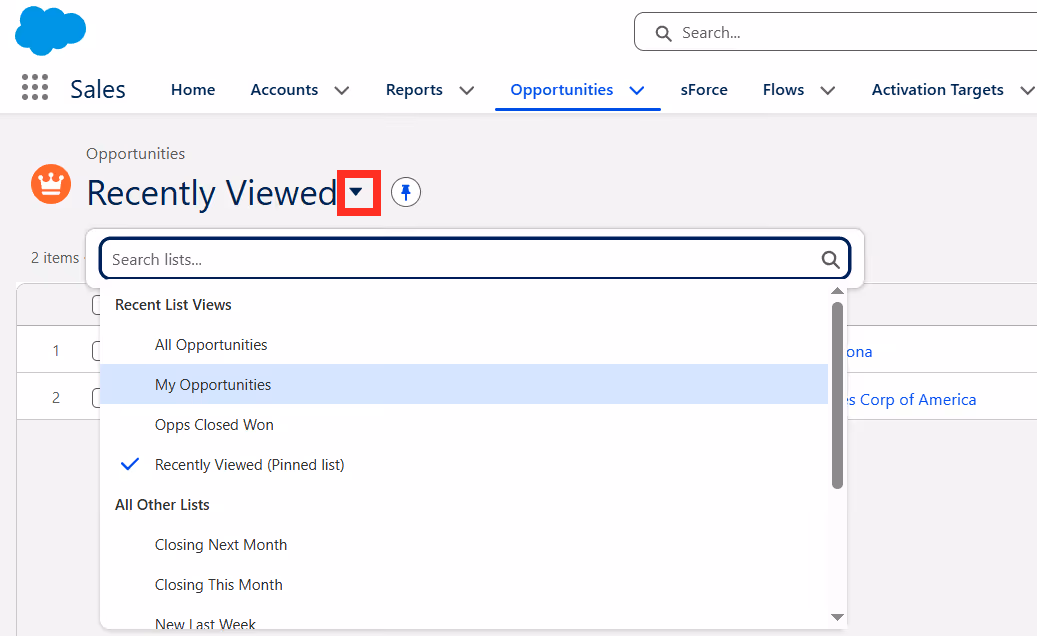
When you click on an object in the Navigation Bar, the Recently Viewed list is pinned by default. However, this view doesn’t always show the customer data or records you’re looking for.
To switch lists, click the arrow next to Recently Viewed and select the list you want from the dropdown.
If you want that list to appear automatically whenever you open the object, simply pin it by clicking the pin icon next to the arrow.

If you still don’t see the data you need, you can create your own List View. To do this, open List View Controls and select New. During setup, you’ll be able to name the list and choose its sharing settings (which you can always change later). Once the list is created, you can also choose which fields should be displayed so it fits your needs.

In some cases, Admins may restrict editing options for certain lists due to data quality issues. When that happens, you can clone an existing list and apply your own filters. This allows you to work with the data you need while respecting system limitations within your Salesforce.

Salesforce also offers a Kanban and a Split view options. Kanban view allows you to visualize records across different stages, making it easier to manage and move them through your workflow.
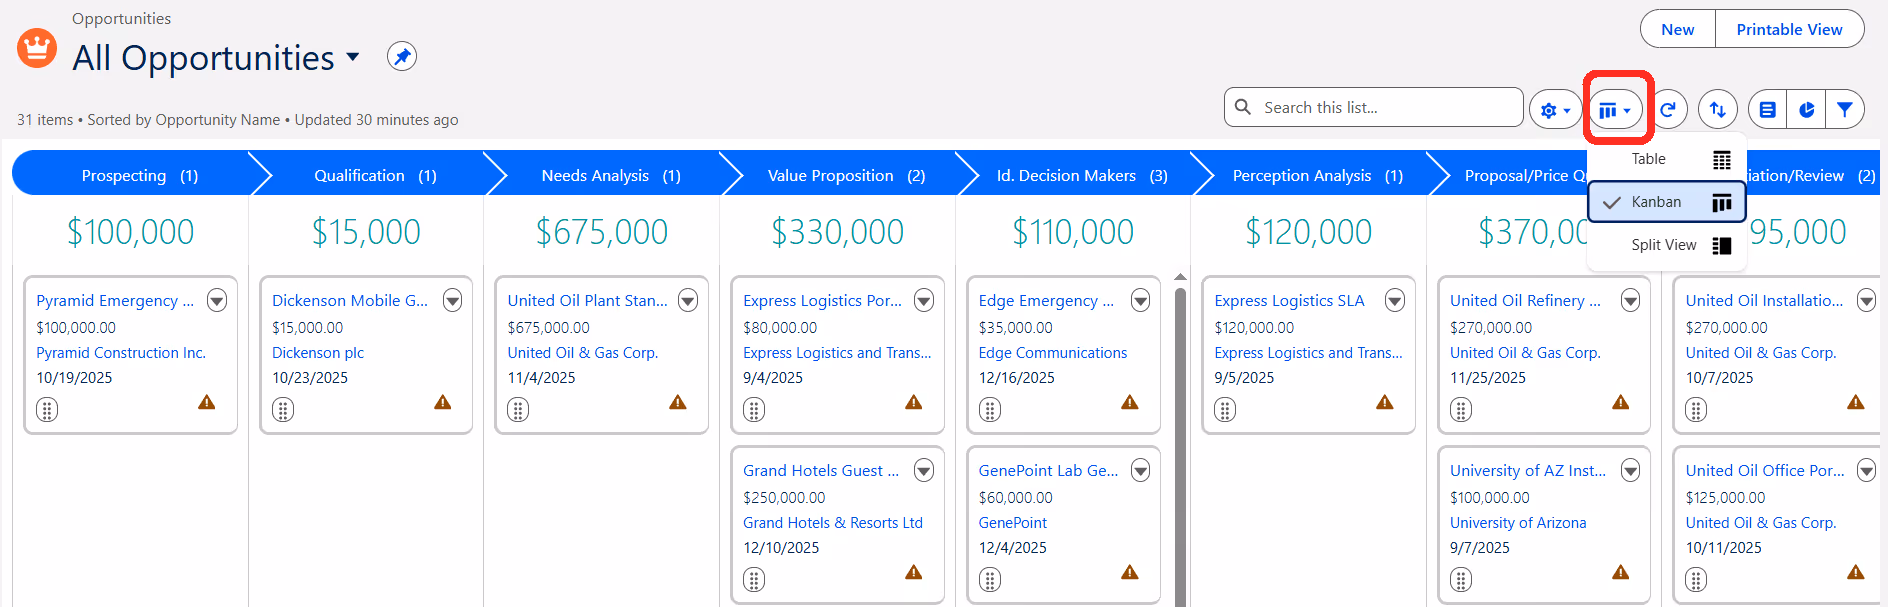
Split View, on the other hand, displays a list of records on the left and record details on the right, so you can review and update information without constantly switching views. This is a simple way to improve efficiency when working on the Salesforce platform.

6. Customize My Pages
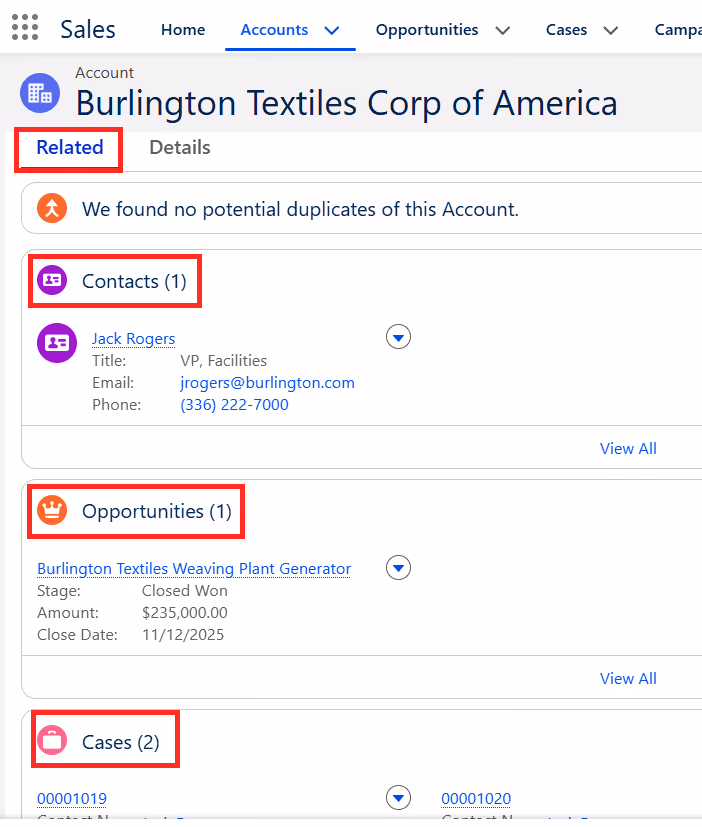
Another option available in Personal Settings allows you to optimize which Related Lists are displayed on an object record page. This means you can choose what information appears when you open a record, helping improve efficiency and making the Salesforce user interface easier to work with.
For example, if you open an Account record page and find yourself scrolling every time to reach the most important information, you can easily change that (and the changes won’t affect anyone else in your Salesforce org). By reordering items in the Related Lists, you can bring key information to the top and access it much faster. You can also remove Related Lists you don’t need from the view.
To access these settings, click your profile icon in the top-right corner:
Settings → Display & Layout → Customize My Pages → select a page you want to customize → Customize Page
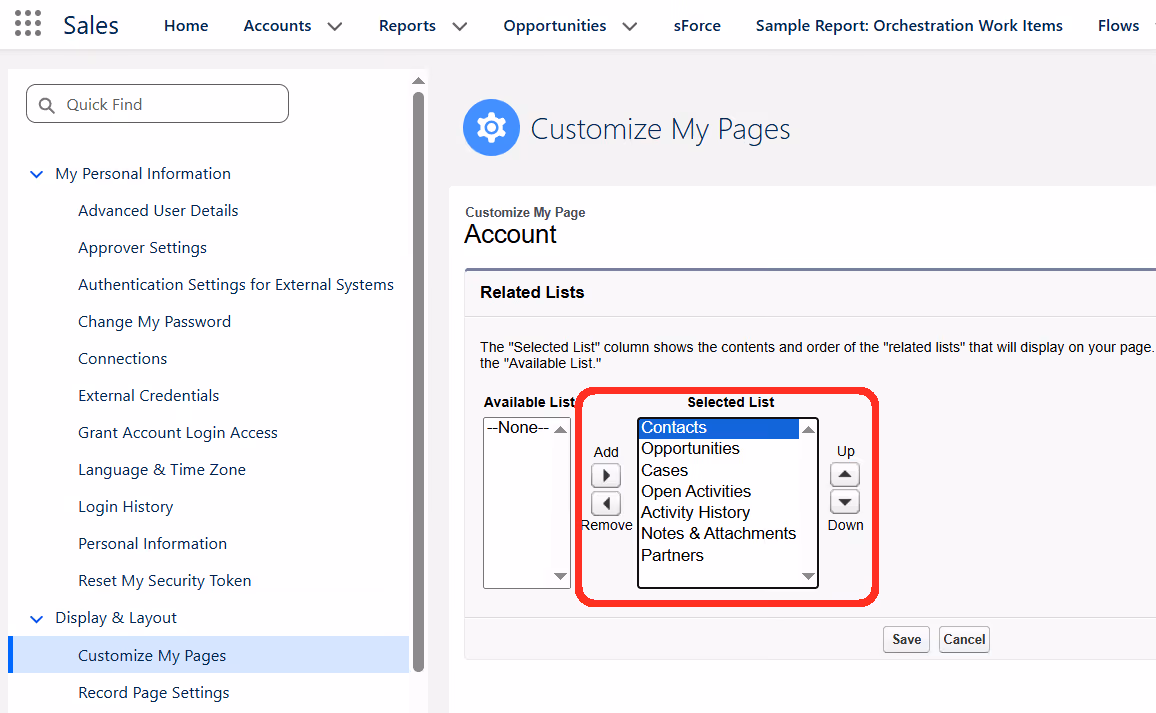
This will reorder the Related Lists on the selected object record page, as shown below:
7. Inline editing
Inline editing is a real game changer when it comes to Salesforce optimization and efficient data management. It allows you to update records directly while reviewing them, without the need to open each record separately. Inline editing is available in both Salesforce Reports and List Views, but it must first be enabled by an Admin. Once activated, it can significantly increase productivity and help you streamline daily work.
Previously, you had to open each record, update the data, go back to the report, refresh it, and repeat this process for every change. Inline editing eliminates these manual processes. Now, when working in a report, you can edit data directly within the report itself without opening individual records.

Inline editing also allows you to quickly update multiple records while reviewing them. That means fewer clicks, less context switching, and faster updates to customer data. All of this contributes to an improved user experience.

For any team - whether Sales, Marketing, or Service - inline editing in Salesforce Reports is a practical way to reduce time spent on repetitive, manual updates.
For example, if you work as a Sales Rep, instead of navigating between individual records, you can update key customer data, such as Opportunity details or next steps, directly from the report view. This encourages better data accuracy and keeps information up to date, because users are more likely to make quick corrections when it’s easy to do so.
While not every field is editable, many commonly used field types are supported. Once inline editing is enabled by an Admin, you can make updates with just a click whenever you need them.

8. Salesforce Reports and Dashboards
Salesforce reports and dashboards are powerful tools for visualising data and turning it into meaningful, actionable insights. They also play an important role in improving data accuracy, because they help you spot gaps, inconsistencies, or trends that might otherwise go unnoticed. The great news is that you can create Salesforce reports yourself, without the help of an Admin.
Reports allow you to better understand your business processes and day-to-day sales processes. For example, you can create an Opportunity report to identify bottlenecks (such as deals that are stalling in a specific stage) and use that insight to streamline sales processes more effectively. You can also create reports to track your top five products, main lead sources, or key performance metrics you review regularly.
If you want to gain actionable insights from your own data and reduce reliance on manual processes, creating a report is one of the easiest ways to do it.
To get started, go to the Reports tab in the Navigation Bar, click New Report, select a report type, click Start Report, and you’re ready to begin.
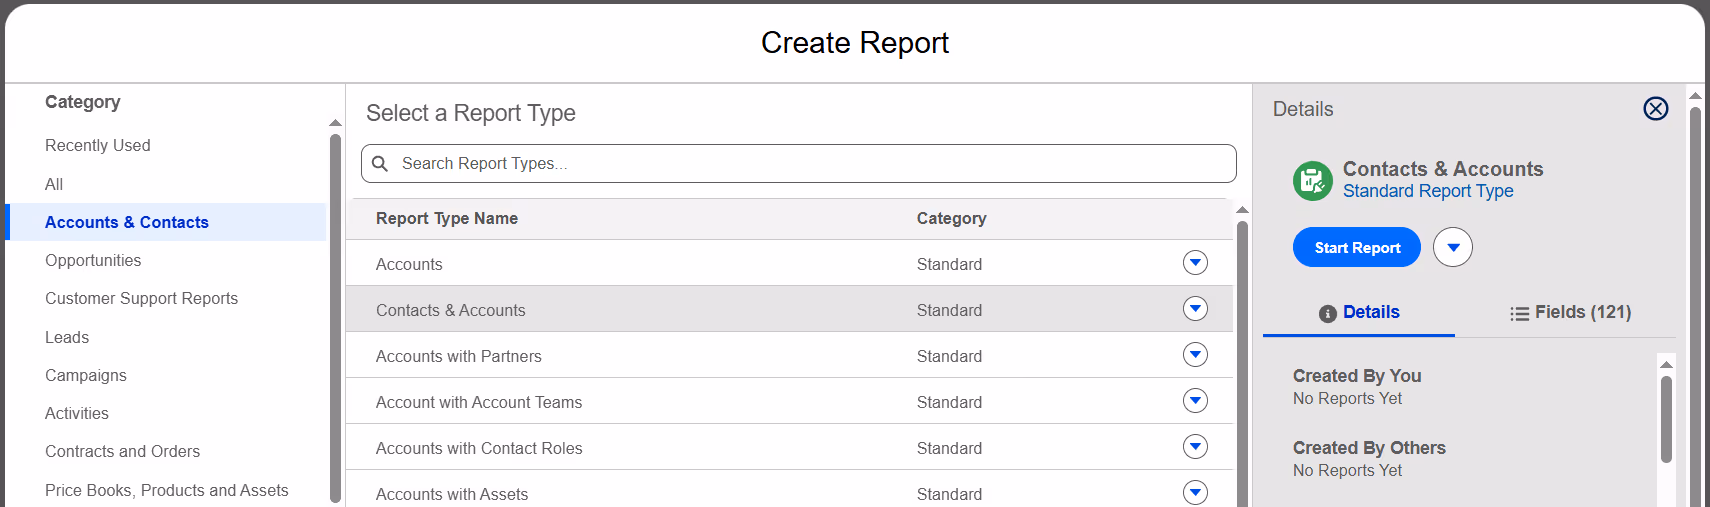
There are four Report formats available on the Salesforce platform:
- Tabular - a simple table of data, similar to an Excel sheet
- Summary - allows you summarize data and group it by rows
- Matrix - lets you summarise data and group it by both rows and columns
- Joined - consists of up to five report blocks, allowing you to display different datasets in one report
Each format supports different use cases, depending on what kind of critical metrics or insights you’re trying to uncover.
While the Salesforce report builder includes many advanced features (enough to warrant a separate article), I’ll focus here on a few core options that help you optimise the experience and work more efficiently.
Salesforce reports offer flexible customization options. You can reorder columns either by dragging and dropping fields from the left-hand panel or by moving columns directly within the report preview. You can also easily add or remove columns as your reporting needs change.
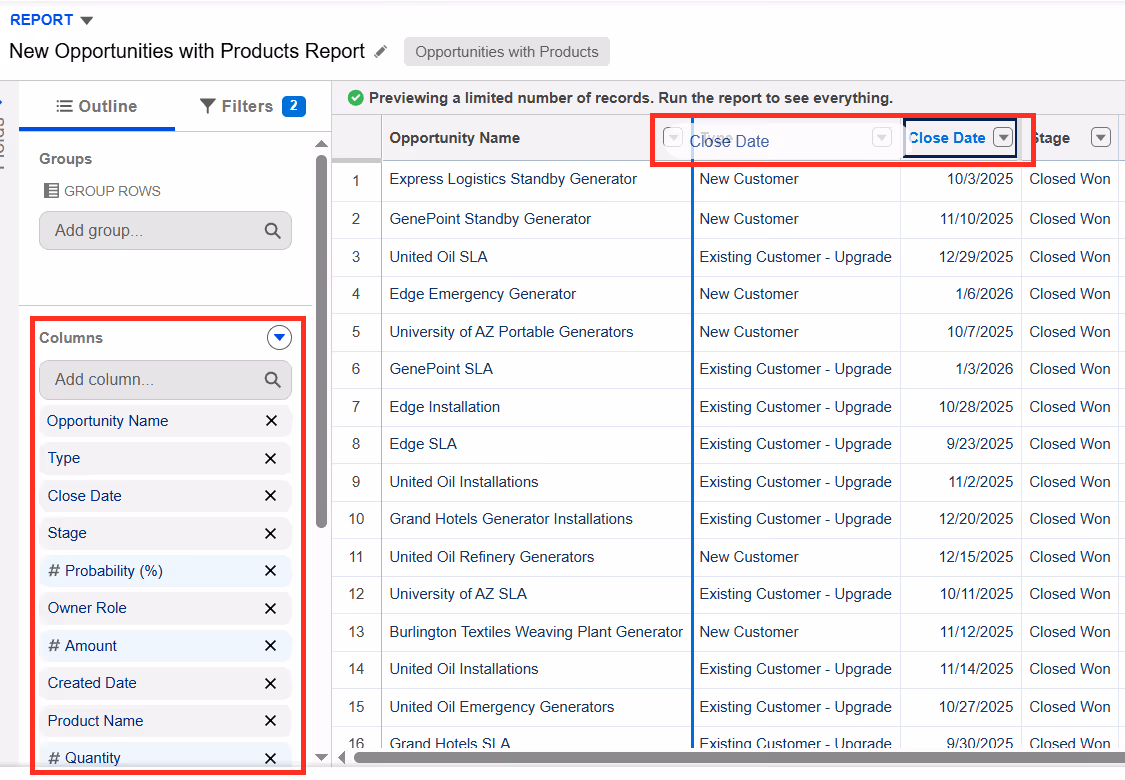
The same applies to grouping data. You can group rows or columns either from the left-hand panel or by using the dropdown menu on a column header. Grouping makes reports easier to read and helps Salesforce reports better support your day-to-day business operations.

Dashboards, on the other hand, help you turn those reports into a clear, visual snapshot of what’s happening right now. Instead of opening multiple reports, you can bring your most important metrics together in one place and see how your business is performing at a glance. For example, you can track sales performance, pipeline health, or key KPIs on a single screen and quickly spot trends or issues that need attention.
Built on Salesforce reports, dashboards transform raw data into charts, tables, and metrics that highlight trends, progress, and potential issues in real time. This means you’re always working with up-to-date information when making decisions. Whether you check them daily or review them in team meetings, Salesforce dashboards help you spot patterns and support data-driven decisions without digging through individual records.

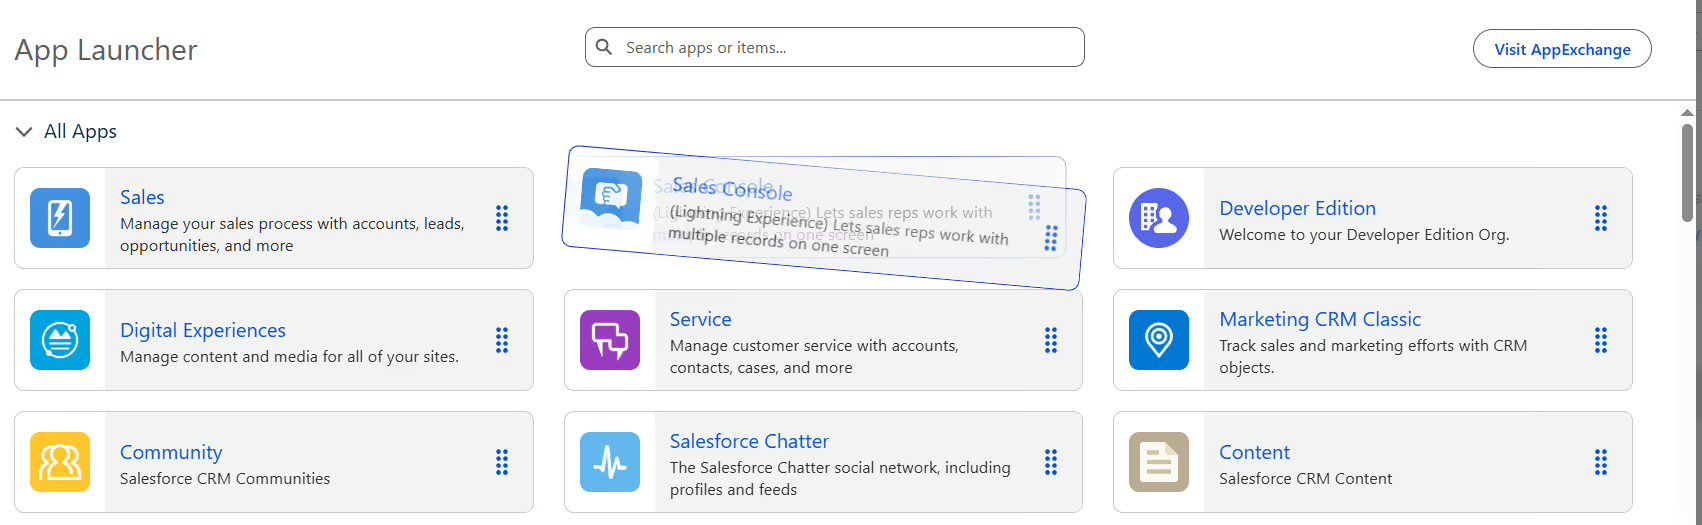
9. App Launcher
Which app are you currently using in Salesforce: Sales, Service, Marketing? Did you know that you may also have access to other apps and items beyond the one you use every day? You can check that right now.
While the Navigation Bar gives you quick access to the most important items, it only shows a small portion of what’s available on the Salesforce platform. Many apps and features aren’t displayed there to keep the Navigation Bar from becoming too long and difficult to navigate. This helps keep the user interface clean, but it also means some useful tools can stay hidden.
To explore everything you have access to, open the App Launcher by clicking the nine-dot icon in the top-left corner and selecting View All. From there, you can see all available apps and items and you might discover some completely new possibilities.

You can also reorder apps in the App Launcher to better suit your needs:
If there are apps or items you plan to use more often, you can add them to the Navigation Bar to reduce clicks and speed up your daily work.

One especially useful feature worth knowing about is My Recycle Bin. If you delete a record by mistake, you can restore it from there without involving an Admin. Records remain in the Recycle Bin for 15 days before being permanently deleted and you can access it directly from the App Launcher.


Conclusion: Customizing Salesforce for Improved Performance
Salesforce can feel overwhelming at times, especially for day-to-day users. It’s a powerful platform, and many people worry they might break something by clicking the wrong field or option, which may also strongly affect user satisfaction. At the same time, they’re often not aware of the many features that can help them streamline processes, and, as a result, significantly improve efficiency using Salesforce.
That’s why I created this article: to help users navigate the Salesforce ecosystem with more confidence. By focusing on practical, user-level Salesforce CRM optimization, you can save time and free up space for more important work tailored to business needs.
Ewa Michalak is a Salesforce professional focused on Salesforce optimization, user adoption, and data quality. She works at the intersection of Salesforce and business, with a strong focus on aligning the platform with real business processes. She enjoys sharing knowledge and translating complex Salesforce features into practical, easy-to-use solutions that drive productivity and operational efficiency.
Ewa has delivered Salesforce trainings and workshops for users at different levels, supporting change adoption and helping teams work more confidently with Salesforce. She is a Salesforce Certified Administrator and continuously expands her expertise within the Salesforce ecosystem.