An Asana Salesforce integration becomes useful when one business process crosses the boundary between the two platforms.
A customer request may begin as a Salesforce Case but require action from a project team working in Asana. A sales process may reach a stage where marketing, onboarding, or delivery work needs to begin. The teams do not necessarily need access to the same tool, but they do need the right information to follow the work.
Without integration, that handoff usually means manual work of creating tasks, copying customer context, updating statuses in two places, and asking other teams for progress. With the right setup, Salesforce and Asana can exchange that information automatically.
The right approach depends on the workflow. Asana's current native Salesforce integration can react to Salesforce triggers and run Asana Rules, which works well when Salesforce starts the process and Asana needs to act on it. Getint supports configurable synchronization between Salesforce and Asana when information also needs to move back from Asana or different fields need different sync directions.
This guide focuses on how to design that second type of workflow properly. We will use a Salesforce Case ↔ Asana Task connection as the main example, then show how to configure, test, and maintain it.
Start With the Workflow, Not the Connector
Before deciding how to integrate Asana and Salesforce, define what actually needs to happen between the teams. Consider a customer request that is registered as a Salesforce Case. The sales or customer-facing team can manage the customer relationship from Salesforce, but resolving the request requires work from another team using Asana.
A useful integration flow might look like this:
Salesforce Case created → Asana Task created → project team works in Asana → selected updates return to Salesforce
The important part is not simply creating the task. The Asana team should receive enough information to start working without opening Salesforce. At the same time, the Salesforce user should not need to monitor an Asana project just to find out whether the request is still open, being worked on, or completed.
That means deciding what the teams actually need from each other.
For example:
- Salesforce may provide the customer request, description, priority, and Case context.
- Asana may become the place where the task is assigned and managed.
- Status may need to stay aligned across both platforms.
- Comments may need to move in both directions.
- Attachments may need to follow the request.
- Some internal fields may need to remain only on one side.
This is where integration design starts. Trying to synchronize everything because the API makes it available usually creates a harder system to manage. A smaller, intentional data flow is often more useful.
Decide What Salesforce and Asana Should Share
Salesforce records and Asana tasks are built for different purposes, so there is rarely a perfect field-for-field match. Instead, establish relationships between the values that matter to the workflow.
For a Salesforce Case and an Asana task, a practical starting point is:
Getint supports two-way mapping for Salesforce fields including Case Origin, Case Reason, Case Type, Company, Internal Comments, Priority, Product, Status, Subject, and supported custom field types. Salesforce fields such as Case Number, ID, Object Type, and URL are available as one-way values because they are not designed to be updated from the other platform.
On the Asana side, supported bidirectional data includes Assignee, Attachments, Comments, Description, Priority, Section, Start Date, Status, Subtasks, Tags, Task Name, and supported custom fields.

Decide Which System Owns Each Field
Bidirectional integration does not mean that every field should be editable everywhere. Imagine that the Salesforce team owns the original customer description, but both teams need to control priority and progress.
The mapping could look like this:
- Description: Salesforce → Asana
- Priority: Salesforce ↔ Asana
- Status: Salesforce ↔ Asana
- Delivery update: Asana → Salesforce
This gives users access to the information they need without creating unnecessary conflicts between the systems.
Getint lets you configure synchronization direction at field level. You can also determine whether a value should be applied when an item is created, when it is updated, or in both situations. The same integration can therefore combine one-way and two-way mappings instead of forcing every field into one global flow.
Account for Different Status Models
Status mapping deserves separate attention because the two platforms may describe progress differently.
A Salesforce Case could use:
New → Working → Closed
while the corresponding Asana project uses:
To Do → Doing → At Risk → Complete
There is no need to rename either workflow. Instead, map the values according to what they mean. For example, an Asana Doing status can correspond to Working in Salesforce. If Doing and At Risk both represent active work from the Salesforce team's perspective, both values can map to Working.
Getint supports this type of status translation, including situations where more than one value corresponds to a status on the other side.
Decide What Happens to Comments and Attachments
A Salesforce Case often develops beyond its original fields. A customer adds context, someone uploads a screenshot, or a project team explains what needs to happen next. If those conversations remain isolated, the integration only solves part of the problem.
Getint can synchronize comments in either direction or both ways. Comment filters can also control which messages are transferred, for example by including or excluding comments from selected authors. Salesforce public and private comment behavior should also be considered because Asana uses a different comment model.
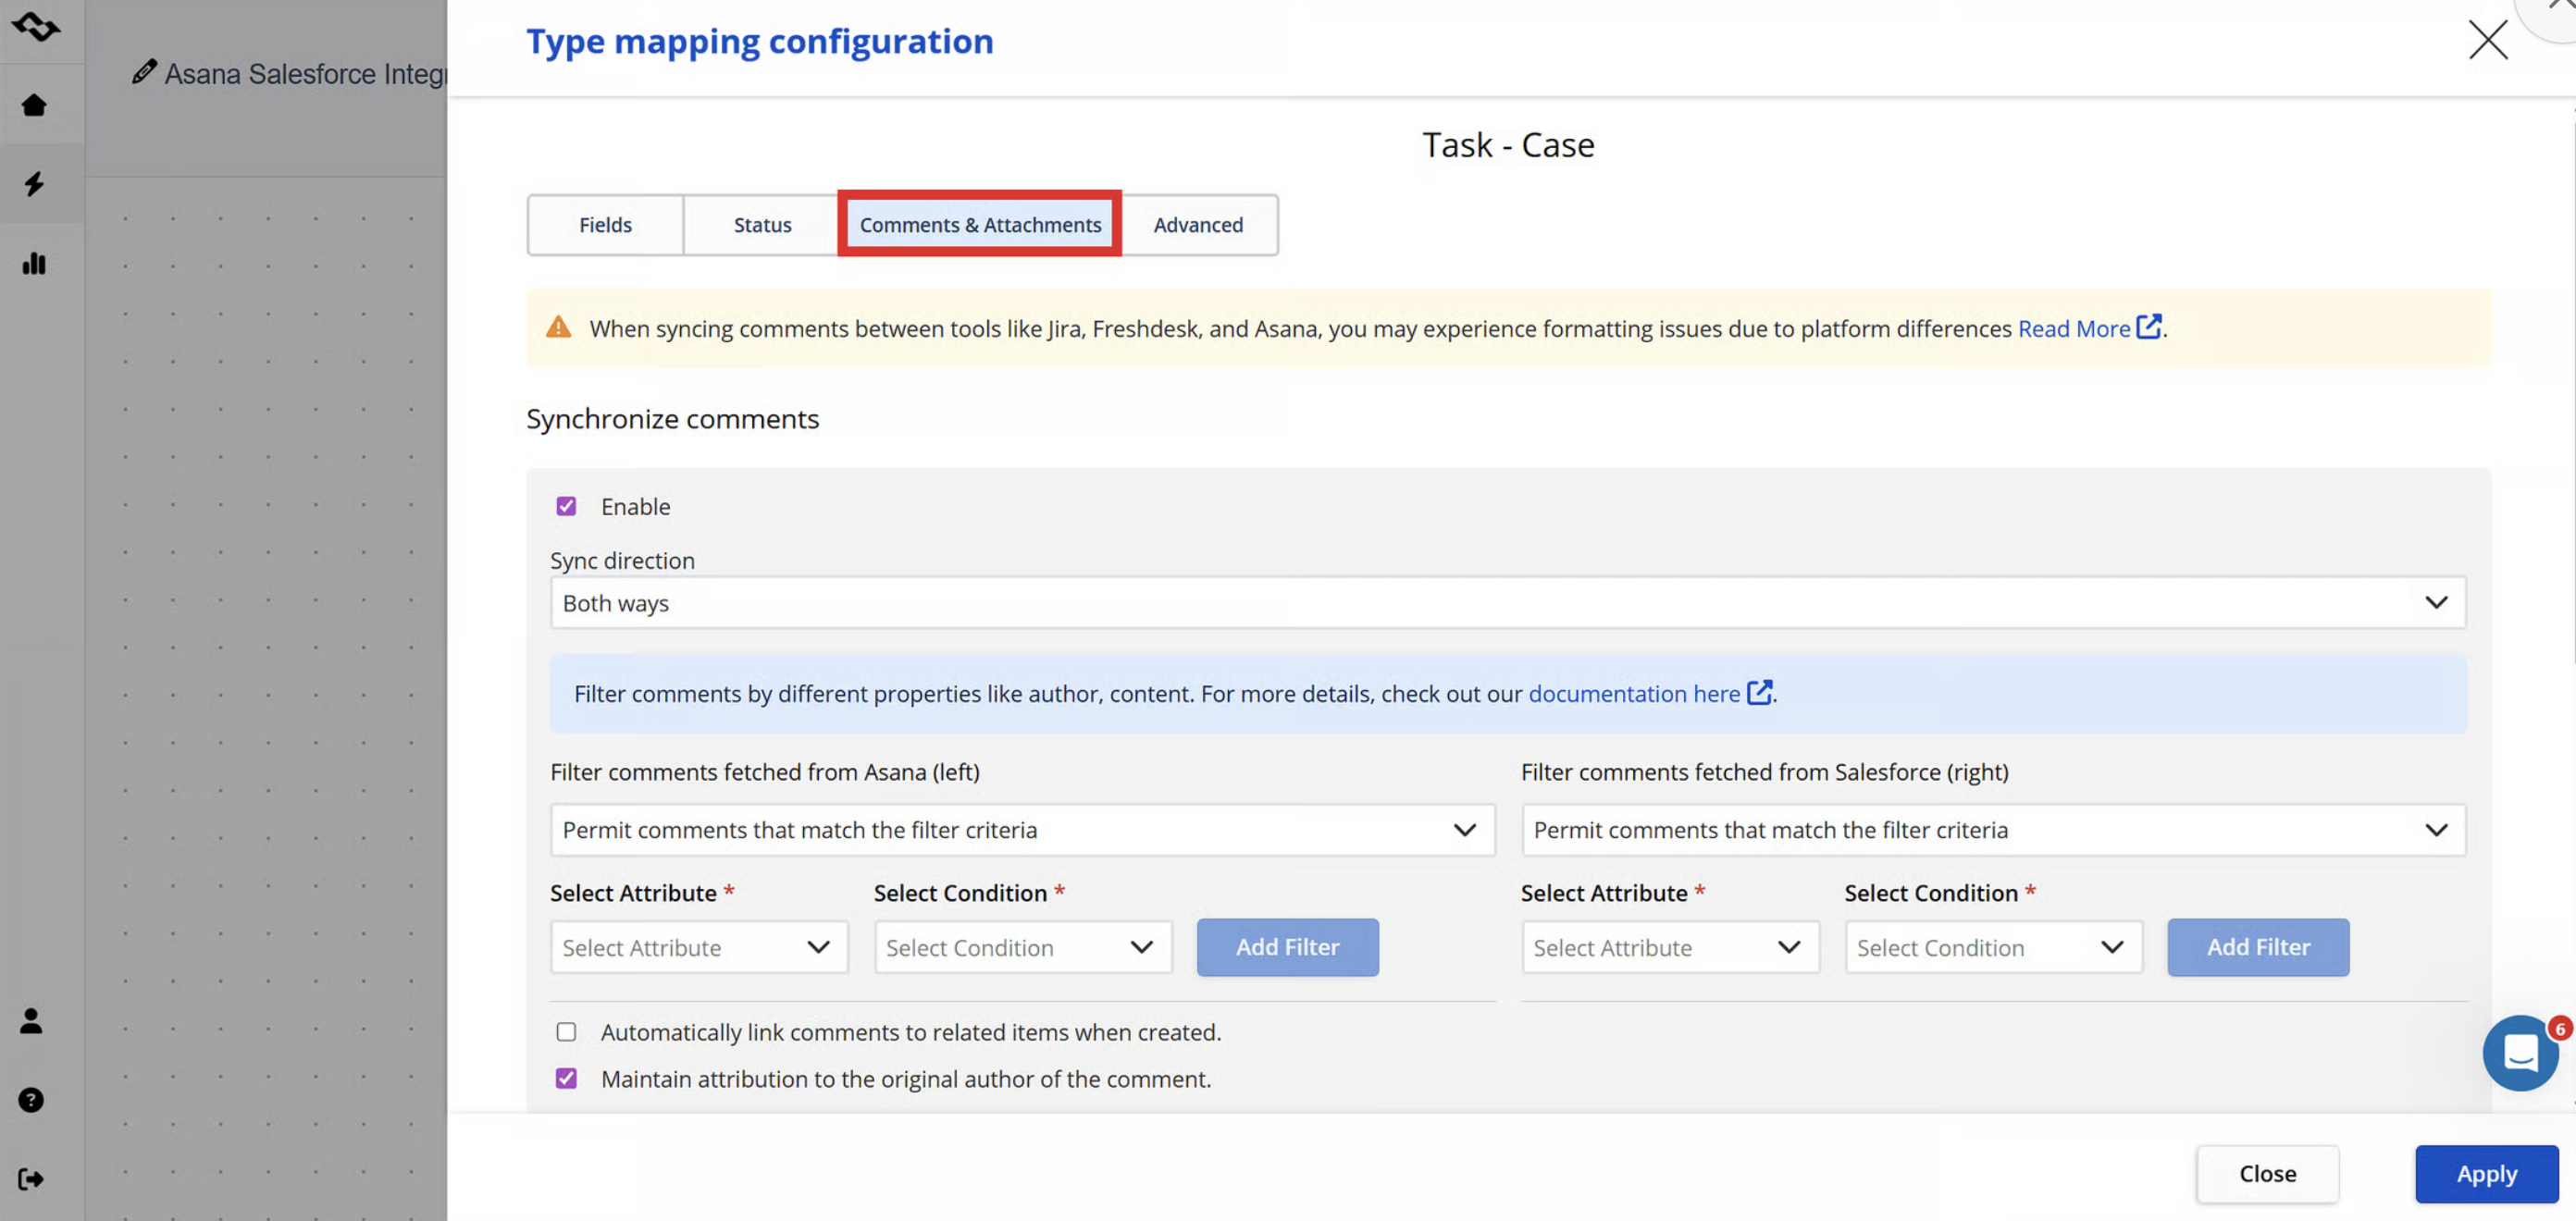
Comments created through the integration are associated with the user account used to establish the connection. The original author's information can appear in the comment footer, which is why using a dedicated service account can make the integration easier to maintain. Getint does not synchronize historical change history.
- Attachments can also move between Salesforce and Asana. They are disabled by default in the integration configuration, so enable them explicitly and choose the required direction if files need to follow the work.
Do You Need One-Way Automation or Two-Way Sync?
Once the workflow and mappings are clear, it becomes much easier to choose the integration model. Not every Salesforce and Asana process needs bidirectional synchronization.
When Native Salesforce in Asana May Be Enough
Asana's current native Salesforce integration is based on Asana Rules.
A Salesforce event can act as a trigger, and Asana performs the configured action. For example, a Rule can run when a Salesforce record is created or updated, or when a Salesforce opportunity reaches a particular stage. The Rule can then create a task in a specific Asana project, update fields, add collaborators, post comments, or run other Asana actions.
This makes sense for a process such as:
Salesforce opportunity reaches a selected stage → create an Asana task
The Salesforce side starts the workflow and Asana reacts to it.
The native integration also provides a Create a task and keeps in sync action, which keeps selected Asana values updated when corresponding Salesforce values change. The current synchronization direction described by Asana is Salesforce → Asana.
A Note About the Previous Salesforce App Exchange Integration
Some older articles may describe a different setup involving Asana for Salesforce, Salesforce AppExchange, Lightning components, automatic project creation, or Salesforce Flow Builder.
That integration is no longer available. Asana deprecated and removed its previous Salesforce AppExchange integration on February 27, 2026. Customers are now directed to the newer Salesforce in Asana integration based on Rules, triggers, sync actions, and the Asana platform.
This matters particularly if you are following an older guide about creating projects or managing Asana components directly from Salesforce. Those instructions may describe the deprecated AppExchange package rather than the new integration.
When Two-Way Synchronization Makes More Sense
The native approach works well when Salesforce initiates the process and Asana needs to receive Salesforce data. The model changes when the team working in Asana also generates information the Salesforce user needs.
Return to the Case example.
Salesforce creates the request. Asana receives it.
Then the project team:
- changes its status;
- changes the priority;
- adds a comment;
- attaches a file;
- updates a custom field.
If that information should also update the original Salesforce Case, the workflow requires data to move back in the other direction.
Getint supports that model:
Salesforce Case → Asana Task
followed by:
Asana Task → Salesforce Case
The same connection can still keep selected fields one-directional where appropriate. That makes two-way sync especially useful when both teams actively manage their part of the process instead of treating Asana as only a destination for Salesforce data.
Prepare Asana and Salesforce Before Connecting Them
Most integration problems are easier to prevent before creating the connection.
You do not need an elaborate architecture document, but you should know which project, accounts, permissions, and Salesforce records will participate in the sync.
What You Need on the Asana Side
Start by deciding which Asana workspace and Asana project should receive the synchronized tasks. You also need a user with sufficient access to that workspace and project.
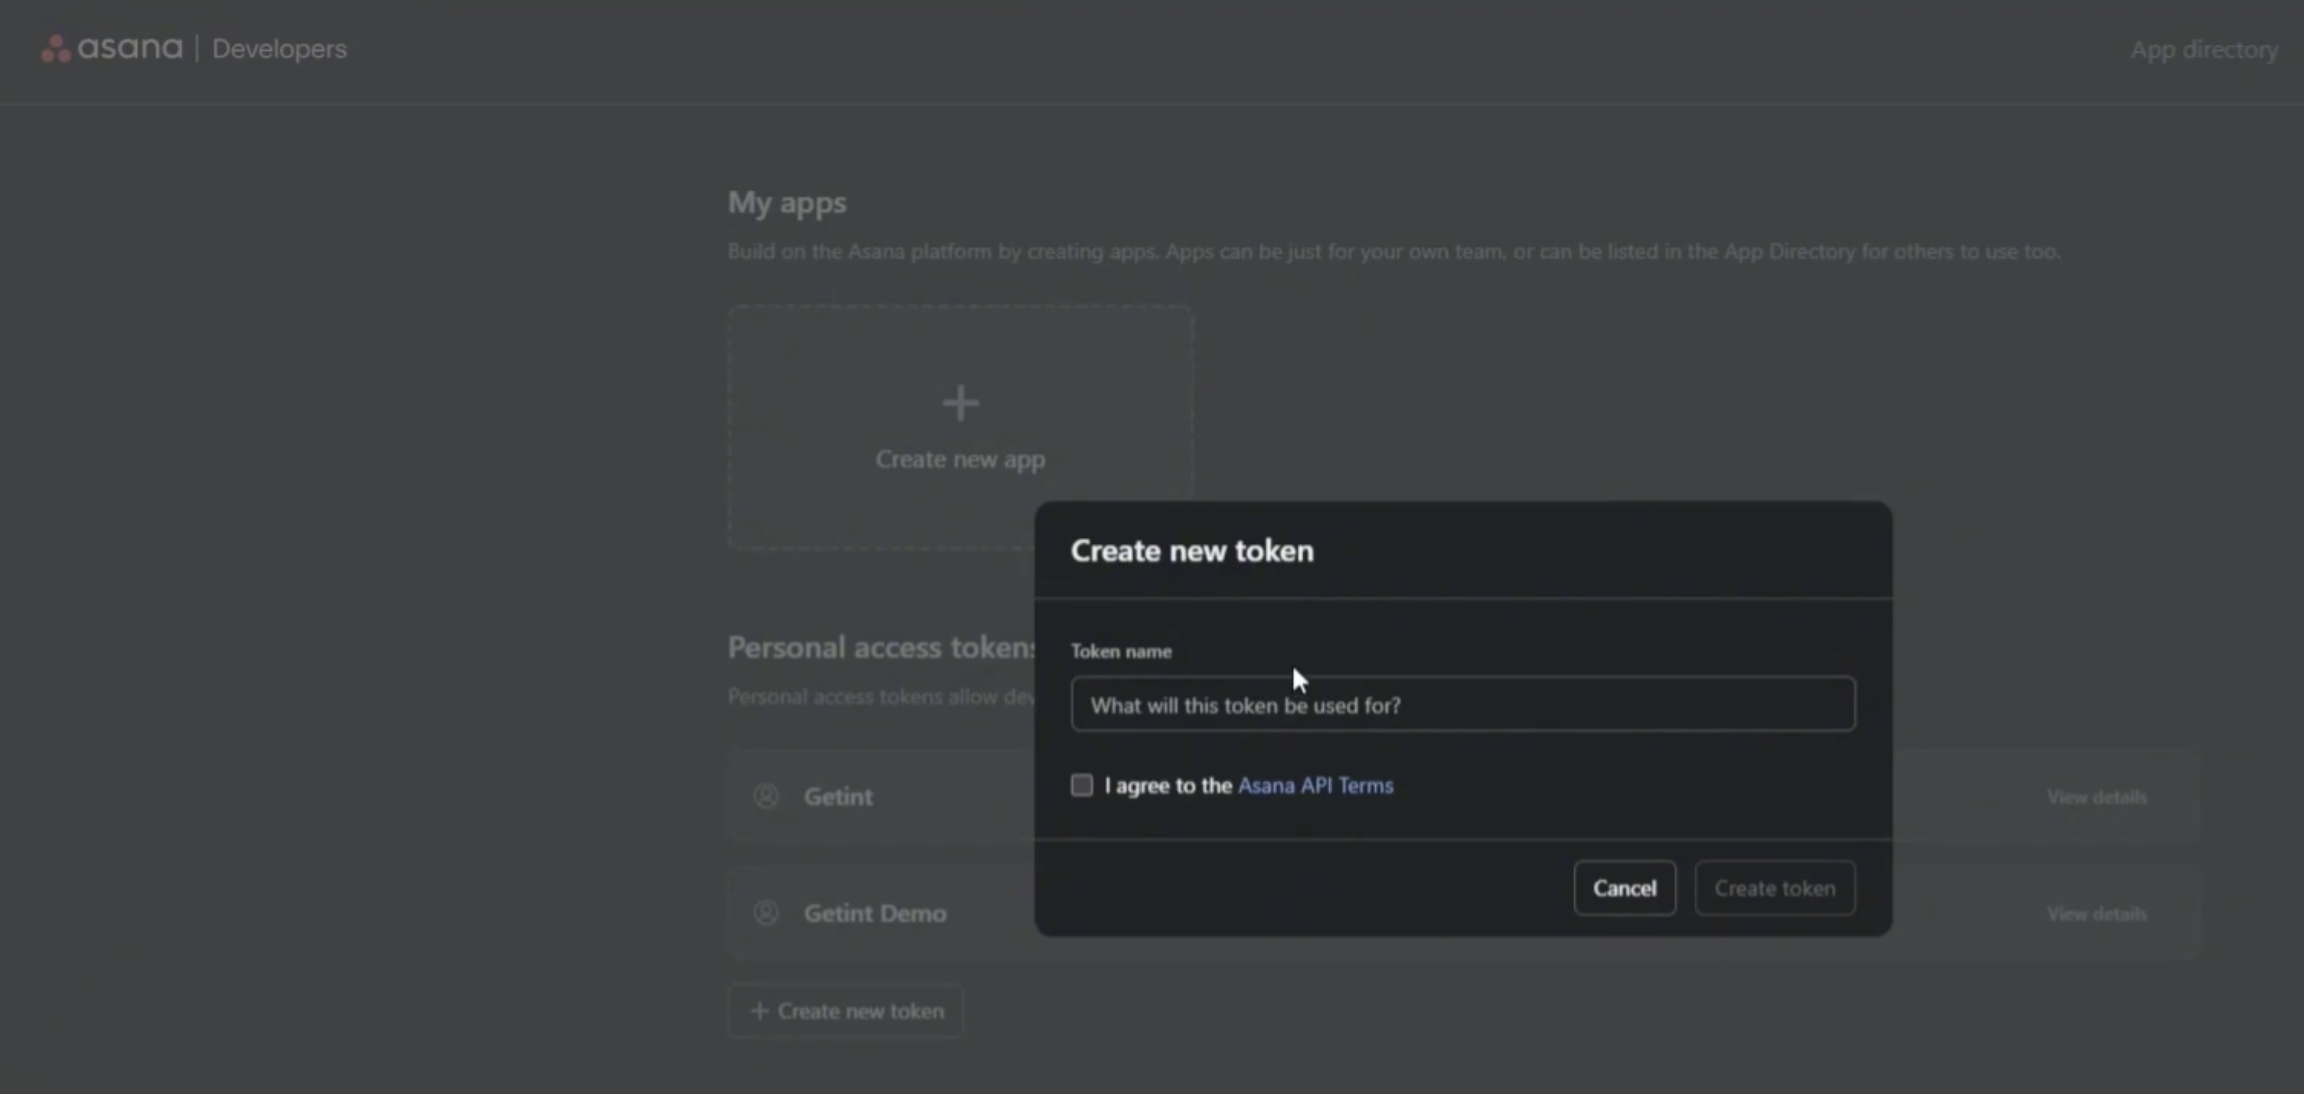
Getint authenticates the Asana connection with a Personal Access Token. In Asana, you can generate the token through:
Profile settings → Apps → Developer Console → Personal Access Token
Create the token, give it a recognizable name, and store the generated credentials securely. The token is then used to authenticate Asana in Getint.
What You Need on the Salesforce Side
Salesforce requires a few additional steps because Getint uses OAuth.
It is useful to involve the Salesforce admin before beginning the setup, particularly if you do not manage API access or External Client Apps yourself.
The Salesforce connection requires:
- access to the required Salesforce instance;
- Salesforce API access;
- an External Client App;
- OAuth configuration;
- Client Credentials Flow;
- Consumer Key;
- Consumer Secret;
- an appropriate Salesforce user.
How to Build an Asana Salesforce Integration With Getint
The following configuration creates ongoing synchronization between Salesforce Cases and Asana tasks.
For a video tutorial, enter our YT guide below.
Step 1: Create a New Integration
Open Getint and choose Create Integration.
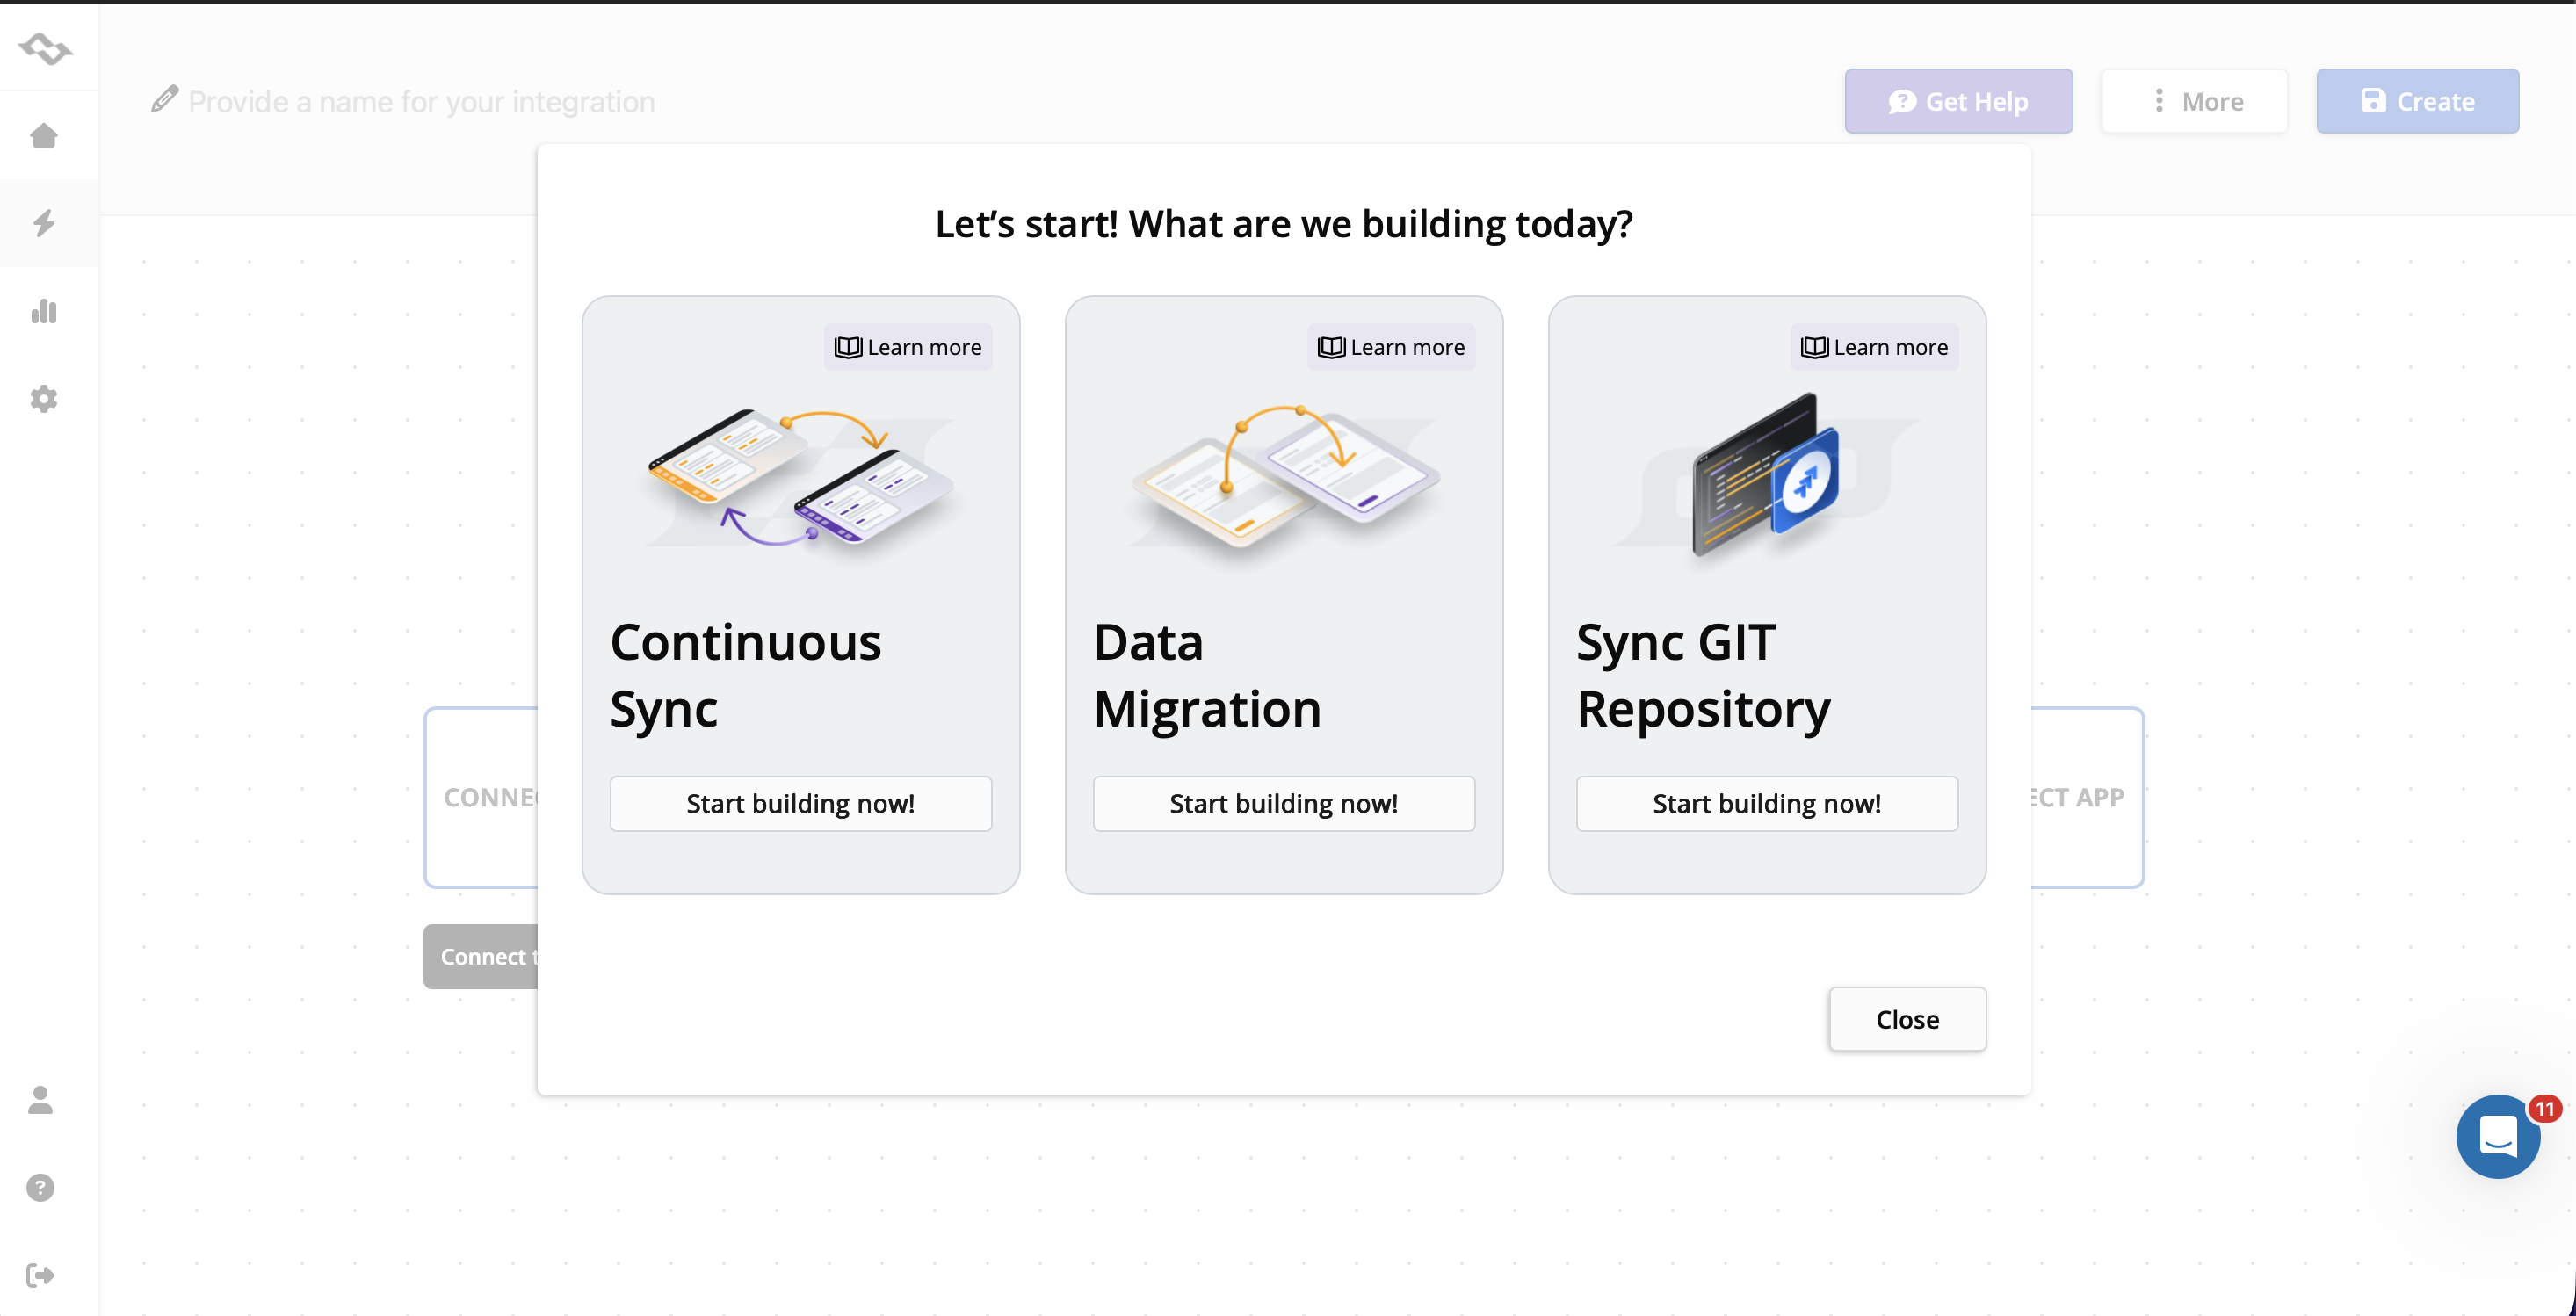
Select Continuous Sync, then select Asana as one of the applications.
Continuous sync is intended for ongoing integration of new and updated work rather than moving a fixed set of historical records once. Our documentation distinguishes this type of integration from migration, which is designed for historical data transfer.
Step 2: Connect Asana
Create a new Asana connection and give it a clear name. Paste the Personal Access Token generated earlier and authenticate the account.
Next, select the relevant workspace and project. If the user has access to several projects, make sure you choose the one that should participate in this workflow.
At this point, Getint has access to the Asana side of the integration.
Step 3: Connect Salesforce
Select Salesforce and create a new connection. If you want to follow the steps with a quick guidance, click below to see our short video guide and follow the steps to prepare Salesforce token.
Summarizing, in Salesforce, go to:
Setup → Platform Tools → Apps → External Client Apps → External Client App Manager
- Create a new External Client App and provide the required app name and contact email.
- Enable OAuth settings and add the callback URL specified in the our documentation. Then add the Manage user data via APIs scope and enable Client Credentials Flow.
- After creating the app, return to its OAuth policies, enable Client Credentials Flow for the appropriate Salesforce user, and save the configuration.
- Next, retrieve the Consumer Key and Consumer Secret from the app settings.
Back in Getint, enter the Salesforce instance information and the generated credentials to authenticate the connection.
Once Salesforce and Asana are connected, move to mapping.
Step 4: Map Salesforce Cases to Asana Tasks
Create the type mapping:
Salesforce Case ↔ Asana Task
Getint can use Quick Build to identify compatible fields and generate an initial mapping. Standard fields with clear equivalents can therefore be connected without building every relationship manually.
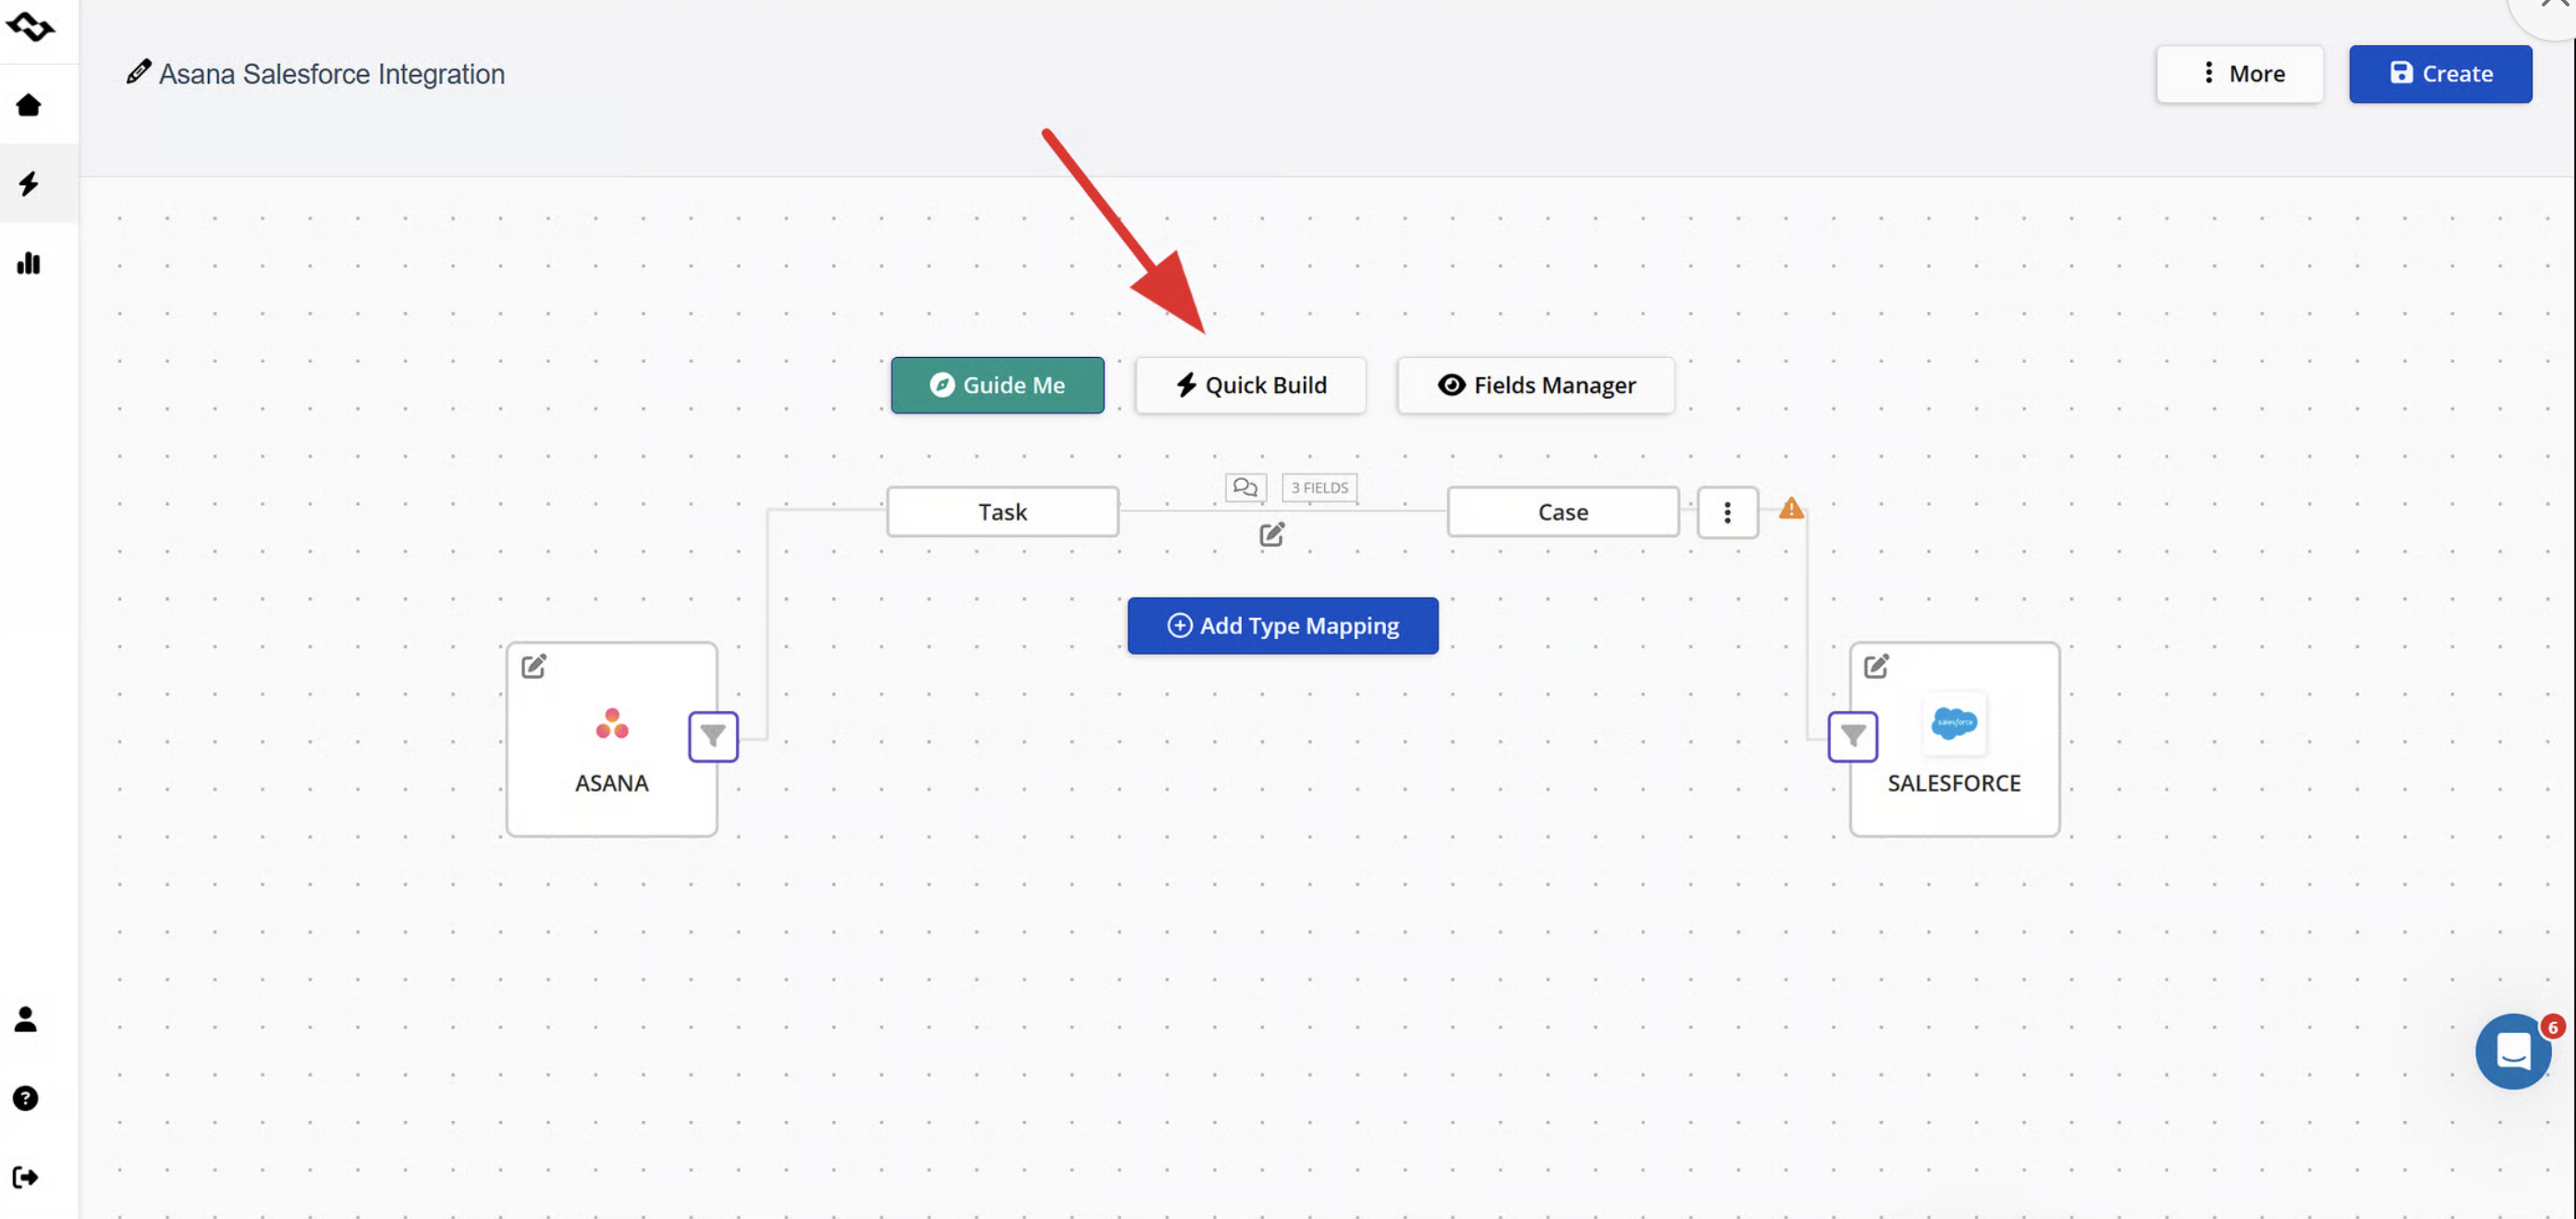
For example, Getint can initially match:
- Salesforce Subject ↔ Asana Title
- Description ↔ Description
- Priority ↔ Priority
You can then remove fields that are unnecessary or add custom mappings required by the workflow.
Step 5: Configure Field Direction and Values
Review each field rather than accepting the initial configuration automatically.
For every mapping, determine:
- whether Salesforce should update Asana;
- whether Asana should update Salesforce;
- whether the field should work in both directions;
- whether it should apply on create, update, or both.
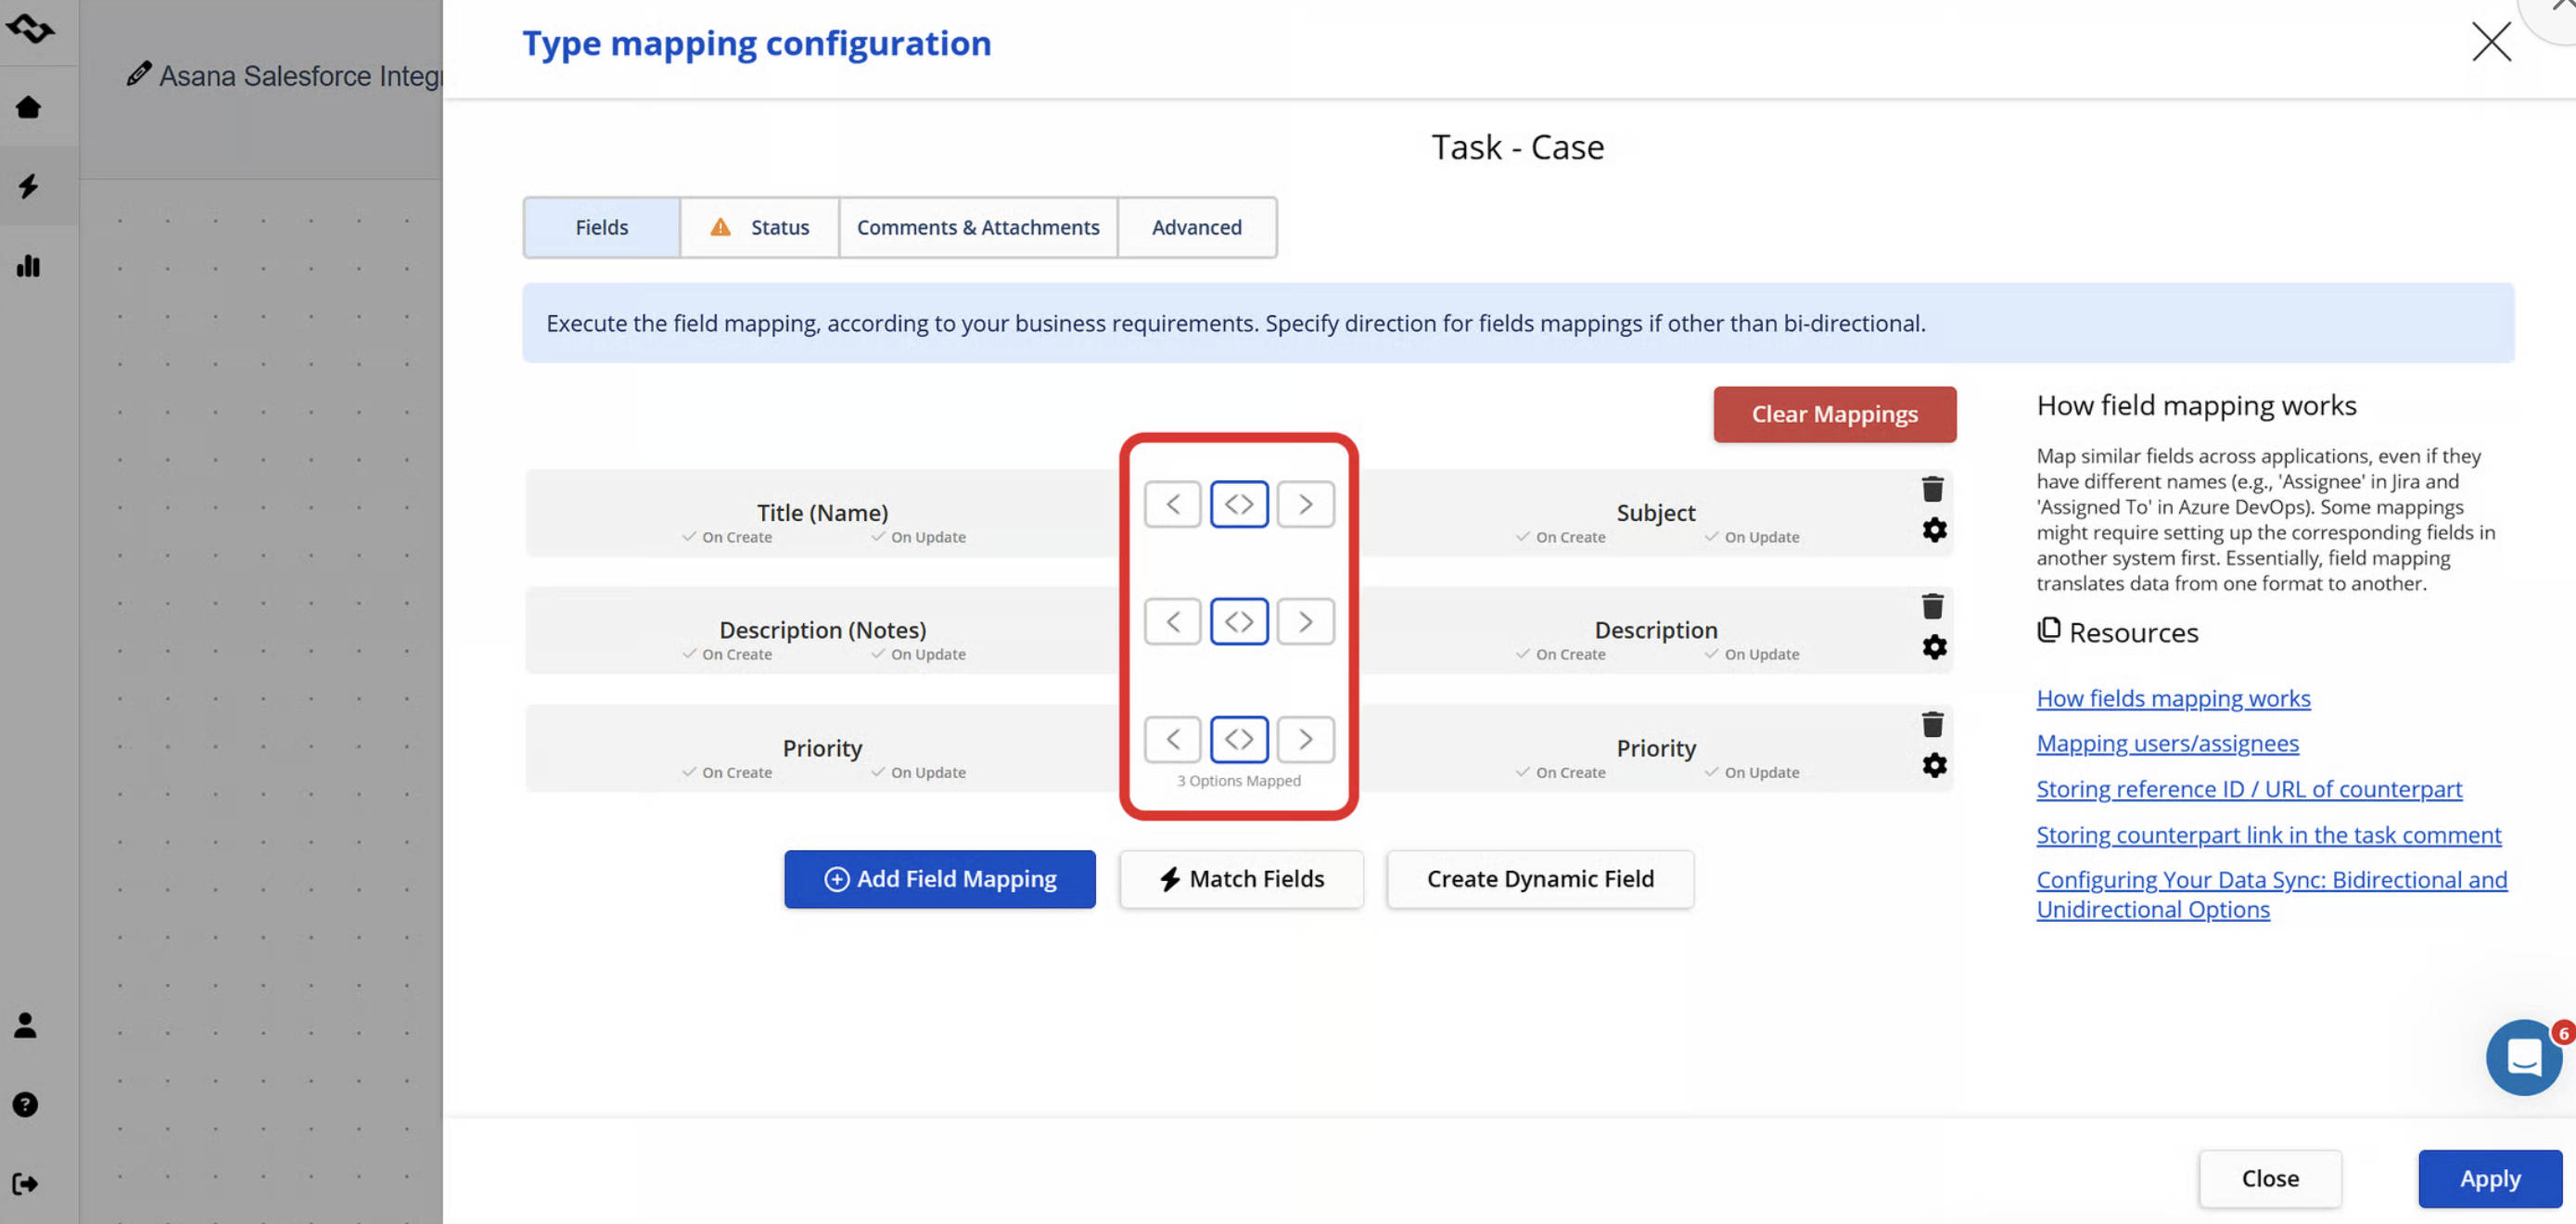
Fields with predefined values also need their values mapped.
For Priority, for example:
- Low ↔ Low
- Medium ↔ Medium
- High ↔ High
Custom fields can be added when the default Salesforce and Asana fields do not contain all the context your organization needs.
Step 6: Map the Workflow Statuses
Next, select the Salesforce and Asana fields that represent progress.
Asana projects may initially expose Section rather than Status depending on their configuration. If your project uses Status, select it and map the corresponding values.
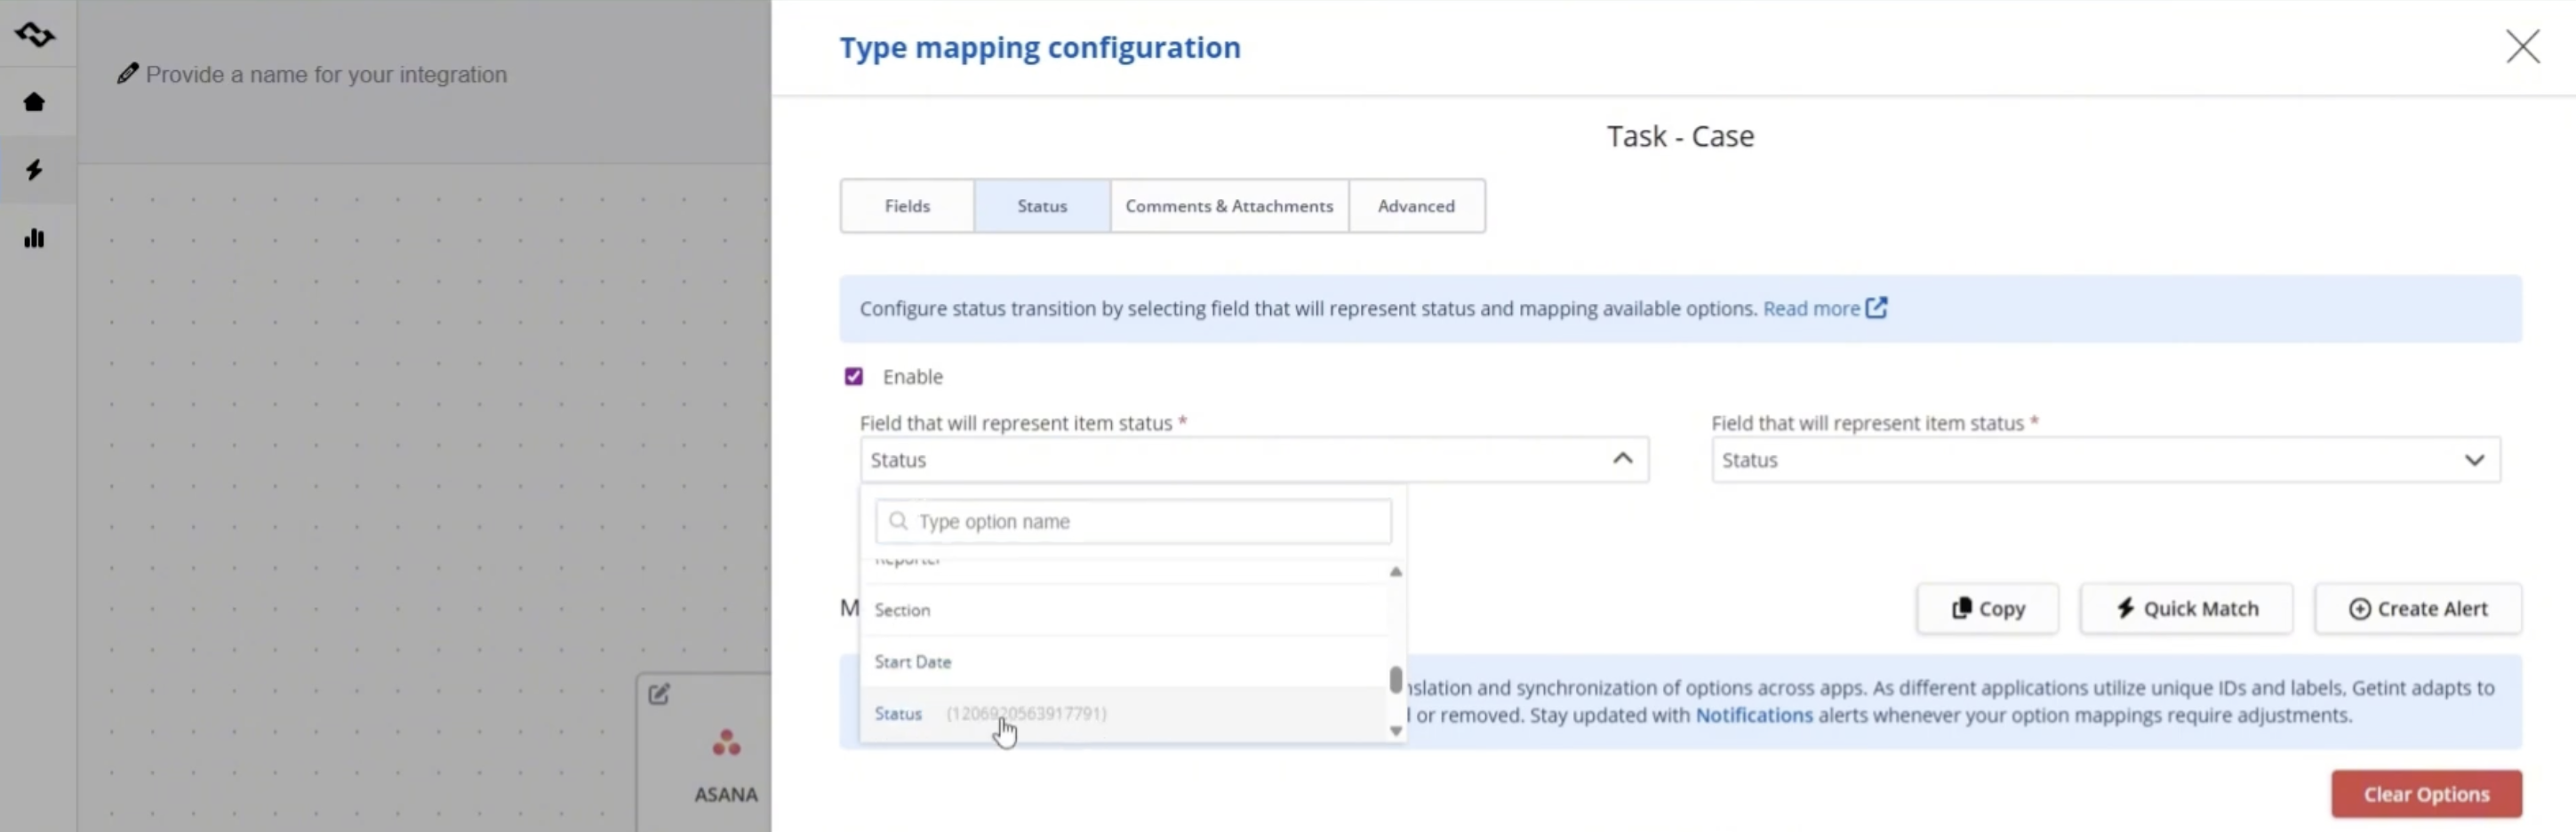
For example:
Asana Doing ↔ Salesforce Working
You can map additional values according to the real workflow rather than forcing both systems to use identical names.
Step 7: Configure Comments and Attachments
Choose how comments should flow:
- Salesforce → Asana;
- Asana → Salesforce;
- both ways.
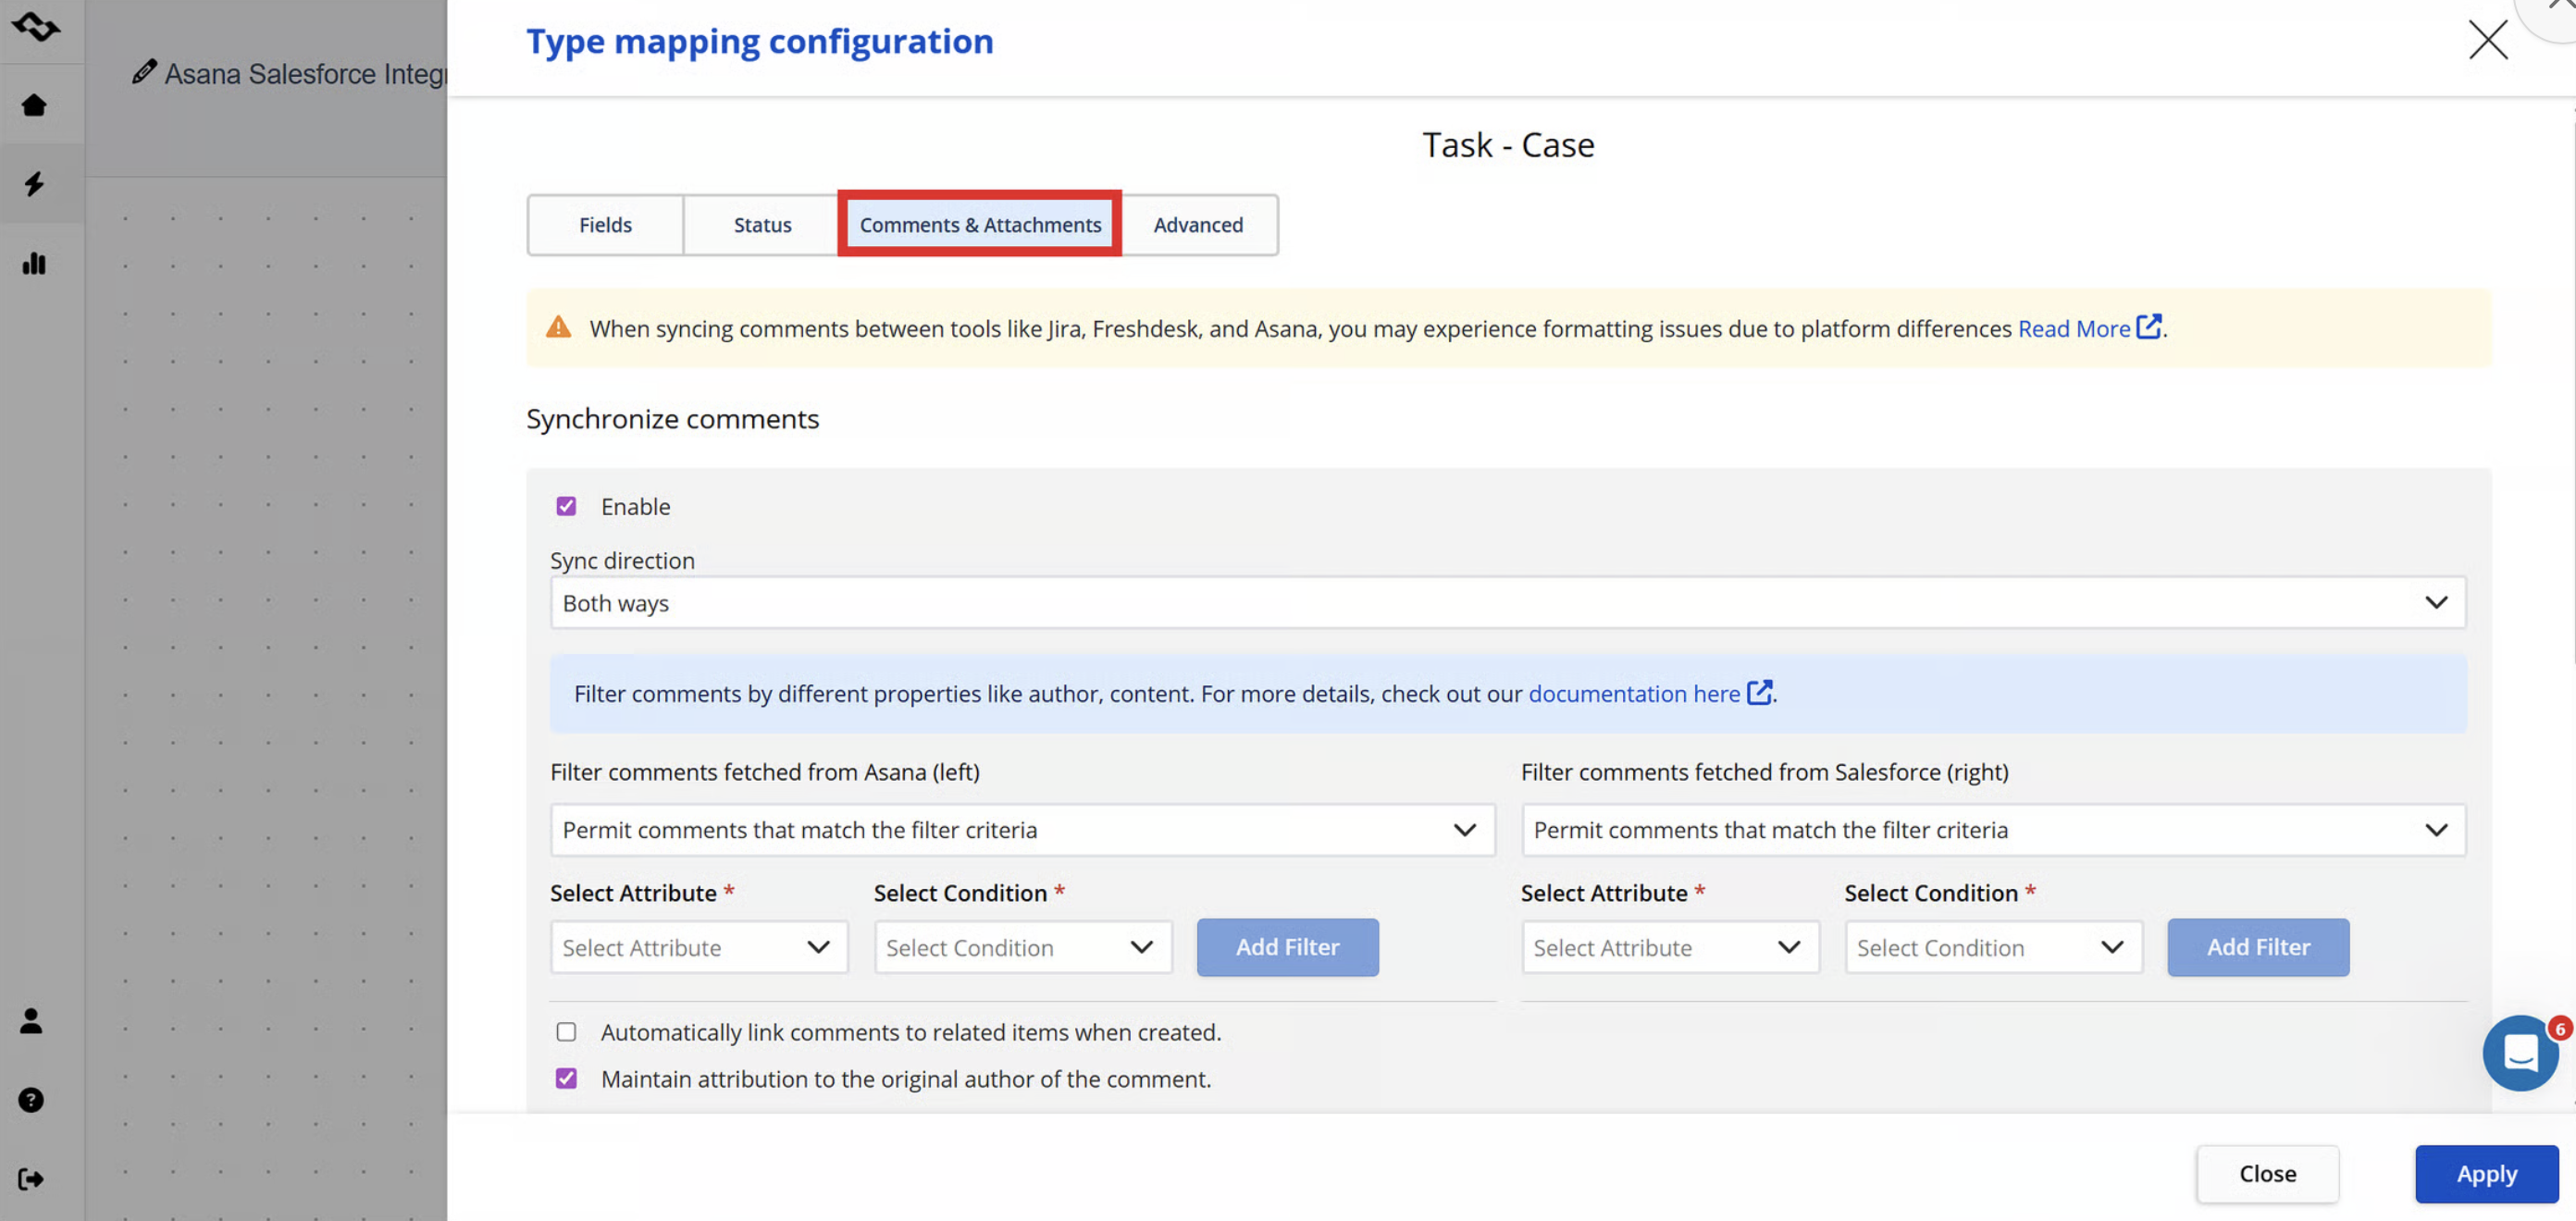
- Add comment filters if only selected comments should cross the integration.
- Review Salesforce public/private comment behavior as part of this setup, especially if some Salesforce information should remain internal.
- If attachments are required, enable attachment synchronization and select the direction. They are disabled by default.
Step 8: Filter Which Items Are Allowed Into the Sync
One of the most important decisions comes after the mapping. Does every Salesforce Case really belong in Asana? Usually, the answer is no.
Getint allows filtering so the integration can act only on records that belong to the cross-team process.
For example, you could synchronize an Asana task only when it contains a tag with the value sync. On the Salesforce side, you can use a field, operator, and value to define which Cases should participate.
Getint provides filtering scopes for:
- ALL items;
- NEW items;
- SYNCED items.
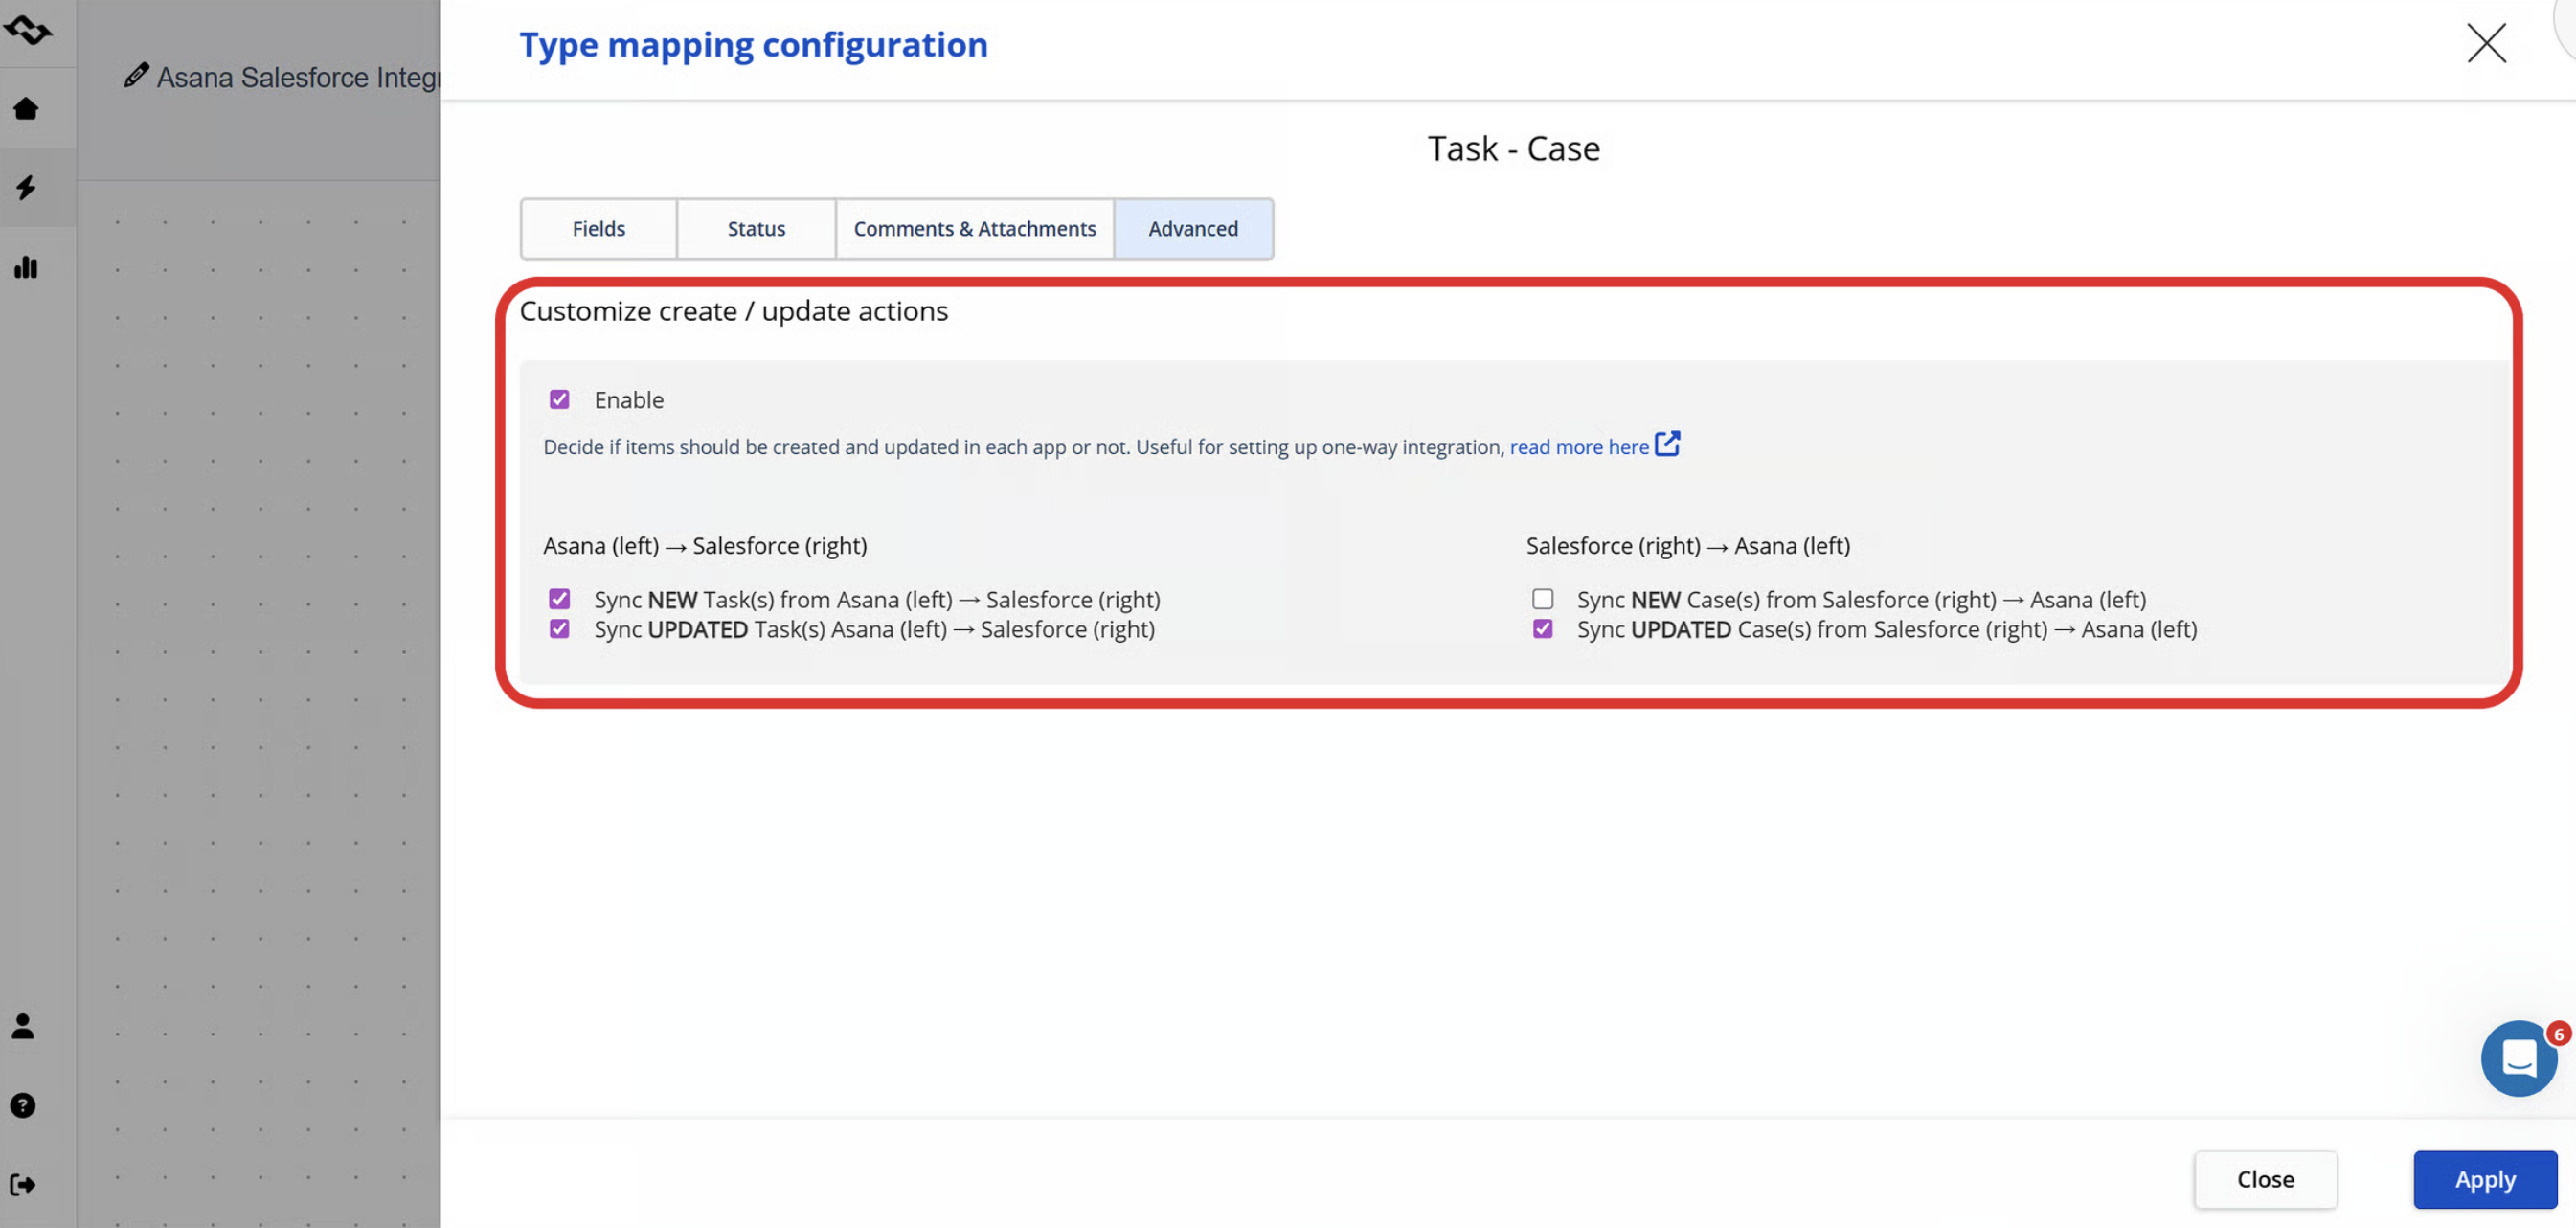
This gives you control not only over which items enter the integration, but also over conditions applied to records that have already been connected.
A filter can be especially helpful in an enterprise environment where one Salesforce instance contains many different Case types but only a subset requires action from the Asana team.
Step 9: Create and Enable the Integration
Review the configuration and apply the mappings. Give the new integration a recognizable name so it is easy to identify later, then create and enable it. At this stage, the connection is technically active.
That does not mean the work is finished. The next step is to prove that the complete process behaves as expected.
Test the Sync From Both Sides
A successful authentication or green integration status does not confirm that the workflow itself is correct.
Testing should follow the same path real users will follow.
Test 1: Salesforce Case → Asana Task
Create a Salesforce Case that meets the conditions required by the integration.
Complete the mapped fields, such as Subject, Description, Priority, and Status. Make sure any mandatory Salesforce fields also have values; Case Origin, for example, may be required depending on the Case configuration.
Allow the next integration run to process the Case.
Then open the Asana project and verify that:
- a task was created;
- the task name is correct;
- the description contains the expected context;
- priority is correct;
- status was translated correctly;
- relevant custom fields contain the expected values.
This verifies the Salesforce → Asana flow.
Test 2: Asana Task → Salesforce Case
Now work from the other side.
Change a mapped value in the task, such as status or priority.
Add a comment.
If attachment synchronization is enabled, attach a test file.
After the next run, open the original Salesforce Case and check whether those updates arrived according to the configured mapping. Getint's current Asana–Salesforce flow supports this update path, including status, comments, and attachments when configured.
This verifies the bidirectional part of the connection.
Test 3: Test What ShouldNot Sync
This test is easy to skip, but it is just as important.
- Create a Salesforce Case that does not meet the filter criteria. It should remain in Salesforce without producing an Asana task.
- If your integration creates the task anyway, the mapping may be correct but the workflow logic is not.
Testing exclusions prevents an integration from becoming a mechanism for generating irrelevant work.
How to Verify and Maintain the Integration After Launch
Once users begin relying on the integration, visibility into what happened during synchronization becomes important.
Getint records synchronization activity under Latest Runs.
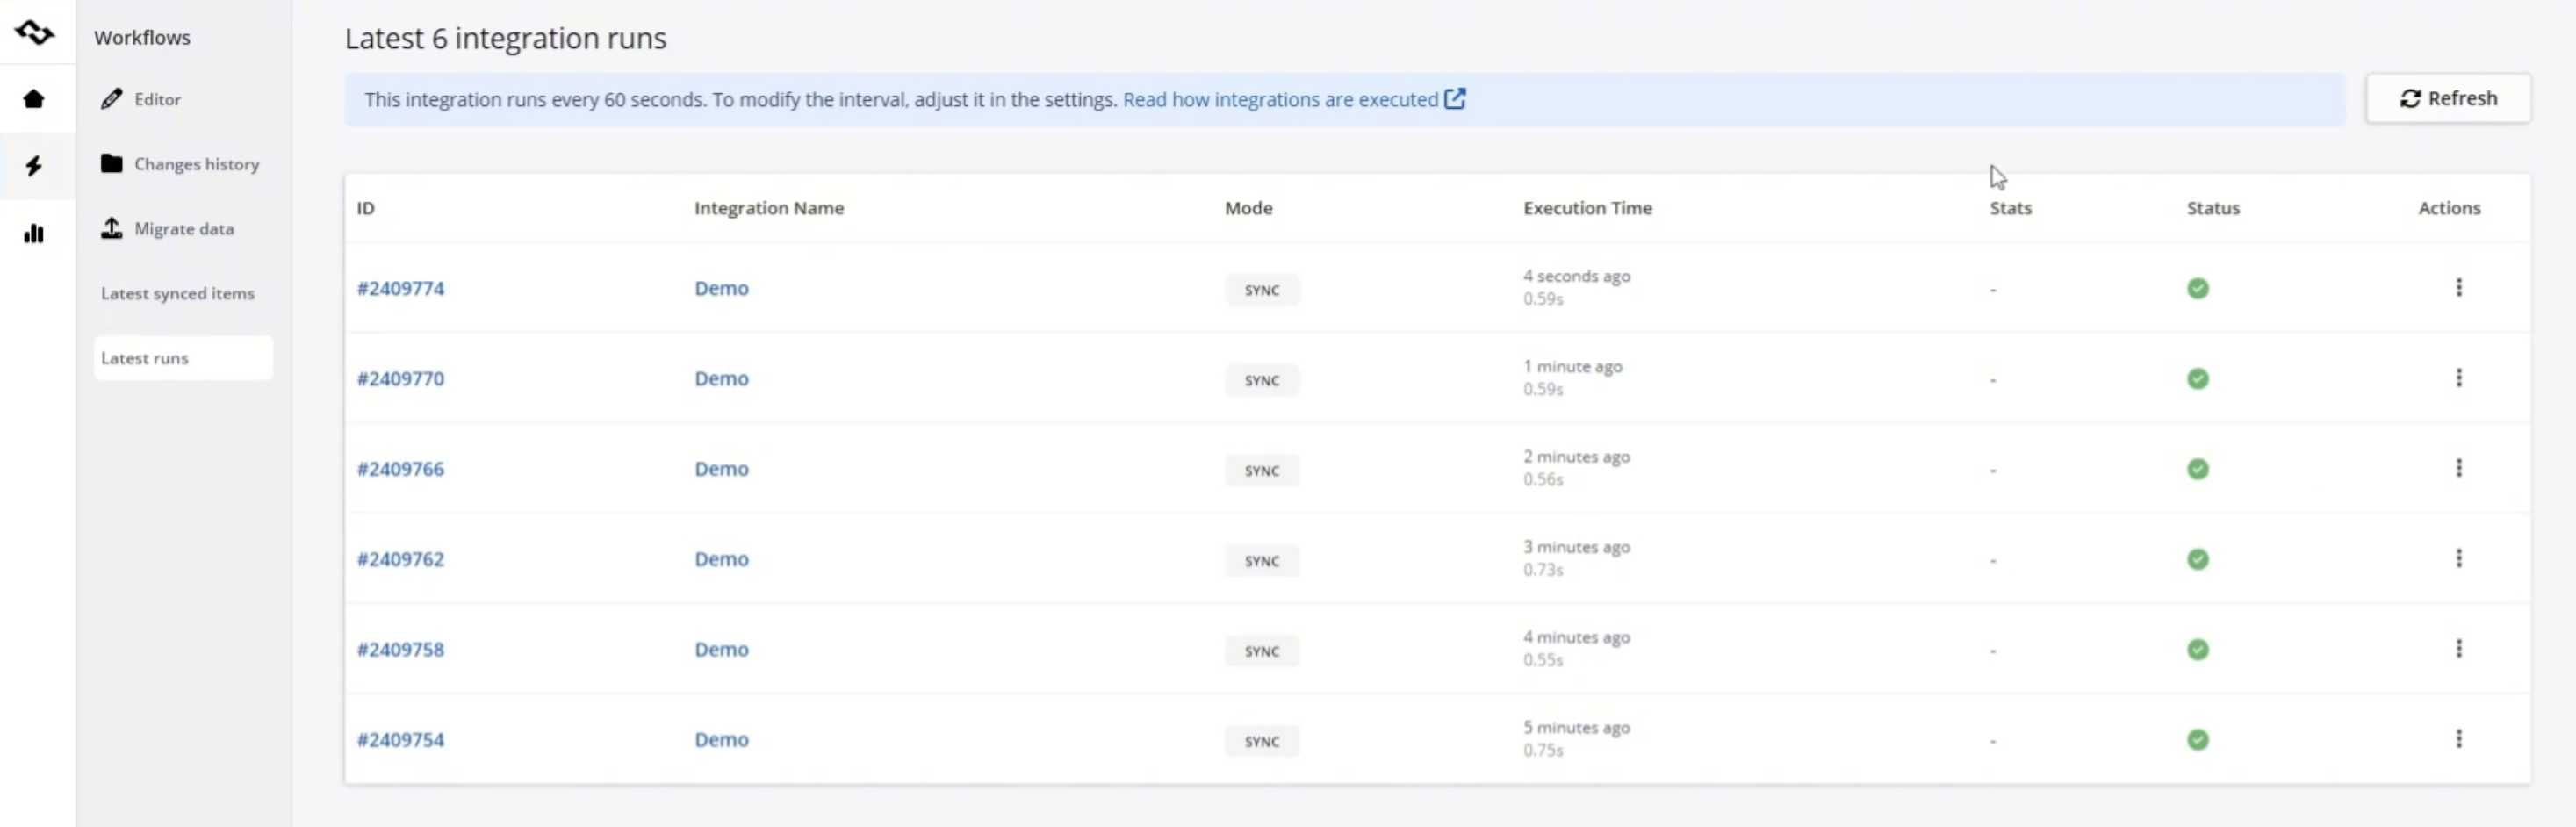
There you can review information such as:
- run ID;
- integration name;
- sync mode;
- execution time;
- synchronization status;
- number of items processed.
Opening the run details shows the IDs of the records involved. You can identify which Salesforce Case triggered the synchronization and which Asana task was auto created or updated.
Getint also distinguishes between create and update operations. When a new Salesforce Case produces a new Asana task, the operation appears as creation. When an existing synchronized Asana task later changes the connected Salesforce Case, the operation is recorded as an update.
This is helpful when a user says an update is missing. Instead of checking both platforms manually, start with the run:
- Did Getint detect the change?
- Did the item pass the configured filter?
- Was the operation a create or update?
- Did synchronization finish successfully?
- Which source and target items were involved?
Maintaining the integration also means reviewing configuration when the underlying workflow changes. A new Salesforce custom field, renamed status, different Asana project, or changed permissions can affect a previously stable flow.
Integration is therefore not only about setting up connections. Someone in the organization should know who owns the credentials, mappings, filters, and ongoing configuration.
The Same Sync Pattern Can Support Other Cross-Team Workflows
A Salesforce Case and Asana task provide a useful example because both teams actively contribute to the same process, but the principle can be applied more broadly.
1. Sales and Marketing Collaboration
A marketing team may manage campaigns and content production in Asana while a sales team manages customer relationships in Salesforce. The teams do not need identical datasets. The useful integration is the one that transfers only the customer, campaign, or request context needed for their shared work.
2. Customer Requests That Become Project Work
Some Salesforce Cases quickly become too operational for the CRM alone. A request may require several Asana tasks, internal discussion, files, ownership changes, and ongoing progress tracking.
Salesforce can remain the customer-facing record while Asana becomes the workspace where the project team manages the execution. The sync keeps the relevant information aligned without requiring the teams to manually maintain both records.
3. Sales Handoffs That Start Work in Asana
For simpler sales processes, the native Asana integration may be enough.
Salesforce opportunities can act as triggers for Asana Rules, allowing teams to create tasks when an opportunity reaches the appropriate stage.
This is a different requirement from maintaining a two-way Case–Task relationship. The important question is whether Asana only needs to receive Salesforce information or whether work completed in Asana must also update Salesforce. That distinction should determine the integration model.
Final Thoughts
A useful Asana Salesforce integrationstarts with the process shared between the teams.
Which Salesforce record starts the work? What should the Asana team receive? Which system owns each value? What information needs to come back? Which records should never enter the integration at all?
Once those decisions are clear, the technical setup becomes much more straightforward.
Asana's native Salesforce integration is useful for Salesforce-driven automation based on triggers and Asana Rules. When both teams need to actively update the same cross-platform process, Getint can provide field-level one-way or bidirectional synchronization, custom field mapping, status translation, comments, attachments, filters, and visibility into synchronization runs.
Start with one clearly defined workflow. Make the mappings intentional, test both successful and excluded records, and expand only when the first connection is working the way the teams expect.