
Modern software development is no longer just about writing code, it’s about delivering reliable, tested, and production-ready applications continuously. That’s where CI/CD (Continuous Integration and Continuous Delivery) comes in.
If you’re working with a GitHub repository, one of the most powerful tools at your disposal is GitHub Actions. It enables you to automate workflows directly within your repo without needing external CI/CD tools.
In this guide, we’ll walk through how to build a production-ready GitHub Actions CI/CD pipeline step-by-step, covering everything from creating your first workflow to deploying a Dockerized application.
What is GitHub Actions CI/CD?
GitHub Actions CI/CD is a powerful automation framework built directly into GitHub that enables developers to define, execute, and manage software development workflows within their GitHub repository.
At its core, GitHub Actions allows you to create workflow files written in YAML that describe a series of steps such as installing dependencies, running tests, building artifacts, or deploying applications. These workflows are triggered by specific GitHub events like a push, pull request, release, or even manual execution.
Understanding the Core Building Blocks
To fully grasp GitHub Actions CI/CD, it’s important to understand its key components:
- Workflow A workflow is a configurable automated process defined in a YAML file inside the .github/workflows directory. Each workflow represents a pipeline.
- Event (Trigger) Workflows are triggered by GitHub events such as:
- push to a branch
- pull_request creation or update
- workflow_dispatch (manual trigger)
- schedule (cron jobs)
- Jobs A workflow consists of one or more jobs. Each job runs independently on a runner.
- Steps Each job is made up of steps. These can either:
- Run shell commands
- Use reusable GitHub Actions (like checkout action)
- Runner The environment where your jobs execute. Common options include:
- ubuntu-latest
- Windows or macOS runners
- Self-hosted runners for custom infrastructure
What is a GitHub Actions Workflow File?
A GitHub Actions workflow file is a YAML file stored inside the .github/workflows directory of your repository. It defines the CI/CD pipeline, including triggers, jobs, and steps.
Each workflow file:
- Is version-controlled with your source code
- Defines a configurable automated process
- Executes based on GitHub events like push or pull request
What Makes It “CI/CD”?
GitHub Actions becomes a CI/CD solution when you use it to automate both integration and delivery pipelines.
Continuous Integration (CI)
CI focuses on validating code changes frequently and automatically.
With GitHub Actions CI workflow, you can:
- Run unit tests on every pull request
- Validate code quality using linters
- Install dependencies and build the project
- Ensure that new code doesn’t break existing functionality
Example flow:
- Developer creates a new pull request
- Workflow runs automatically
- Tests execute within seconds
- Merge is allowed only if checks pass
This ensures your master branch always contains stable, production-ready code.
Continuous Delivery (CD)
CD extends CI by automating the release process.
With GitHub Actions CD pipelines, you can:
- Automatically build Docker images
- Push artifacts to Docker Hub or other registries
- Deploy applications to staging or production environments
- Trigger releases based on version tags
Example flow:
- Code is merged into the master branch
- Workflow builds a Docker image
- Image is pushed to Docker Hub
- Application is deployed to production
Using GitHub Secrets for Secure CI/CD
When building production-ready pipelines, you should never expose sensitive data like API keys, credentials, or tokens in your workflow file.
GitHub provides a secure way to manage this using GitHub Secrets.
You can:
- Store credentials as repository secrets
- Reference them inside workflows
- Keep sensitive data encrypted
Example use cases:
- Docker Hub login
- Deployment credentials
- API keys
This ensures your CI/CD pipeline remains secure while automating deployments.
Key Capabilities of GitHub Actions CI/CD
With GitHub Actions, you can build highly flexible pipelines that support:
- Automatic test execution on every code change
- Docker-based deployments with image versioning
- Parallel job execution for faster pipelines
- Event-driven automation based on repository activity
- Manual workflow runs for controlled deployments
Because everything lives inside your GitHub repo, your CI/CD pipeline becomes version-controlled alongside your source code.
Real-World Example
Let’s say you’re working on a Node.js application.
A typical GitHub Actions CI/CD pipeline might:
- Trigger on a pull request
- Install dependencies using npm install
- Run unit tests
- Build the application
- On merge to master branch:
- Build a Docker image
- Push it to a registry
- Deploy it to a server
All of this happens automatically, often within a few minutes.
Why This Matters
Before tools like GitHub Actions, teams relied on external CI/CD tools like Jenkins or CircleCI. While powerful, they often required:
- Separate setup and infrastructure
- Manual integration with repositories
- Additional maintenance
GitHub Actions simplifies this by bringing CI/CD directly into your development workflow making automation more accessible and tightly integrated.
Why Use GitHub Actions for CI/CD? (Expanded)
GitHub Actions has rapidly become one of the most popular CI/CD tools not just because it works, but because it fits naturally into how modern developers already build software.
Let’s break down why it stands out.
1. Native Integration with Your GitHub Repository
Unlike external CI/CD tools, GitHub Actions is built directly into GitHub.
This means:
- No additional setup or integrations required
- Direct access to repository events like push and pull request
- Seamless connection with branches, commits, and issues
For example:
- A new pull request automatically triggers your CI workflow
- Merging into the master branch can trigger deployment
Everything happens within the same ecosystem.
2. Supports Modern Software Development Workflows
GitHub Actions aligns perfectly with modern development practices:
- Feature branching
- Pull request reviews
- Continuous integration pipelines
- Automated releases
It allows teams to define workflows that mirror real-world processes:
Code → Test → Build → Deploy
This makes it ideal for both open source projects and enterprise applications.
3. YAML-Based Configuration (Simple Yet Powerful)
Workflows are defined using YAML files, which are:
Easy to read and write Version-controlled Highly customizable
Example:
on: push
jobs:
  build:
    runs-on: ubuntu-latest
Despite its simplicity, YAML allows you to define:
- Complex multi-job pipelines
- Conditional execution
- Matrix builds (multiple environments)
4. Built-In Secrets and Security Features
Security is critical in CI/CD pipelines.
GitHub Actions provides:
- GitHub Secrets for storing sensitive data
- Encrypted environment variables
- Scoped access to repositories
This ensures:
- API keys are never exposed in code
- Credentials remain secure
- Deployments are safe
5. Scalable Runners and Execution Environments
GitHub Actions supports multiple runners:
- ubuntu-latest (most commonly used)
- Windows and macOS environments
- Self-hosted runners for custom setups
This flexibility allows you to:
- Test cross-platform applications
- Use custom hardware or infrastructure
- Scale workloads efficiently
6. Centralized Automation Across Tools
In modern teams, development rarely happens in isolation.
You often use:
- GitHub (code repository)
- Jira (issue tracking)
- Slack (communication)
CI/CD pipelines act as the central automation layer connecting these tools.
For example:
- A pull request can trigger a workflow
- Workflow completion can update a Jira ticket
- Deployment status can be sent to Slack
This is where integration solutions like Getint become valuable.
Instead of manually syncing tools, Getint can:
- Automatically link pull requests to Jira issues
- Sync status updates across platforms
- Maintain visibility across cross-tool teams
This is especially useful for scaling teams where coordination becomes complex.
Understanding GitHub Actions CI/CD and why it’s widely used is critical before diving into implementation.
In essence:
- GitHub Actions gives you automation inside your repository
- CI/CD ensures your code is tested, validated, and deployed continuously
- Together, they form the backbone of modern software delivery
And when combined with integration tools like Getint, your pipeline evolves from just automation to a fully connected development ecosystem.
Step-by-Step: Setting Up a Demo GitHub Actions CI/CD Workflow
Now that you understand what GitHub Actions CI/CD is and why it’s widely used, let’s move into the practical part i.e. building a demo workflow from scratch.
This section will guide you through creating a fully functional CI/CD pipeline inside your GitHub repository. By the end, you’ll have a working workflow that:
- Runs automatically on every push and pull request
- Installs dependencies
- Executes unit tests
- Simulates a production-ready CI pipeline
Prerequisites
Before you begin, make sure you have:
- A GitHub repository (public or private)
- Basic project setup (Node.js, Python, Java, etc.)
- A working master branch
- Some sample source code and tests
For this demo, we’ll assume a simple Node.js application—but the same concepts apply to any tech stack.
Step 1: Prepare Your Repository
Your project should have a structure like this:
project/
├── src/
├── tests/
├── package.json
└── .github/
    └── workflows/
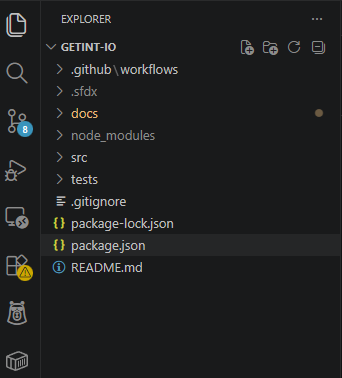
If the .github/workflows directory doesn’t exist, create it manually.
This is where your workflow file will live.
Step 2: Create Your First Workflow File
Inside .github/workflows, create a new file:
ci-demo.yml
This YAML file defines your GitHub Actions workflow.
Step 3: Define the Workflow Trigger
Every workflow starts with a trigger.
name: Demo CI Pipeline

on:
  push:
    branches: [ "master" ]
  pull_request:
    branches: [ "master" ]
What this does:
- Runs the workflow on every push to the master branch
- Runs on every pull request targeting main
- Ensures all code changes are validated
Step 4: Define a Job
Next, define a job that will run your pipeline:
jobs:
  build:
    runs-on: ubuntu-latest
Key Concepts:
- Job: A unit of work in your workflow
- runs-on: Specifies the environment (here, Ubuntu)
Step 5: Add Steps to Execute Tasks
Now we define the steps inside the job.
steps:
  - name: Checkout code
    uses: actions/checkout@v3
Why this is important:
This step pulls your repository’s source code into the runner so that subsequent steps can access it.
Step 6: Set Up Runtime Environment
For a Node.js project:
- name: Setup Node.js
  uses: actions/setup-node@v3
  with:
    node-version: '18'
This ensures your workflow uses the correct node version.
Step 7: Install Dependencies
- name: Install dependencies
  run: npm install
This step installs all required packages defined in your package.json.
Step 8: Run Unit Tests
- name: Run tests
  run: npm test
This is the core of your continuous integration pipeline.
Every time code changes:
- Tests are executed
- Failures stop the pipeline
- Bugs are caught early
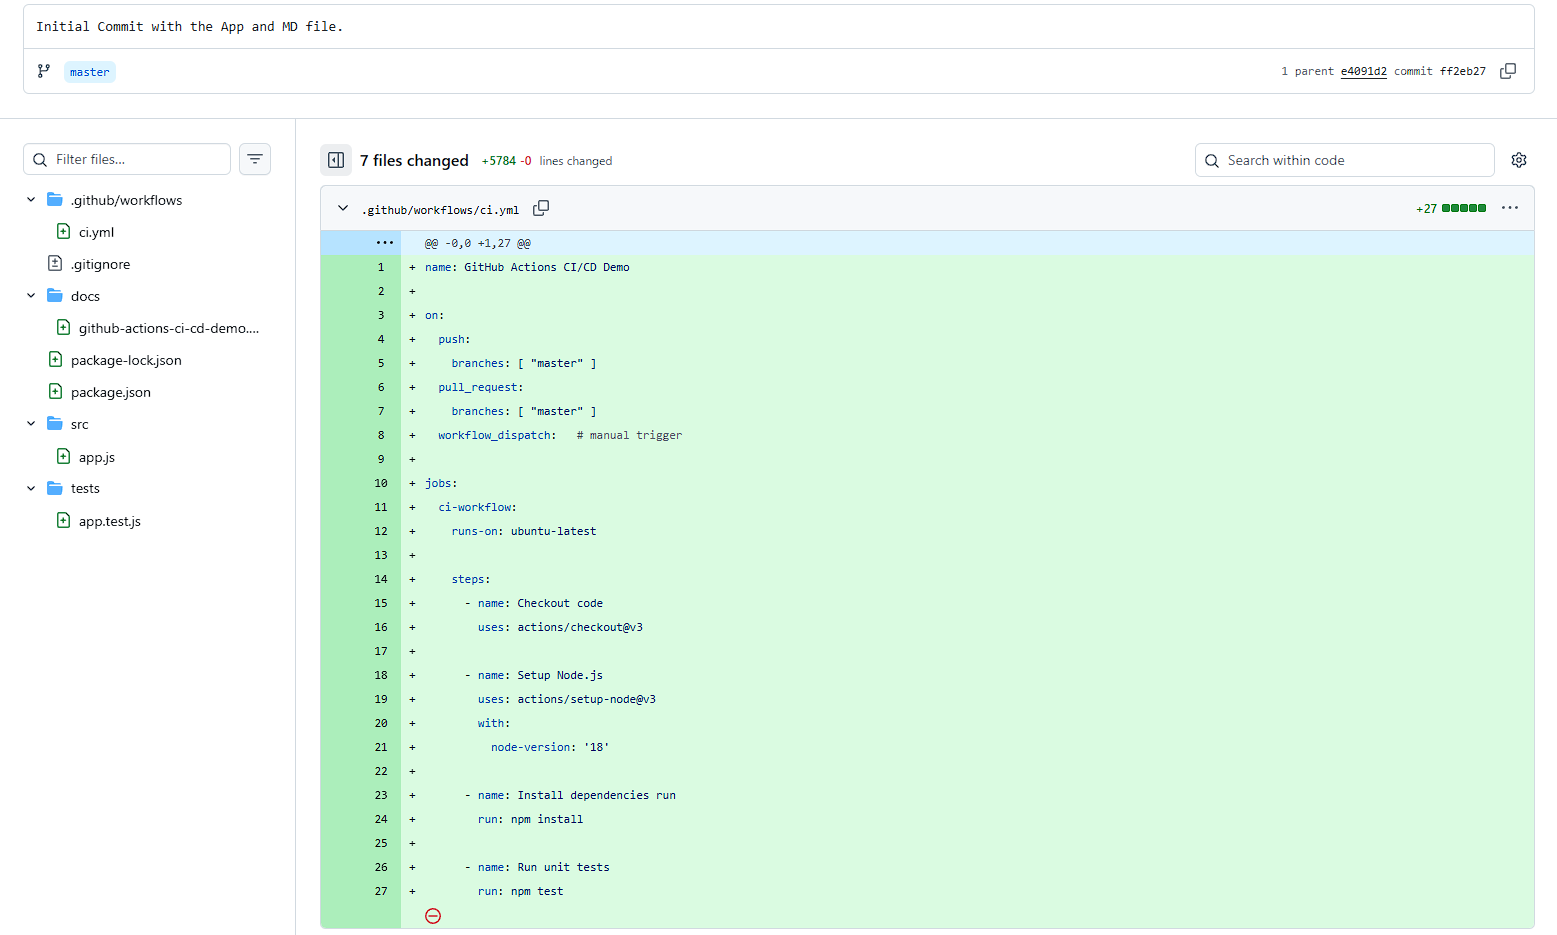
Step 9: Full Demo Workflow File
Here’s your complete working CI workflow:
name: GitHub Actions CI/CD Demo

on:
  push:
    branches: [ "master" ]
  pull_request:
    branches: [ "master" ]

jobs:
  ci-workflow:
    runs-on: ubuntu-latest

    steps:
      - name: Checkout code
        uses: actions/checkout@v3

      - name: Setup Node.js
        uses: actions/setup-node@v3
        with:
          node-version: '18'

      - name: Install dependencies
        run: npm install

      - name: Run unit tests
        run: npm test
Step 10: Commit and Push Your Workflow
Now add the workflow to your repository:
git add .github/workflows/ci-demo.yml
git commit -m "Initial Commit with the App and MD file"
git push origin master
Step 11: Watch Your Workflow Run
Once you push:
- Go to your repository
- Click on the Actions tab
- You’ll see your workflow running

Each workflow run shows:
- Job status
- Step-by-step logs
- Success or failure indicators
Step 12: Testing with a Pull Request
To fully validate your setup:
- Create a new branch
- Make a small code change
- Open a pull request
Demonstration
For this purpose, we will create an app.js file set-up a simple function that returns the sum of two numbers.
// .src/app.js
function sum(a, b) {
  return a + b;
}

module.exports = sum;
To validate this function, we write a test class.
// .tests/app.test.js

const sum = require('../src/app');

test('adds 1 + 2 to equal 3', () => {
  expect(sum(1, 2)).toBe(3);
});
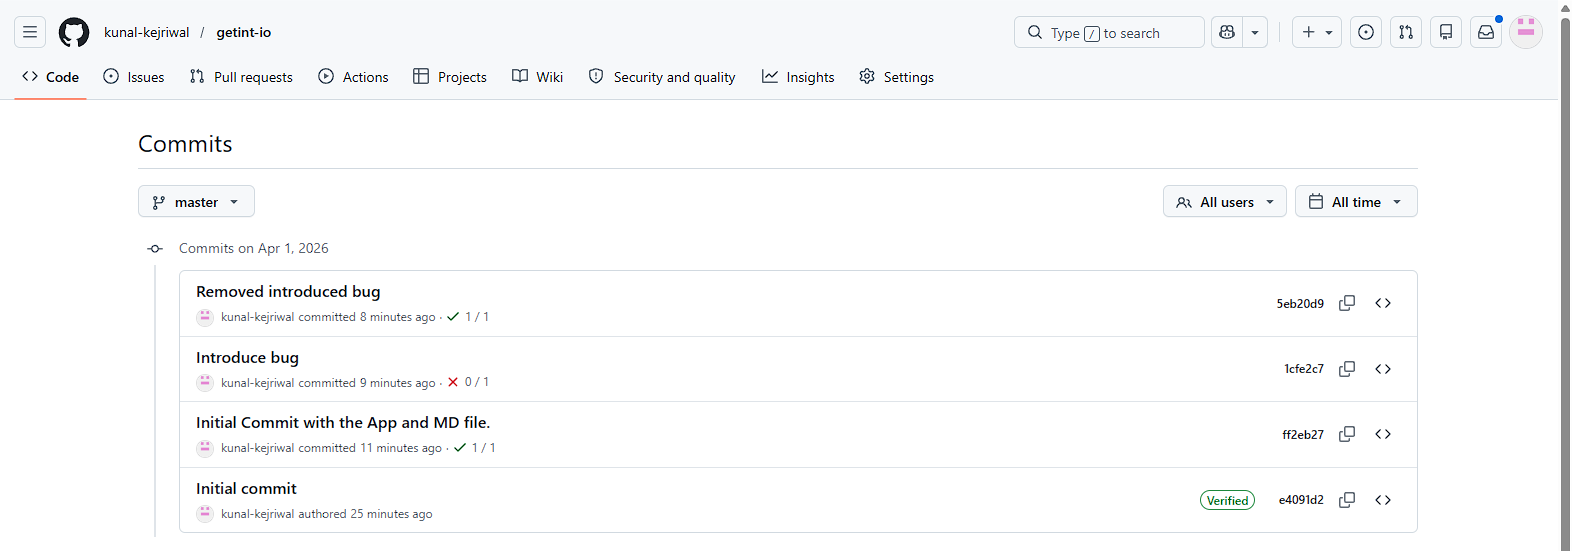
Once we have added the files, we committ them.
For our initial committ, our workflow will execute successfully since our test class validates the function for adds 1 + 2 to equal 3and expects our function to return the value 3.

Your GitHub Actions workflow will:
- Automatically trigger
- Run all steps
- Show status checks on the PR
This ensures only tested code gets merged into the master branch.
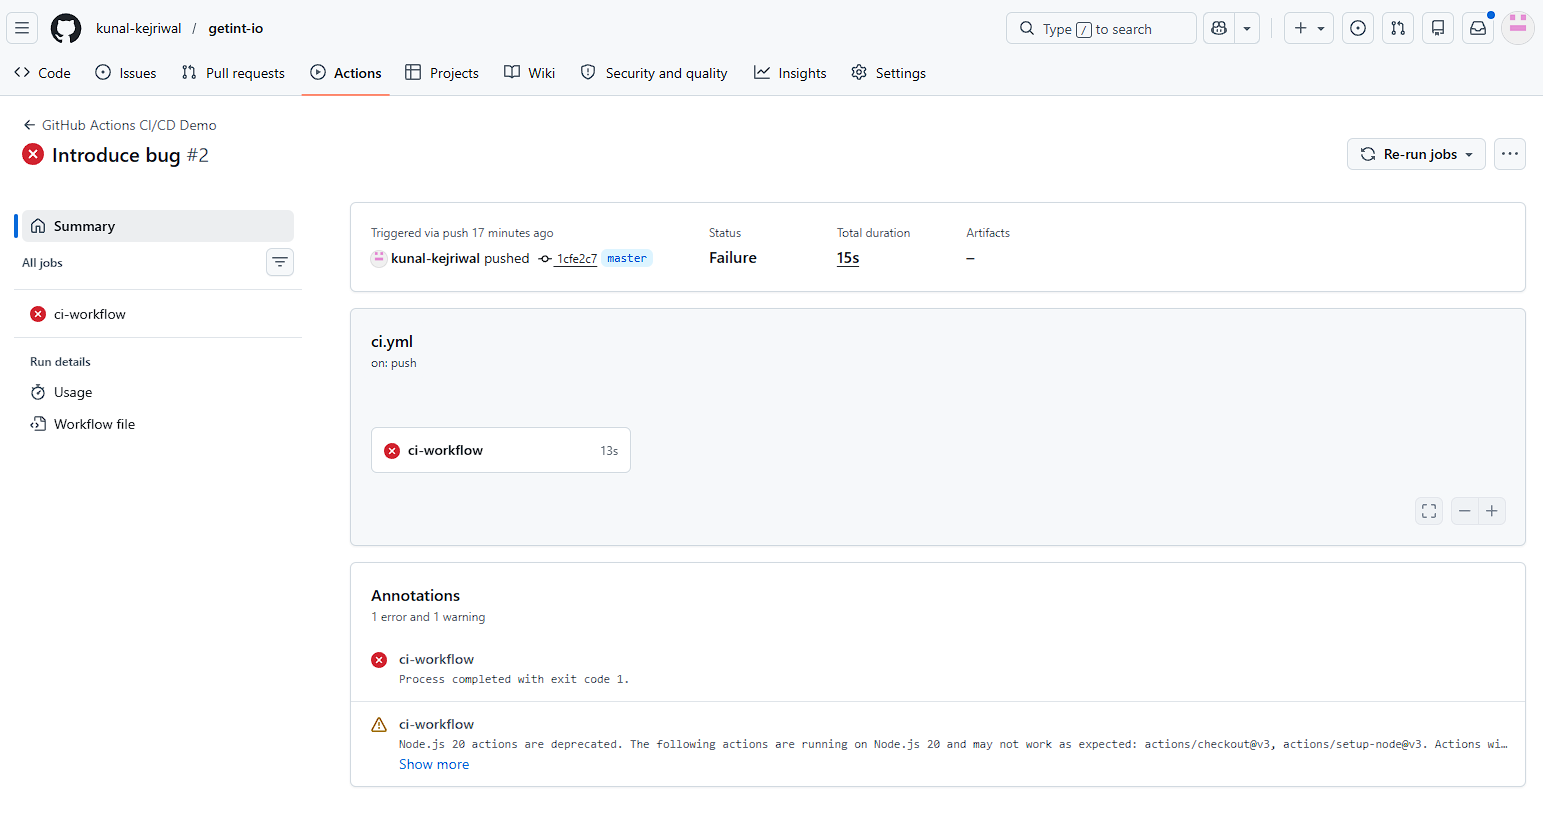
Now, let's introduce a bug to verify what happens when our test class fails.
Modify your app.js file.
// .src/app.js
function sum(a, b) {
  return a - b;
}

module.exports = sum;

In this case, our function will return the value of -1 while our test class expects 3. In this case, all the test classes will not pass. As a result, the workflow will stop executing, and your changes will not be merged.
Let's fix our function, commit our changes, and see whether the workflow executes?

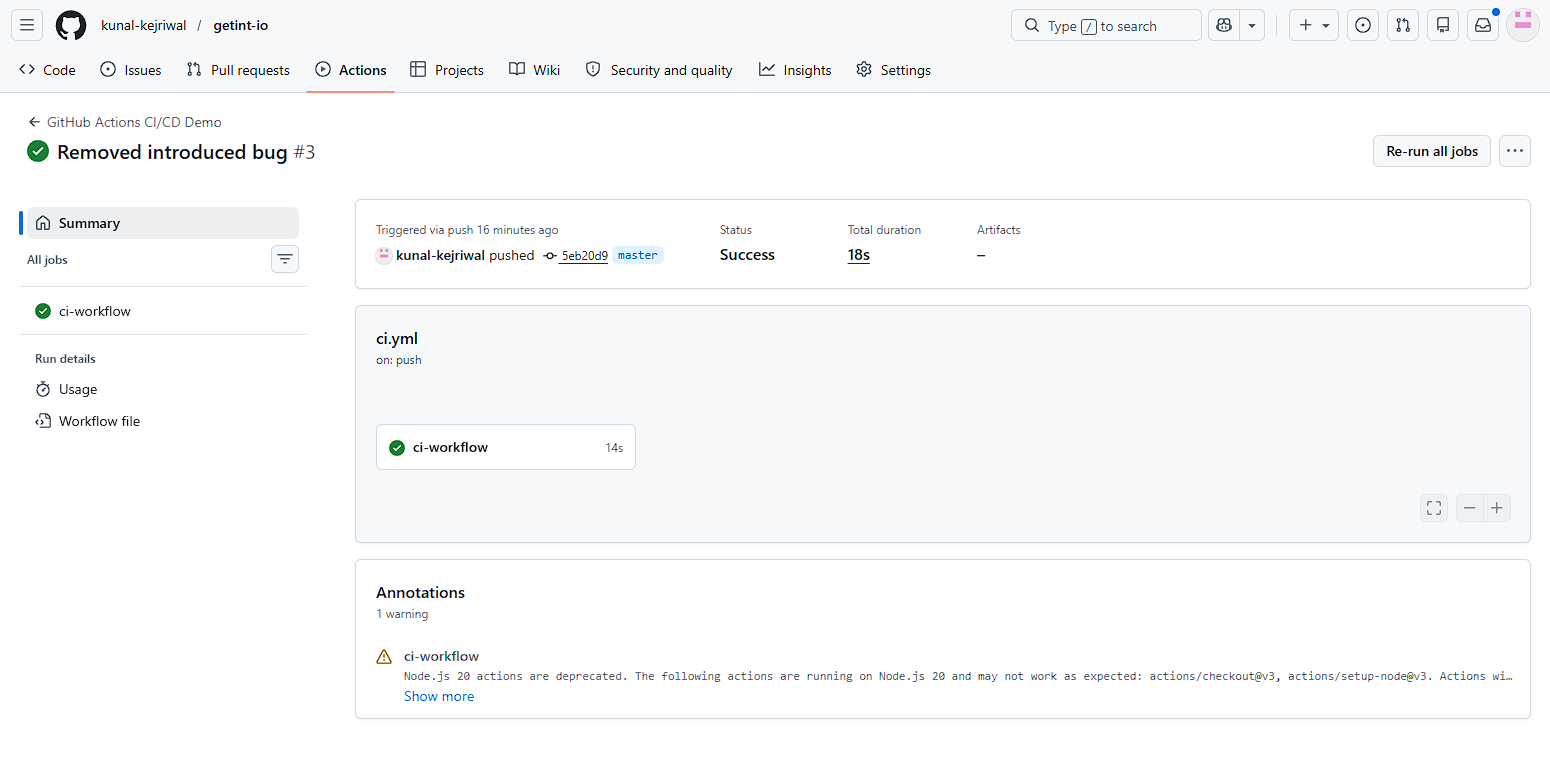
Step 13: What You’ve Built
With this demo, you now have:
- A working GitHub Actions workflow
- Automated CI pipeline
- Pull request validation
- Test execution on every code change
This is the foundation of any production CI/CD system.
What Happens After You Add the Workflow?
Once your workflow file is committed and pushed to your GitHub repository, the automation kicks in immediately. Every push to the master branch or any new pull request triggers a workflow run. Within a few seconds, GitHub spins up a runner (typically ubuntu-latest), checks out your source code, installs dependencies, and executes your defined steps.
You can monitor this in real time from the Actions tab, where each workflow run provides detailed logs for every step. This visibility is crucial—it helps you debug failures, optimize performance, and ensure your CI pipeline is reliable.
If a test fails, the workflow stops, and the pull request is marked with a failed status. This acts as a quality gate, preventing unstable code from being merged. Over time, this creates a strong engineering discipline where every code change is validated automatically.
You can also re-run failed jobs, inspect logs, or extend your workflow with additional steps like linting, security checks, or build artifacts. What starts as a simple demo quickly becomes a scalable CI/CD foundation that evolves with your project.
What’s Next?
This demo is intentionally simple — but in real-world scenarios, you’ll extend it by:
- Adding Docker build and push steps
- Implementing continuous delivery pipelines
- Using GitHub Secrets for secure deployments
- Splitting workflows into multiple jobs
Think Beyond Just CI: Streamline Your CI/CD Across Tools with Getint
Even at the demo stage, it’s worth thinking about how your workflow connects with the rest of your development ecosystem.
For example:
- Can your pull request automatically update a Jira ticket?
- Can deployment status sync with your project management tool?
As your CI/CD pipeline grows, managing workflows across multiple tools like GitHub, Jira, or Azure DevOps — can become complex.
That’s where Getint comes in by enabling, for example, GitHub Jira integration.
Instead of manually updating tickets or tracking pull request progress, Getint automatically syncs your GitHub Actions activity with your project management tools. This means:
- Pull requests linked to Jira issues in real time
- Workflow status updates reflected across platforms
- Better visibility for both developers and non-technical teams
If you're building production-ready CI/CD pipelines, it’s not just about automation — it’s about connected workflows.
Kunal Kejriwal is a backend engineer and technical writer specializing in APIs, integrations, and scalable system design. He has hands-on experience building RESTful services using Java, Spring Boot, Python, and Django, along with deploying cloud-native applications on GCP. His writing focuses on breaking down complex architectures into clear, practical insights that developers can apply in real-world systems.