If your support team lives in Salesforce and your developers live in Azure DevOps, every escalated bug or feature request has to cross that gap somehow. Most often, it crosses manually — a support rep copies case details into a new Azure DevOps work item, or pings a developer on Slack to ask what changed, then updates the case by hand once someone finally replies.
That handoff is where customer context gets lost. This guide walks through why teams connect Azure DevOps and Salesforce, how basic automation differs from two way sync, and how to set up a working Azure DevOps Salesforce integration using Getint — covering account setup, field and status mapping, and a few operational details that are easy to miss on a first pass.
Azure DevOps and Salesforce at a Glance
Azure DevOps is where development actually happens — work items (bugs, tasks, user stories, features) tracked through Azure Boards, tied to pull requests, feature branches, and pipelines all the way to major releases. Salesforce, as the CRM backbone for sales and support teams, organizes customer data through objects like Cases, Accounts, Opportunities, Leads, and even Ideas for feature suggestions, giving support teams a single place to manage customer interactions and escalate cases when something needs engineering attention.
In practice, the two rarely overlap on their own: Salesforce is where the customer relationship lives, Azure DevOps is where the fix actually gets built for the customers depending on it.
Why Azure DevOps and Salesforce Integration Matters
A support team can only be as fast as the information they can see.
Without a connection between the two systems, a support agent escalating a bug has no visibility into whether a developer even picked it up, let alone how close it is to shipping. Developers, in turn, get incomplete bug reports without the customer or account context that would help them prioritize.
Integrating Azure DevOps and Salesforce closes that loop. A case escalated in Salesforce becomes a work item in Azure DevOps automatically, and updates — status changes, comments, attachments — flow back to the case without either team switching tools or chasing the other for an update.
Common Challenges When Azure DevOps and Salesforce Are Not Connected
The same friction points come up again and again in support-to-dev handoffs:
- Manual case-to-work-item creation. A support agent has to recreate every escalated case as a new Azure DevOps work item by hand, retyping details that already exist in Salesforce.
- No visibility into development status. Support agents can't tell a customer when a fix is coming because they have no window into Azure DevOps — they have to ask, and wait.
- Lost context on escalation. Reproduction steps, customer account details, and prior interactions often don't make the trip from Salesforce to Azure DevOps, so developers end up asking the same questions support already answered.
- Duplicate tracking. Without a sync, teams sometimes track the same issue in both systems independently, and the two versions quietly drift out of alignment.
None of this means either tool is doing something wrong — it's simply what happens when a support team and a development team operate in separate systems with no bridge between them.
What Two-Way Sync With Getint Actually Means
The core of this integration is continuous, bidirectional synchronization — not a one-time handoff, but a connection that keeps a case and its linked work item aligned for as long as both stay open.
A few things define what that looks like in practice:
- The whole lifecycle stays connected, not just the creation moment. Once a case creates a work item, every subsequent status change, comment, attachment, or custom field update keeps flowing in both directions as the two records evolve — not only at the point they were first linked.
- No-code configuration, end to end. Connecting accounts, mapping work item types to Salesforce objects, matching fields and statuses, and setting sync direction are all handled through a visual interface. Nothing here requires writing or maintaining scripts.
- Direction and scope are controllable per field. Not everything has to sync both ways — you can set individual fields, statuses, or comment types to flow one direction only, and filter which items are included at all.
- The same setup scales without starting over. Once one Azure DevOps project–Salesforce org pairing is configured well, it can be duplicated for additional teams rather than rebuilt.
The result is a sync that keeps working as the relationship between a case and a work item changes over time, configured by whoever owns the workflow rather than whoever can write a script.
If your Salesforce admins already use Salesforce Flow to trigger actions inside Salesforce itself — internal notifications, approval steps, and so on — this sync runs alongside that, not instead of it; the two operate at different layers.
How Azure DevOps Work Items Map to Salesforce Cases
Taking into account fundamentals, Azure DevOps organizes work through work item types — Bug, Task, User Story, Feature, Epic — while Salesforce organizes customer interactions through the Case object (and, depending on your setup, related objects like Account or Opportunity for feature requests tied to a deal).
- Type mapping decides where each item lands: an escalated bug case typically routes to an Azure DevOps Bug or Task, while a feature request tied to a sales opportunity might route to a User Story or Epic instead.
- Field mapping then keeps the details attached to that item consistent — case subject to work item title, description, priority, and any custom fields that both platforms track, including Azure DevOps fields like Area Path or Iteration Path where a matching custom field exists on the Salesforce side.
- Status mapping is a special case worth calling out on its own: Azure DevOps states and Salesforce case statuses rarely line up one-to-one, and a well-built integration lets you map several source statuses onto a single target status where the two systems' workflows don't cleanly correspond.
If a case and a work item already exist separately for the same issue, look for a way to link cases to existing work items rather than syncing a fresh one — this avoids creating duplicates of something that's already being tracked on both sides.
Both platforms also have their own extension ecosystems — Azure DevOps through its Marketplace, and Salesforce through the Salesforce AppExchange — but neither solves the sync problem between the two on its own; that's what an integration platform like Getint is built to do when you want to integrate Salesforce with Azure DevOps directly, without the need to involve developers for code-based actions.
Enterprise Security for Your Azure DevOps and Salesforce Data
Syncing support cases into a development tracker means customer data — account details, descriptions, attachments — is moving between systems continuously. For most organizations, that's the first question before rollout: is the connection itself secure?

- Certified compliance. Getint is ISO 27001 and ISO 27018 certified, SOC 2 Type II audited, and GDPR compliant, independently verified through Getint's Vanta Trust Center.
- Encryption in transit and at rest. Data moving between Azure DevOps and Salesforce is encrypted using TLS 1.2/1.3, with AES-256 encryption for data and logs at rest.
- Flexible deployment. Getint can be deployed on-premise, as SaaS on AWS, or in a private cloud with EU or US tenants, with configurable log retention or none at all.
- Controllable access. Secure, revocable API keys and role-based access control mean you decide exactly what syncs and who can manage the connection.
Full details are on the Getint Data Security page and the Trust Center.
How to Integrate Salesforce and Azure DevOps: Step-by-Step with Getint
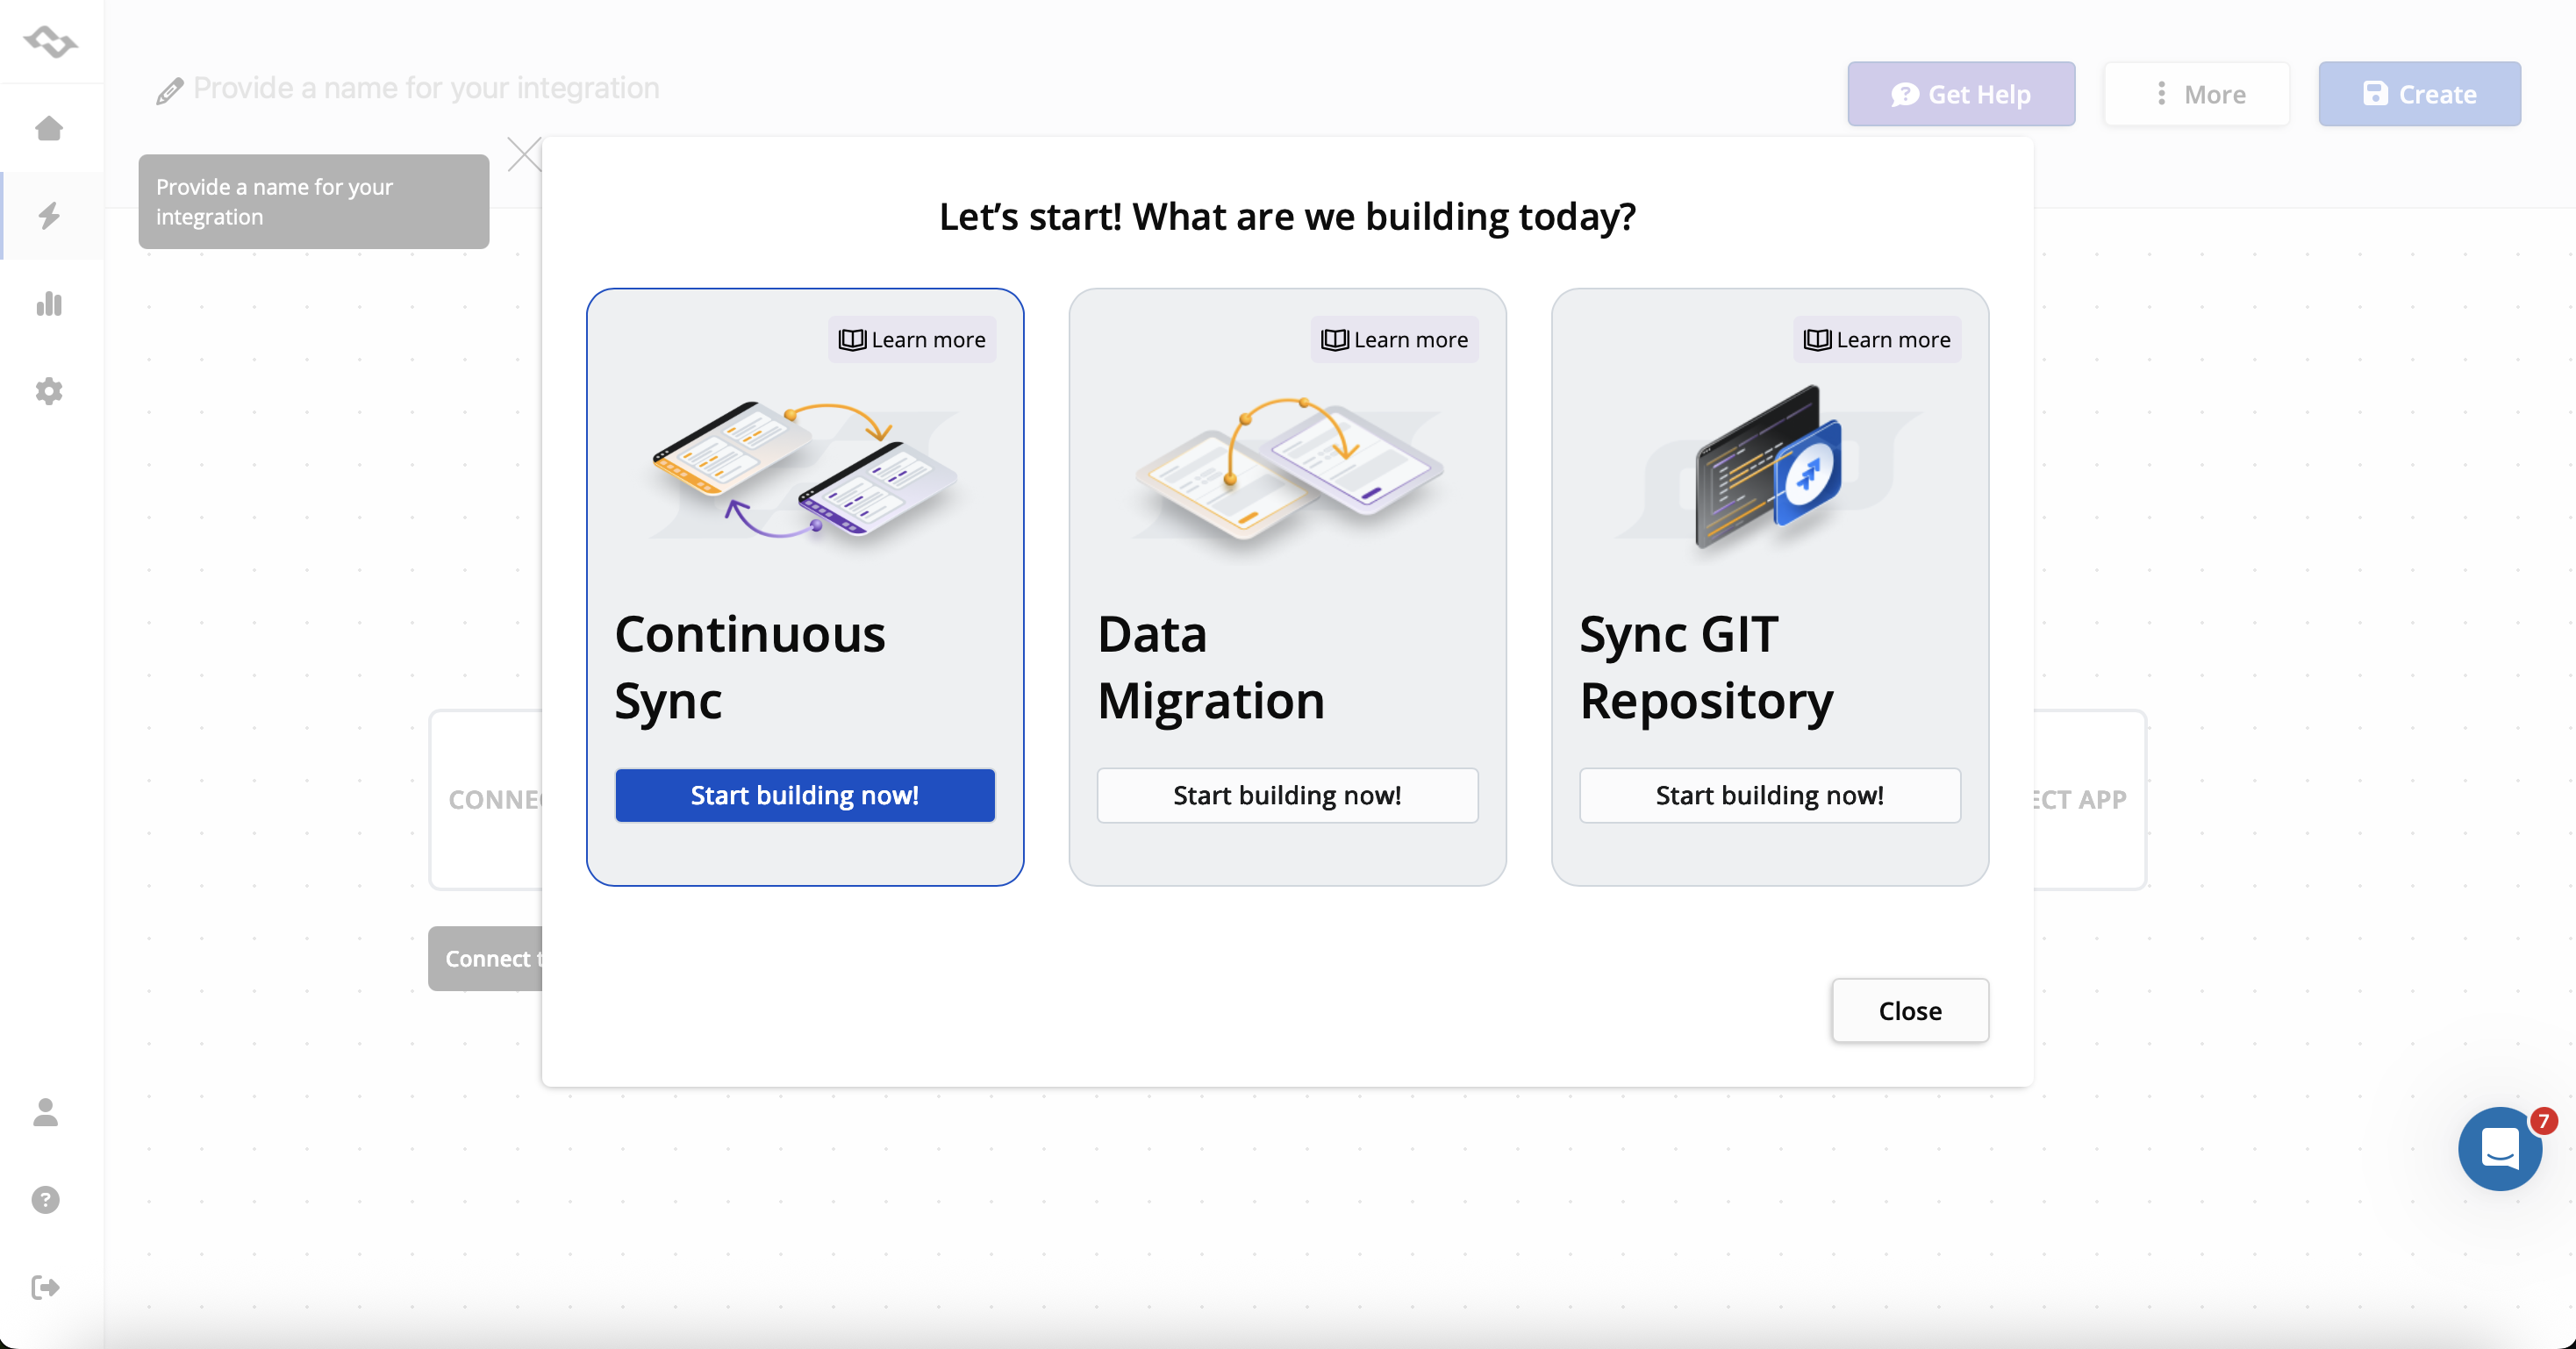
Here's how the connection comes together in Getint platform, end to end.
Step 1: Generate an Azure DevOps Personal Access Token
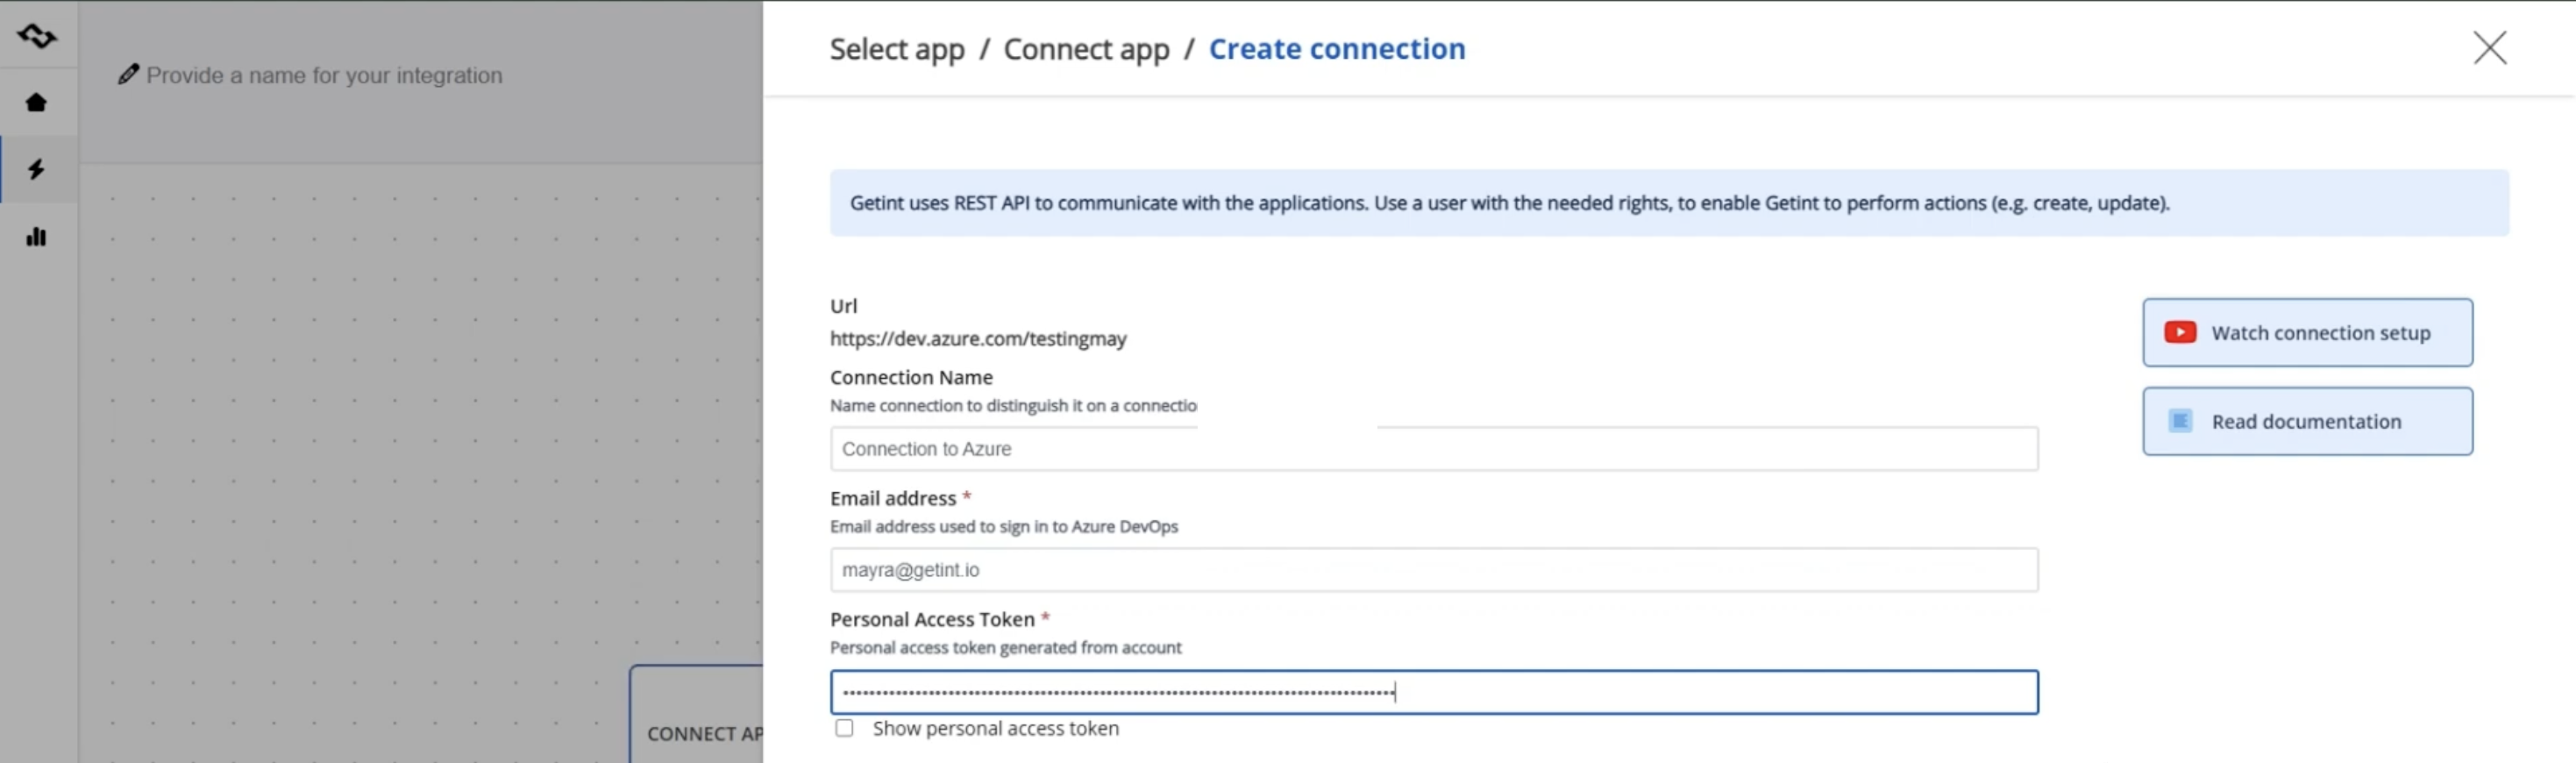
- In your Azure DevOps organization, open User Settings and select Personal Access Tokens, then New Token.
- Give it a name and expiration date, and select the scopes Getint's documentation recommends for your setup — Work Items, Project and Team, Graph, and Code (if you're also syncing repository data).

- Copy the URL of your Azure DevOps organization and the token itself; you'll enter your account email plus this token as the password when connecting.
Step 2: Connect Salesforce via OAuth
Salesforce authenticates through OAuth rather than a static token, which means a short setup inside Salesforce before you come back to Getint:
- Follow the preparatory steps in our documentation to authorize the connection on the Salesforce side (scroll to the Salesforce part).

- Back in Getint, create the Salesforce connection and complete the OAuth flow. If you've connected Salesforce before, you can reuse an existing connection instead of authorizing again.
Step 3: Select Your Azure DevOps Project
With both accounts connected, choose the specific Azure DevOps project you want this integration to sync against.
Step 4: Map Work Item and Case Types
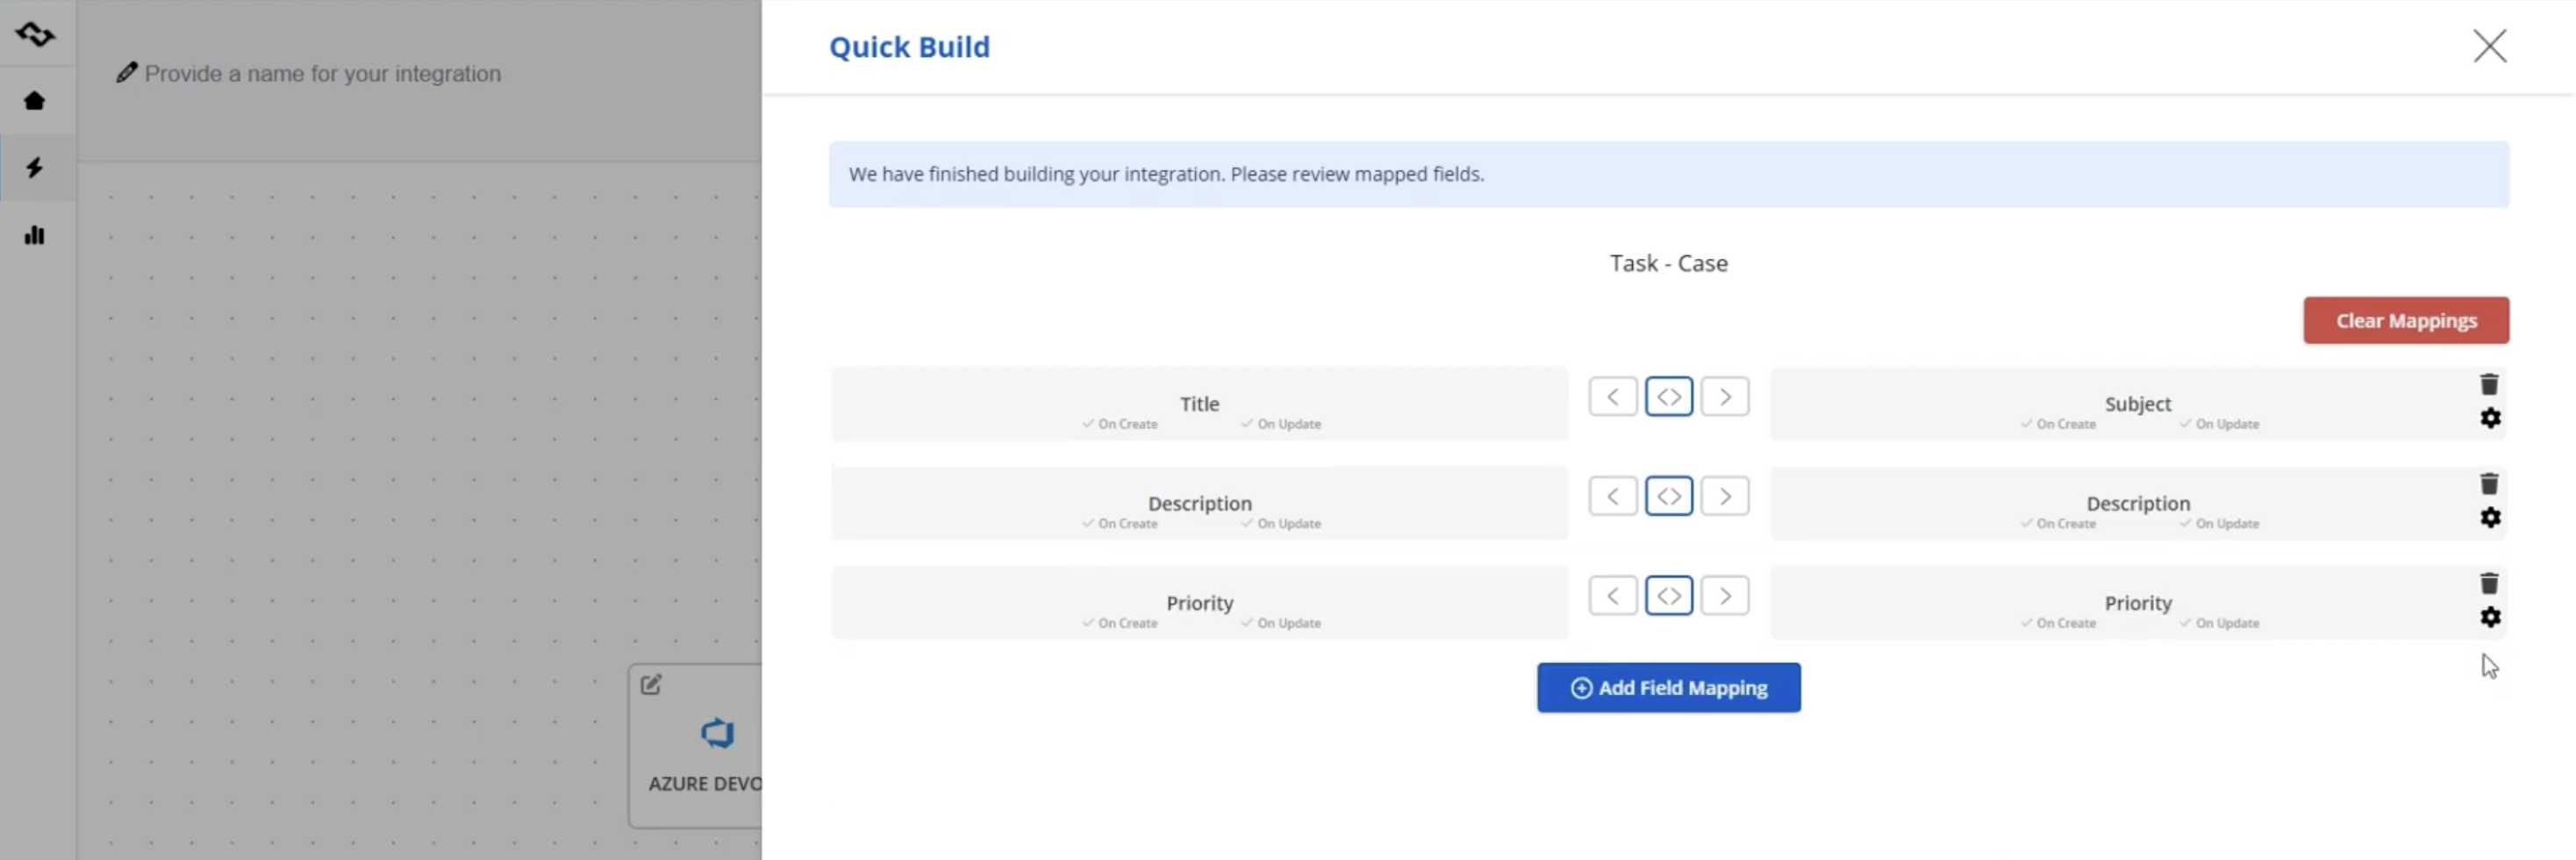
Use Quick Build to automatically map the minimum fields needed for the integration to work — Getint will match, for example, Task to Case along with a starting set of fields. Some auto-mapped fields may show an alert if they're read-only on one side; simply remove those, since a read-only field can't accept synced values. From here you can also add additional field mappings manually and choose which direction each one flows.
Step 5: Map Custom Fields and Set Direction
Click into a work item to add more fields from either side. For fields with different value sets between systems — Priority is a common example, since Azure DevOps often uses numbers where Salesforce uses labels — map values one to one, and where a value on one side doesn't have a clean equivalent, you can map two source values to the same target value rather than leaving it unmapped. Each field mapping can also have its own direction, so not everything has to flow both ways.
Step 6: Map Statuses
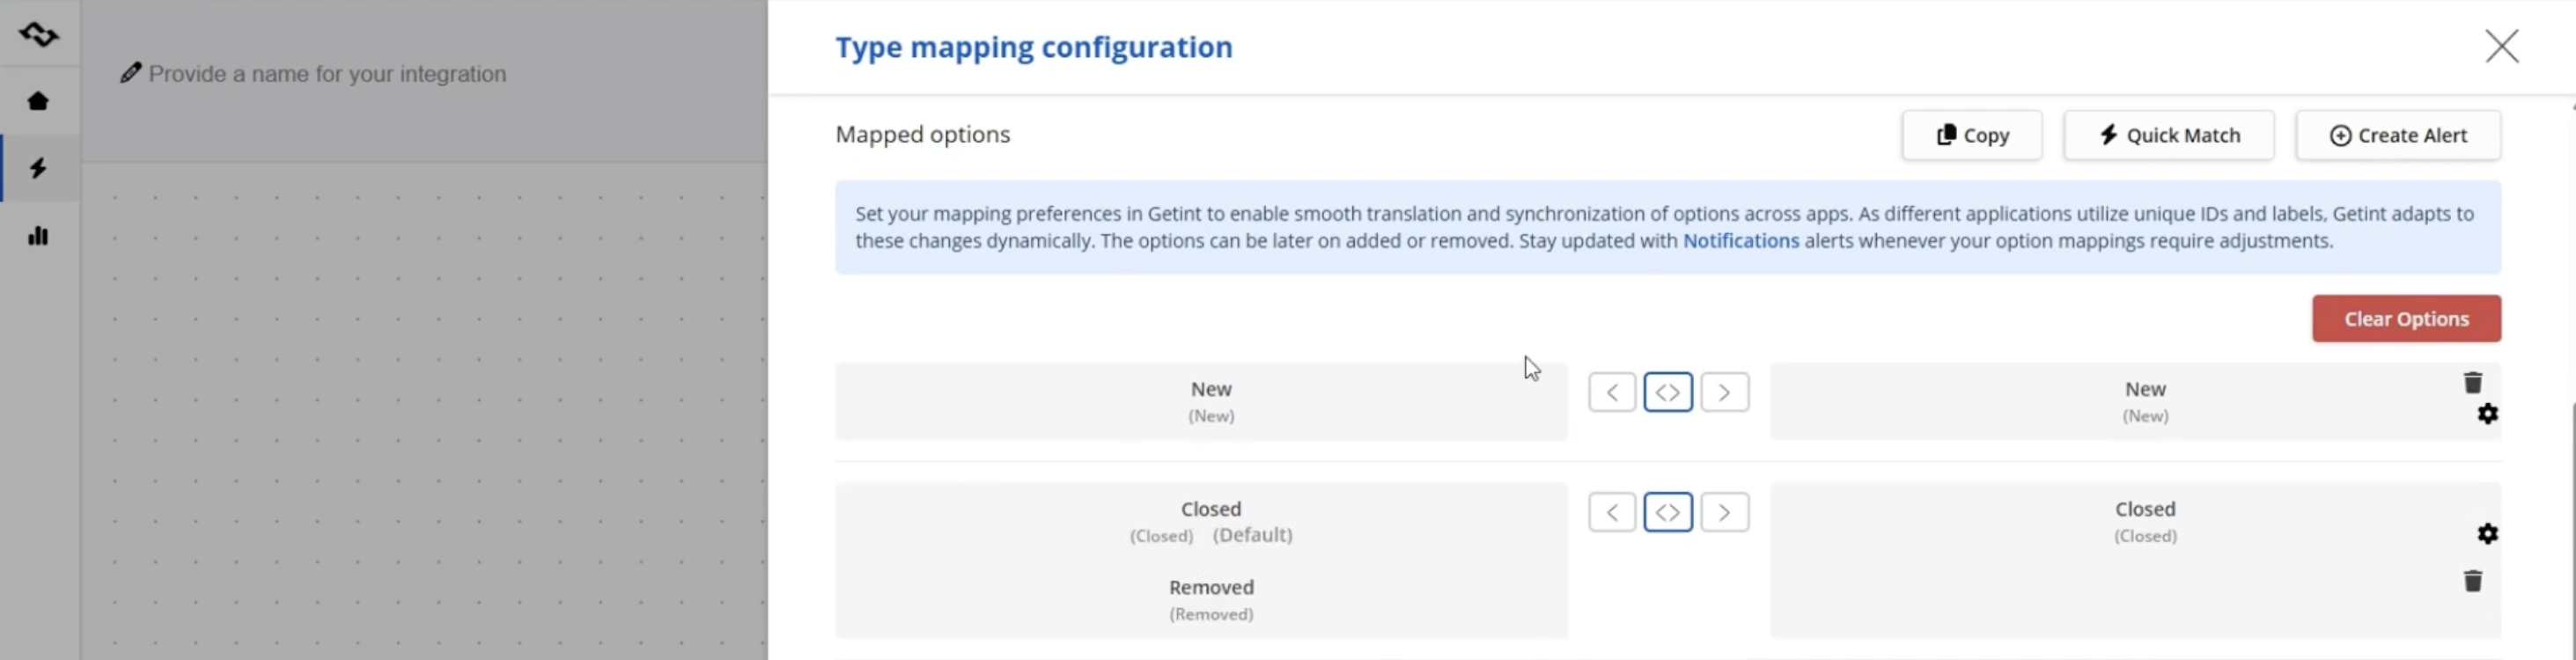
Azure DevOps states and Salesforce statuses get matched next. Quick Build typically pairs the obvious ones automatically (New, Closed), but you'll want to check the rest — mapping Active to Working, for example — and, as with custom fields, you can map more than one source status to a single target status where needed. Direction is configurable here too, in case you only want status changes to flow one way.
Step 7: Configure Comments and Attachments
Turn on comment and attachment sync, choosing one direction or both. You can filter which comments sync based on specific attributes rather than syncing everything.
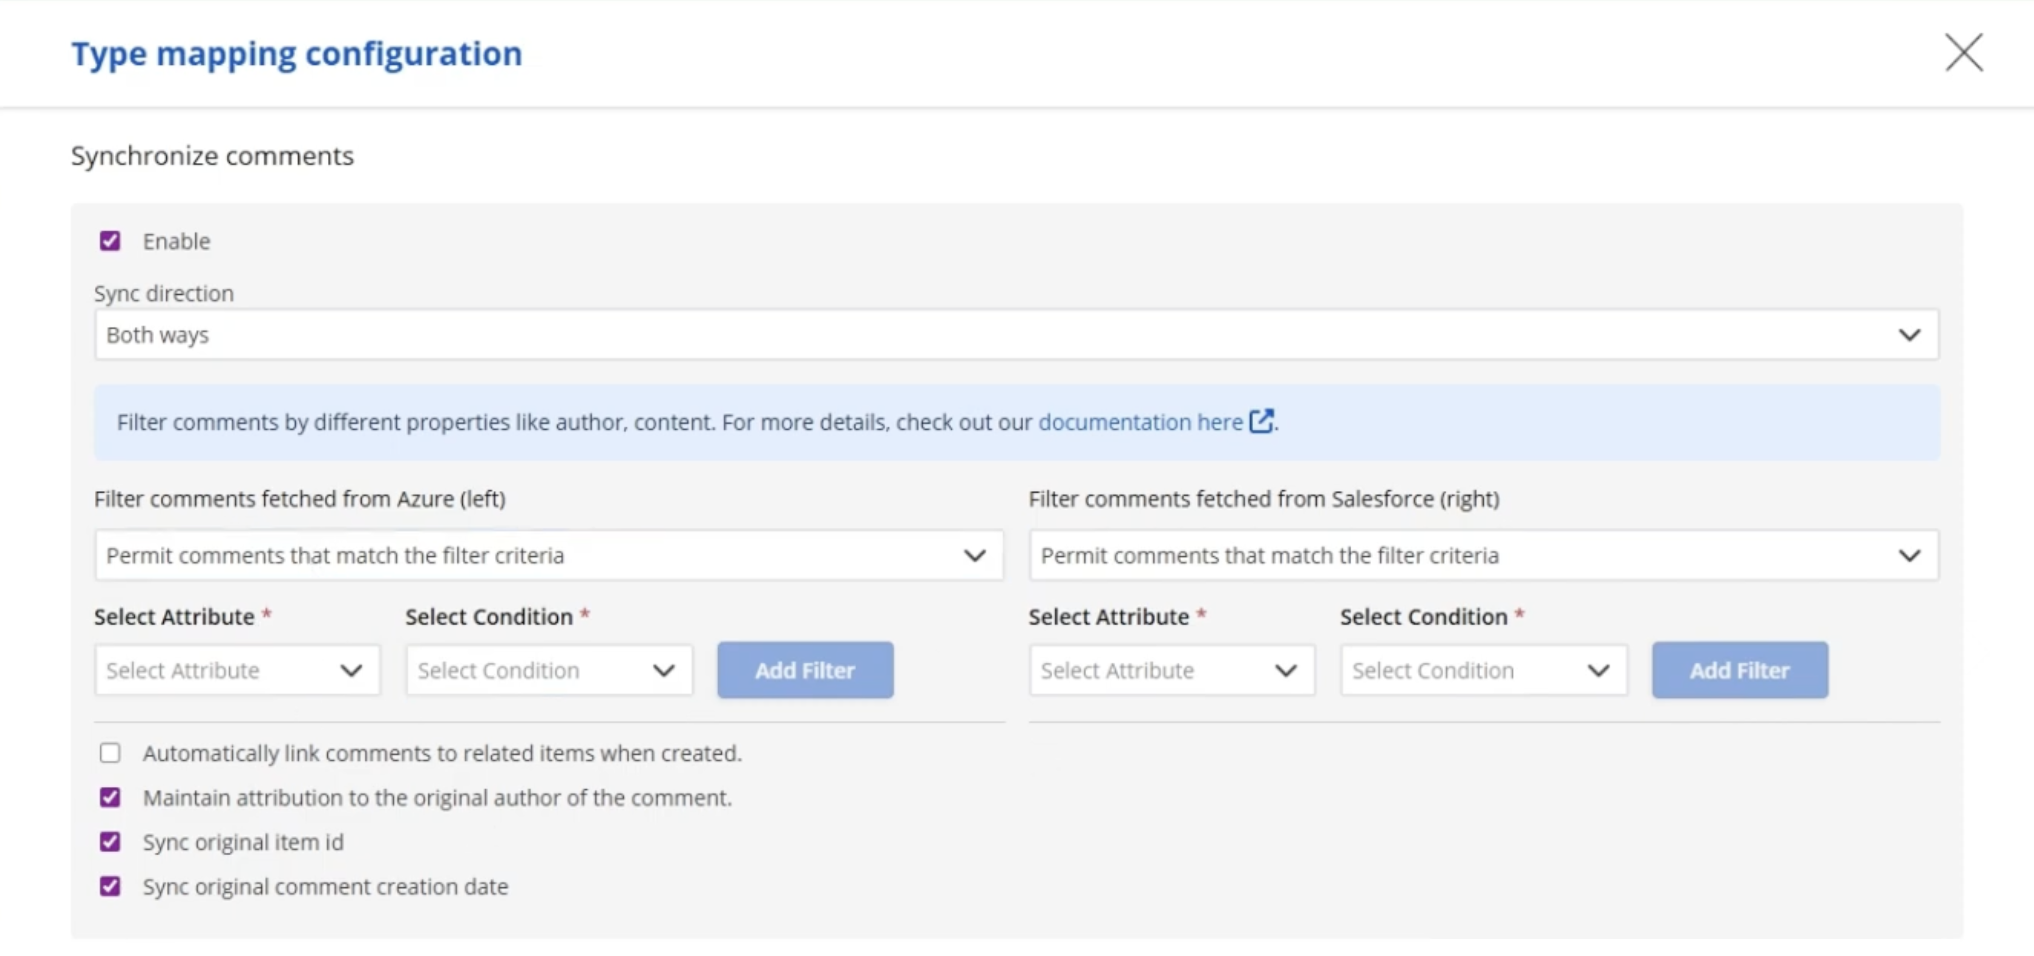
One important nuance to plan around: public and Chatter comments in Salesforce don't sync to Azure DevOps the moment they're posted — Salesforce doesn't trigger an event for a comment alone. The sync fires on the next update to another field on the case (a status change, for instance). If you're testing the integration and a comment doesn't appear to have synced yet, that's usually why — trigger an update to something else on the item and it will come through.
Step 8: Apply Filters and Save
Before saving, decide whether you want every item syncing or only a subset. Filters can apply to All items, New items, or already Synced items separately — for example, only syncing Azure DevOps items with a specific tag, or Salesforce cases matching a given field value. Name the integration and save it.

Step 9: Monitor Sync Runs
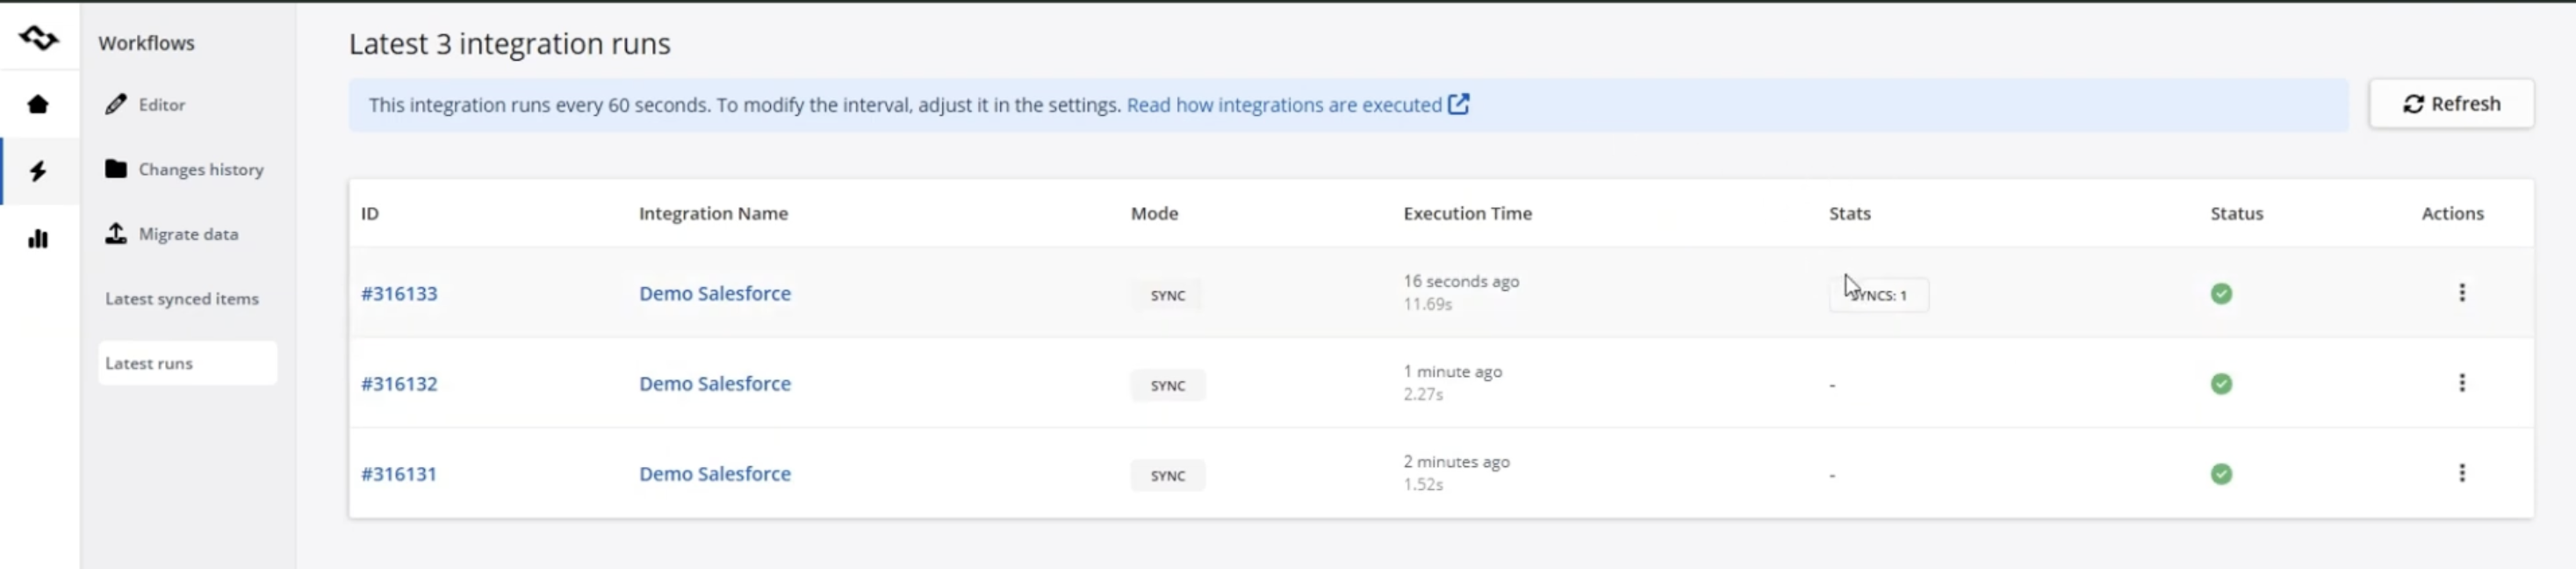
Once live, check the Latest Runs view to confirm synchronization is working. Execution time differs by deployment: roughly 1 minute on-premise versus up to 3 minutes on SaaS. Each run logs the item IDs involved, which mode was used (create or update), and how long the sync took — useful for catching a misconfigured mapping before it affects more items.
Step 10: Duplicate the Setup to Scale
Managing more than one Azure DevOps project or Salesforce org? Use the duplicate option on an existing integration rather than rebuilding the mapping from scratch — swap in the new project or org and you're set.
Real-World Use Cases
There are multiple cases in which integrating Azure DevOps and Salesforce can help, depending on where a team feels the support-to-dev gap most:
Bug escalation from Salesforce to Azure DevOps. A support agent identifies a case as a bug and escalates it — a case escalation that, without integration, usually means retyping everything into a new work item. The integration automatically creates a corresponding Azure DevOps work item with the case details attached, and as developers update status or add Chatter posts and comments, that context flows back to the case, so agents can view work item status directly inside Salesforce without leaving it or asking a developer directly.
Feature request visibility across sales and product. Sales reps log feature requests as cases or Ideas (sometimes tied to an open opportunity). Synced into Azure DevOps as user stories, product and engineering get direct visibility into requests with business context attached, and sales gets notified through Salesforce once the related work item ships.
Support ticket routing for technical issues. Not every case needs engineering — but for the ones that do, escalating straight into an Azure DevOps work item, with support notes and priority already attached, avoids the round of clarifying questions that usually follows a bare bug report.
Across all three, the underlying reason teams integrate Azure DevOps and Salesforce is the same: give both functional teams — and the users on each side — the ability to see the status of work without asking the other team to stop and explain it.
Best Practices for ADO Salesforce Integration
- Sync what teams act on, not everything Salesforce tracks. Cases and the fields tied to escalation are usually the right scope — extending sync to every Salesforce object adds maintenance for little benefit.
- Agree on ownership before mapping statuses. Decide upfront whether Salesforce case status or Azure DevOps work item state drives the relationship, especially where the two don't map cleanly one-to-one.
- Account for the comment-sync trigger nuance early. If your team expects comments to sync instantly, the Salesforce Chatter/public comment behavior described above is worth explaining before go-live, not after someone reports a "broken" sync.
- Use filters to keep noise down. Tag-based or field-based filtering keeps low-priority items out of the sync entirely, rather than flooding both systems.
- Duplicate rather than rebuild. Once one Azure DevOps project–Salesforce org pairing works well, reuse that configuration for additional teams instead of starting over.
- Search the sync logs before assuming something's broken. Most "the sync didn't work" reports turn out to be a filter or a mapping worth double-checking in the run history, not a genuine failure — and teams that implement this habit early address problems in minutes instead of escalating them.
Conclusion
A well-built Azure DevOps Salesforce integration closes the gap between the team that owns the customer relationship and the team that owns the fix. Support agents stop chasing developers for status, developers stop working from incomplete bug reports with no file attachments or context, and the case and the work item stay aligned automatically as both move forward. Whether you frame it as an Azure DevOps Salesforce integration or a Salesforce Azure DevOps integration, the goal is the same solution: one accurate record of the issue, visible from either tool.
Getint sets this up without scripting — no-code account connections, visual field and status mapping, and a live sync you can watch run in the dashboard from the first test item. If your integration needs extend beyond these two tools, Getint also supports connecting different Salesforce instances, Jira and Salesforce, Azure DevOps and Jira, Salesforce Zendesk, and many more using the same underlying approach.