Run GitLab CI long enough and you’ll inherit one of these: a deploy.sh script that nobody wants to touch, a runner with a cluster credential nobody remembers issuing, a kubectl apply -f step that someone wrote on a Friday in 2021 and quietly hoped never had to be rewritten. The pipeline is in the repository. The trust in it isn’t.
I’ve rebuilt this exact shape three times in the last year. The pattern that survived all three is the one in this post. Pull the cluster connection out of CI variables, hand it to the GitLab Agent, let Helm run the deploy, gate production behind a human, and make the merge request the single place where a release is actually auditable. The walkthrough below is that setup, distilled.
A pile of “GitLab CI/CD pipeline for Kubernetes” tutorials end at a hello-world .gitlab-ci.yml. The YAML is the easy part. What bites in real production is the connection to the cluster, the container registry login, the deploy variables that drift between environments, and the multi-team reality of who owns what. This piece is about those four.
The walkthrough covers:
- the prerequisites for a real GitLab CI/CD pipeline for Kubernetes
- connecting GitLab to your Kubernetes cluster with the GitLab Agent
- the build, push, and deploy stages, plus a copyable .gitlab-ci.yml
- environments, deploy variables, and a manual gate on production
- the operational stuff at scale: caching, runners, multi-team templates
- keeping delivery teams in sync across GitLab, Jira, and Azure DevOps
Every command in this GitLab CI/CD walkthrough is sourced from the current GitLab and Helm docs and tested in a working setup. Treat the YAML as a starting point, configure it for your stack, and sharpen the parts that need tightening.
What “production-ready” actually means here
A lot of guides skip this section because it sounds boring. But the choices you make right here are the ones that decide whether your continuous integration flow still works in six months when the original author has moved on and the cluster has been resized twice.
Whether you’re starting from a new project or layering this onto an existing Git repository, the walkthrough assumes:
- A GitLab project with a Dockerfile at the root, hosted on GitLab.com or a Self-Managed instance. Either works.
- A working Kubernetes cluster you can already reach from your local machine with kubectl. The setup doesn’t care whether it’s EKS, AKS, GKE, DigitalOcean, k3s on a small app server, or bare-metal kubeadm. I’ve shipped this same shape on all of them.
- A Helm chart that describes your app, either in charts/ in the same repository or in a chart registry. If you haven’t got one yet, the Helm 3 quickstart walks you to a working Chart.yaml in about ten minutes.
- A GitLab Runner available to your project. Shared runners on GitLab.com are free within your tier’s quota and fine for getting started. Self-hosted is what you want as soon as build times or compliance push you off shared.
- kubectl, helm, and Docker installed locally for the one-time bootstrap.
Versions used in this post: GitLab 19.0 (which supports Kubernetes 1.33 through 1.35), Helm 3, and alpine/k8s:1.34.7 for the deploy job’s image. If you’re on an older GitLab version and the Agent option is missing from the UI, upgrade first. Layering a modern pipeline on top of a half-built cluster is probably the most reliable way to spend a weekend debugging certificate errors.
Connecting GitLab to your Kubernetes cluster
This is the part that’s changed the most in the last few GitLab releases, and it’s where most “I followed a 2022 tutorial” pain starts. So let’s get it right once.
Why the GitLab Agent replaced the old KUBECONFIG approach
For years, the default way to deploy from GitLab CI was to stuff a KUBECONFIG file into a CI/CD variable, mount it inside the job, and let kubectl reach the cluster API outbound. It works. But it also means a long-lived cluster credential lives in your project variables, anyone with maintainer access can read it indirectly, and rotation is a manual mess.The first time you onboard a security reviewer with real Kubernetes experience, this is what they ask about.
The GitLab Agent for Kubernetes is the modern answer. It runs inside your cluster (the in-cluster component is called agentk), opens a bidirectional gRPC channel to the GitLab agent server (kas), and lets CI jobs talk to the cluster through that channel instead of via a stored credential. No inbound cluster firewall changes. No long-lived kubeconfig. Per-project authorization that you actually control. The design also fits real clusters that live behind NAT, behind a firewall, or in a private subnet, because the cluster opens the connection outbound rather than waiting to be reached.
A few things worth pulling out of GitLab’s own docs:
- One agent per cluster is the recommended pattern. Multi-tenancy gets handled inside that one agent rather than by running multiple.
- The Agent supports two workflows: GitOps with Flux (GitLab’s recommended approach for productiondeployments since 15.10) and CI/CD (push-based, which is what we use here). GitLab says directly that the CI/CD workflow has a weaker security model than GitOps. If you’re running real production deploys at scale, the realistic path is to ship the CI/CD setup first and migrate to GitOps once it’s working. The CI/CD version is plenty for most teams.
- The Agent is enabled on the Free tier, so this isn’t gated behind a paid plan.
Installing the agent
The install is a Helm chart plus a config file. The chart lives at gitlab/gitlab-agent. You create the agent configuration file in your repository first, then register the agent in the GitLab UI, and finally install it on the cluster.
Step 1. Drop the agent configuration file into your repo on the default branch:
.gitlab/agents/production/config.yaml
The agent name has to follow RFC 1123 DNS label rules: lowercase alphanumeric and - only, at most 63 characters, starts and ends with an alphanumeric. production, prod-eks, cluster-eu-west-1 all work. Production_EKS does not, and the error you get if you try is unhelpful.
Step 2. Inside that file, authorize which projects can use this agent:
ci_access:
  projects:
    - id: demo-corp/web-app
      environments:
        - staging
        - production
      protected_branches_only: true
      access_as:
        ci_job: {}
Details that matter here:
- environments: scopes the agent to jobs targeting those environments. Reduces blast radius when a non-prod jobgoes rogue.
- protected_branches_only: true (generally available in GitLab 17.10) only lets jobs from protected branches use this agent. Pair it with environment scoping and you have a clean perimeter without writing a single RBAC rule.
- access_as: ci_job: {} makes the agent impersonate the CI job’s identity in the cluster instead of the agent’s default service account. That’s the lever that lets you write per-environment, per-project RBAC inside Kubernetes itself.
Step 3. Once the config file is in the default branch, head to Operate > Kubernetes clusters in the GitLab UI.GitLab picks up the file automatically and lists the available configuration with a Register an agent button next to it.
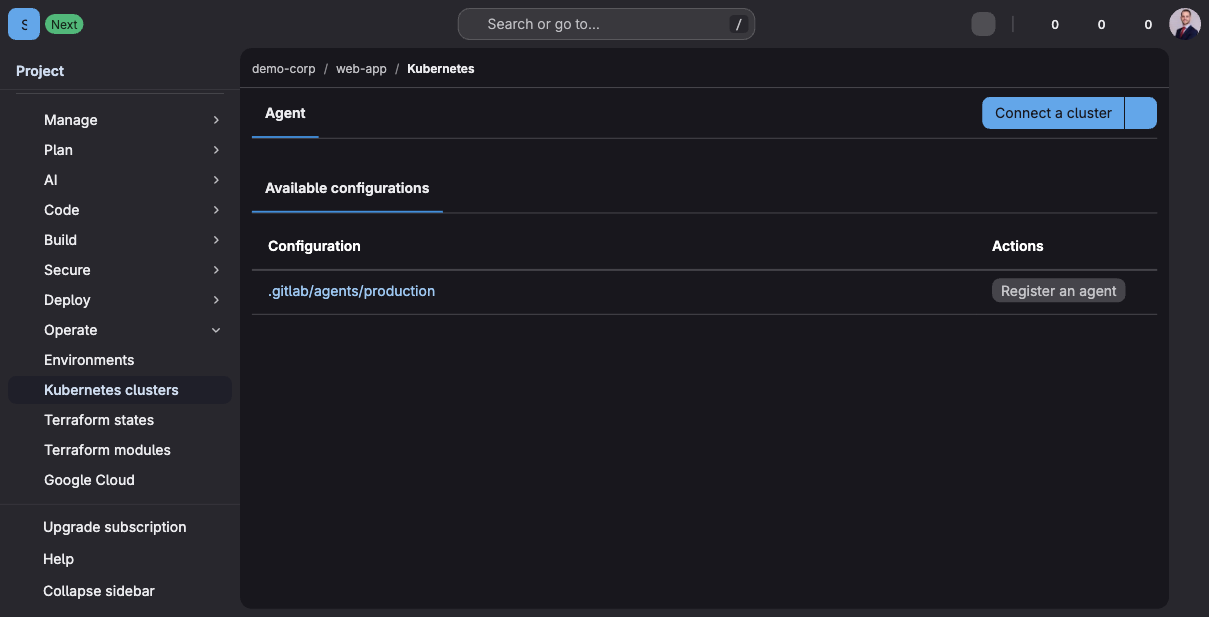
The Kubernetes clusters page after pushing .gitlab/agents/production/config.yaml. GitLab reads the file, lists the configuration, and offers a one-click register.
Click Register an agent, leave the name as production (it’s pre-filled from the config), then click Create and register. GitLab gives you the install command for the cluster, including the agent token that you’ll need for --set config.token:

The install dialog after registration. The token shows once. Copy it now or you’ll have to rotate it.
The command looks like this:
helm repo add gitlab https://charts.gitlab.io
helm repo update
helm upgrade --install production gitlab/gitlab-agent \
    --namespace gitlab-agent \
    --create-namespace \
    --set image.tag=<current-agentk-version> \
    --set config.token=<your-token> \
    --set config.kasAddress=wss://kas.gitlab.com
For Self-Managed Omnibus, the kasAddress is wss://gitlab.example.com/-/kubernetes-agent/.
One thing not to skip: by default the chart gives the agent a cluster-admin service account. GitLab’s own docs are explicit that this isn’t suitable for production. Override with --set rbac.useExistingRole=<your-role> and create a role with the minimum permissions the agent actually needs in your cluster. Five minutes of work that saves you a finding on the next security review.
Step 4. Verify the connection. Back in Operate > Kubernetes clusters, the agent shows up in the Project agents table with its name, an Agent ID, and a Configuration link back to the file you just pushed.

The agent registered against the project. Once agentk is actually running in the cluster, the Connection status flips from “Never connected” to a green Connected.
In my experience the two most common reasons the agent doesn’t flip to Connected are kasAddress pointing at the wrong host and the cluster’s egress rules blocking wss://. Both are quick to fix once you know to check them.
The pipeline structure: build, push, deploy
Here’s the full .gitlab-ci.yml for a build, test, deploy flow with the agent doing the cluster connection. I’ll walk through each block after the YAML.
stages:
  - test
  - build
  - deploy

default:
  image: docker:24.0.5-cli
  services:
    - docker:24.0.5-dind

variables:
  DOCKER_HOST: tcp://docker:2376
  DOCKER_TLS_CERTDIR: "/certs"
  IMAGE_TAG: $CI_REGISTRY_IMAGE:$CI_COMMIT_REF_SLUG
  KUBE_CONTEXT: demo-corp/web-app:production
  HELM_RELEASE: web-app
  HELM_CHART_PATH: ./charts/web-app

unit-tests:
  stage: test
  image: node:20-alpine
  cache:
    key:
      files:
        - package-lock.json
    paths:
      - node_modules/
  script:
    # Drop your real test script here (npm test, pytest, go test, ...)
    - npm ci
    - npm test  # running tests against the latest code changes

build-image:
  stage: build
  before_script:
    - echo "$CI_REGISTRY_PASSWORD" | docker login "$CI_REGISTRY" -u "$CI_REGISTRY_USER" --password-stdin
  script:
    - docker build --pull -t "$IMAGE_TAG" .
    - docker push "$IMAGE_TAG"
  rules:
    - if: $CI_PIPELINE_SOURCE == "merge_request_event"
    - if: $CI_COMMIT_BRANCH == $CI_DEFAULT_BRANCH

deploy-staging:
  stage: deploy
  image:
    name: alpine/k8s:1.34.7
    entrypoint: [""]
  script:
    - kubectl config get-contexts
    - kubectl config use-context "$KUBE_CONTEXT"
    - kubectl version --client
    - helm upgrade --install "$HELM_RELEASE-staging" "$HELM_CHART_PATH"
        --namespace staging
        --create-namespace
        --set image.repository="$CI_REGISTRY_IMAGE"
        --set image.tag="$CI_COMMIT_REF_SLUG"
        --atomic --wait --timeout 5m
  environment:
    name: staging
    url: https://staging.example.com
    deployment_tier: staging
  rules:
    - if: $CI_COMMIT_BRANCH == $CI_DEFAULT_BRANCH

deploy-production:
  stage: deploy
  image:
    name: alpine/k8s:1.34.7
    entrypoint: [""]
  script:
    - kubectl config use-context "$KUBE_CONTEXT"
    - helm upgrade --install "$HELM_RELEASE" "$HELM_CHART_PATH"
        --namespace production
        --create-namespace
        --set image.repository="$CI_REGISTRY_IMAGE"
        --set image.tag="$CI_COMMIT_REF_SLUG"
        --atomic --wait --timeout 10m
  environment:
    name: production
    url: https://www.example.com
    deployment_tier: production
  needs:
    - deploy-staging
  rules:
    - if: $CI_COMMIT_BRANCH == $CI_DEFAULT_BRANCH
      when: manual
That’s the whole CI/CD pipeline. Save it as .gitlab-ci.yml at the root of your repo and the rest of this section walks through it block by block. There’s a lot of YAML at first glance, but most of it is configuration you set once and never look at again.
The four jobs at a glance
GitLab renders the four jobs as a stage-based DAG, with deploy-production showing needs: deploy-staging as the link between the two deploy jobs:

The pipeline structure as rendered by the Build > Pipeline editor > Visualize tab. Useful as a sanity check before pushing, since it validates the YAML and shows the stage layout without having to run anything.
Stages and the default image
Three stages: test, build, deploy. Jobs run in parallel inside a stage; stages execute sequentially during pipeline execution. The default: block sets the image and the Docker-in-Docker service every job inherits unless it overrides. Defining the image once at the top means less duplication and one place to bump the version when deploying applications to a new cluster.
The DinD setup follows the GitLab pattern: docker:24.0.5-cli as the image, docker:24.0.5-dind as the service, with DOCKER_HOST and DOCKER_TLS_CERTDIR set as variables. Skip those two variables and the build fails with a TLS error that takes about an hour to track down. I have spent that hour, so you don’t have to.
Building and pushing to the GitLab Container Registry
The build-image job authenticates to the GitLab Container Registry using GitLab’s predefined CI/CD variables, builds the image with the commit’s ref slug as the tag, and pushes it. The auth command is the recommended pattern from the docs:
echo "$CI_REGISTRY_PASSWORD" | docker login "$CI_REGISTRY" -u "$CI_REGISTRY_USER" --password-stdin
--password-stdin keeps the password out of process listings. Don’t replace it with the older -p $CI_REGISTRY_PASSWORD form unless you enjoy security review feedback you could have avoided.
Two more details worth flagging:
- $CI_COMMIT_REF_SLUG is the right variable for the tag, not $CI_COMMIT_REF_NAME. The plain ref name can contain forward slashes (a branch like feature/auth-rewrite), which are illegal in image tags. The slug version strips them.
- docker build --pull re-pulls the base image every build. It’s a few seconds slower per job, but it kills the “works on my machine, fails on the runner” class of bug where a stale node:20-alpine lives in the runner’s cache.
The rules: block runs this job on merge requests and on the default branch, but not on every random branch push. That keeps the container registry clean and your tag list short.
Deploying with Helm and the agent
The two deploy jobs use the alpine/k8s:1.34.7 image, which bundles kubectl, helm, and the AWS IAM authenticator into a single container. That saves you installing them at job start, which adds up across hundreds of pipeline runs a week.
The actual deploy script is three commands:
kubectl config use-context "$KUBE_CONTEXT"
helm upgrade --install "$HELM_RELEASE" "$HELM_CHART_PATH" \
    --namespace production --create-namespace \
    --set image.repository="$CI_REGISTRY_IMAGE" \
    --set image.tag="$CI_COMMIT_REF_SLUG" \
    --atomic --wait --timeout 10m
Because the agent has authorized this project, GitLab automatically mounts a kubeconfig file in the job and exports its path as $KUBECONFIG. The kubectl config use-context call with "$KUBE_CONTEXT" picks the right context from that file. The context name format is <path/to/agent/project>:<agent-name>, so for an agent named production in demo-corp/web-app, you’d use demo-corp/web-app:production.
helm upgrade --install is the idempotent shape of a Helm deploy: creates the release if it doesn’t exist, upgrades it if it does. --atomic rolls the upgrade back if any Kubernetes resources fail or time out. --wait blocks until everything is ready. --timeout 10m caps how long that wait can go before Helm gives up. Skip --atomic and --wait and a partial deploy will leave you with half the new version live and no clean signal in the pipeline. Been there.
Environments and deploy variables
The environment: block on each deploy job is doing more work than it looks. It registers the deploy with GitLab’s environment view, sets a URL for one-click access from the merge request, and tags the deployment with a deployment_tier. That tier matters more than you’d think: it’s how GitLab decides which deploys are protected, which deploy variables are exposed, and which environment-scoped tokens get mounted.
Patterns that hold up at scale:
- Protected variables for production secrets. Mark cluster tokens, registry pull secrets, and any third-party API key as protected and masked, then scope them to the production environment so review jobs can’t read them by accident.
- No .env in the repo. Anything secret comes from project variables. Anything not secret can live in the Helm chart’s values.yaml.
- Manual gate for the production environment. The when: manual on deploy-production means production deploys still need a human to click. Two seconds of friction, big audit trail, fewer 3am incidents.
- Same chart, different values per environment. --values values-staging.yaml and --values values-production.yamlon the same chart. The deploy script stays one line different per environment.
The deploy-production job also has needs: [deploy-staging], which means production can’t deploy unless staging deployed successfully in the same pipeline. Not bulletproof, but it catches the obvious mistakes before they reach customers.
The operational reality at scale
This is where the example stops looking like a tutorial and starts looking like a Tuesday morning sprint.
Caching that actually saves time
A naive cache: block caches everything and warms slower than running without it. The example above caches node_modules keyed on the lockfile, so the cache invalidates when the lockfile changes and only then. For Docker layer caching on the build stage, you’ve got two options: rely on the runner’s local Docker cache (works on dedicated runners, doesn’t on ephemeral cloud ones), or use --cache-from against a tagged image in the registry. The second one is more setup work. But it probably pays for itself once you’ve got more than a couple of services in the same project.
Runners that don’t bite at scale
Shared runners on GitLab are free within your tier’s quota and excellent for getting started. They start hurting when:
- Your build times pass the 25-minute mark and you’re paying compute minutes.
- You need access to internal services (databases, internal registries) that the shared runner can’t reach.
- Compliance or data residency requires the build to happen on infrastructure you control.
A self-hosted GitLab Runner on a small VM with the Docker executor will probably run a typical Node or Go pipelinefaster than the shared one once you’ve cached the image layers. The Kubernetes executor on your existing cluster is the next step up. More setup, but it gives you autoscaling runners for the cost of cluster capacity you’re already paying for. If you’re running multi-cluster, putting the runner pool on the cluster that owns staging is usually the cleanest separation.
When multiple teams pile into the same project
Once five teams are pushing to the same monorepo, three things break: pipeline times balloon, somebody else’s pipeline change probably breaks yours, and the YAML becomes unreadable. The fixes are boring and they work:
- include: to pull pipeline fragments from a shared CI repo. Each service includes the common build template and overrides only what it needs.
- extends: to inherit job definitions inside a single file.
- The CI/CD components catalog for the same idea with proper versioning. Pin to a tag, never to main, so a shared template change can’t break every service at once.
Push the real logic out of YAML and into shell scripts or actual programs in your repository. The YAML should be wiring, not logic. The pipeline gets faster to read and easier to refactor when the messy parts live somewhere a linter can reach.
Keeping delivery teams in sync
This is the part nobody writes about, and it’s the one that decides whether your pipeline is solving the problem or just moving it around.
Engineering lives in GitLab. Product lives in Jira. QA often lives in Azure DevOps, especially if the team came from a Microsoft shop. Each tool is doing the right thing for its users. But the status of any single release ends up scattered across all three. The GitLab merge request says “ready to deploy,” the Jira ticket says “in development,” the Azure DevOps test run says “pending.” And whoever writes the release notes plays detective every two weeks.
If you’re running into this, the fix isn’t asking engineers to update tickets by hand. They won’t, and you shouldn’t want them to. The fix is integrating code state with the work-tracking systems automatically, so that a merge request moving to merged, a job passing in the pipeline, or a deploy hitting production updates the corresponding ticket without anyone copy-pasting.
Integration platforms like Getint handle that sync layer between GitLab and Jira and Azure DevOps and a long list of other tools. The sync is two-way, so a status change in Jira reflects back in GitLab and vice versa. From what I’ve seen, that’s the kind of thing that quietly removes an entire category of standup friction. You can build the same shape with webhooks and an afternoon of work, but for most teams the effort is better spent on the pipeline itself.
What to do next
That’s a working GitLab CI/CD pipeline for Kubernetes end to end: GitLab Agent, build, push to container registry, staging deploy, manual production gate, all auditable from the merge request. From here, the obvious next steps for the future of your delivery setup:
- Move to GitOps with Flux. It’s GitLab’s recommended production deployment workflow for a reason: pull-based, no push credentials at all, fully declarative. The Agent you just installed already supports it, so the migration is incremental.
- Add a second cluster. One agent per cluster, same project authorization, distinct context per agent. The pipeline picks the right context per environment, and you can scale to as many clusters as you have regions.
- Autoscale the runners. The Kubernetes executor on your existing cluster is the cleanest path. The same capacity you’re paying for does double duty as build infrastructure.
And keep the Helm chart simple. Most teams over-engineer the chart in year one and pay for it in year two when nobody remembers what half the values do.